Typical Dom Events
Everything that happens in a browser is an event which means that you can create an event listener for it to execute some JavaScript code when it occurs. Typical events include
	•	Opening the browser.
	•	Loading a web page.
	•	Clicking a button, including the browsers back and forward buttons.
	•	Clicking a link.
	•	Typing something on the keyboard.
	•	Moving the mouse.
	•	Clicking, holding or releasing a mouse button.
For more information on events, you might want to check out the MDN Online Docs page, Event Reference (which contains a list of events) or the 23schools.com page, HTML DOM Events, which also has a list. In both cases, the lists also provide links to more information on each individual event.
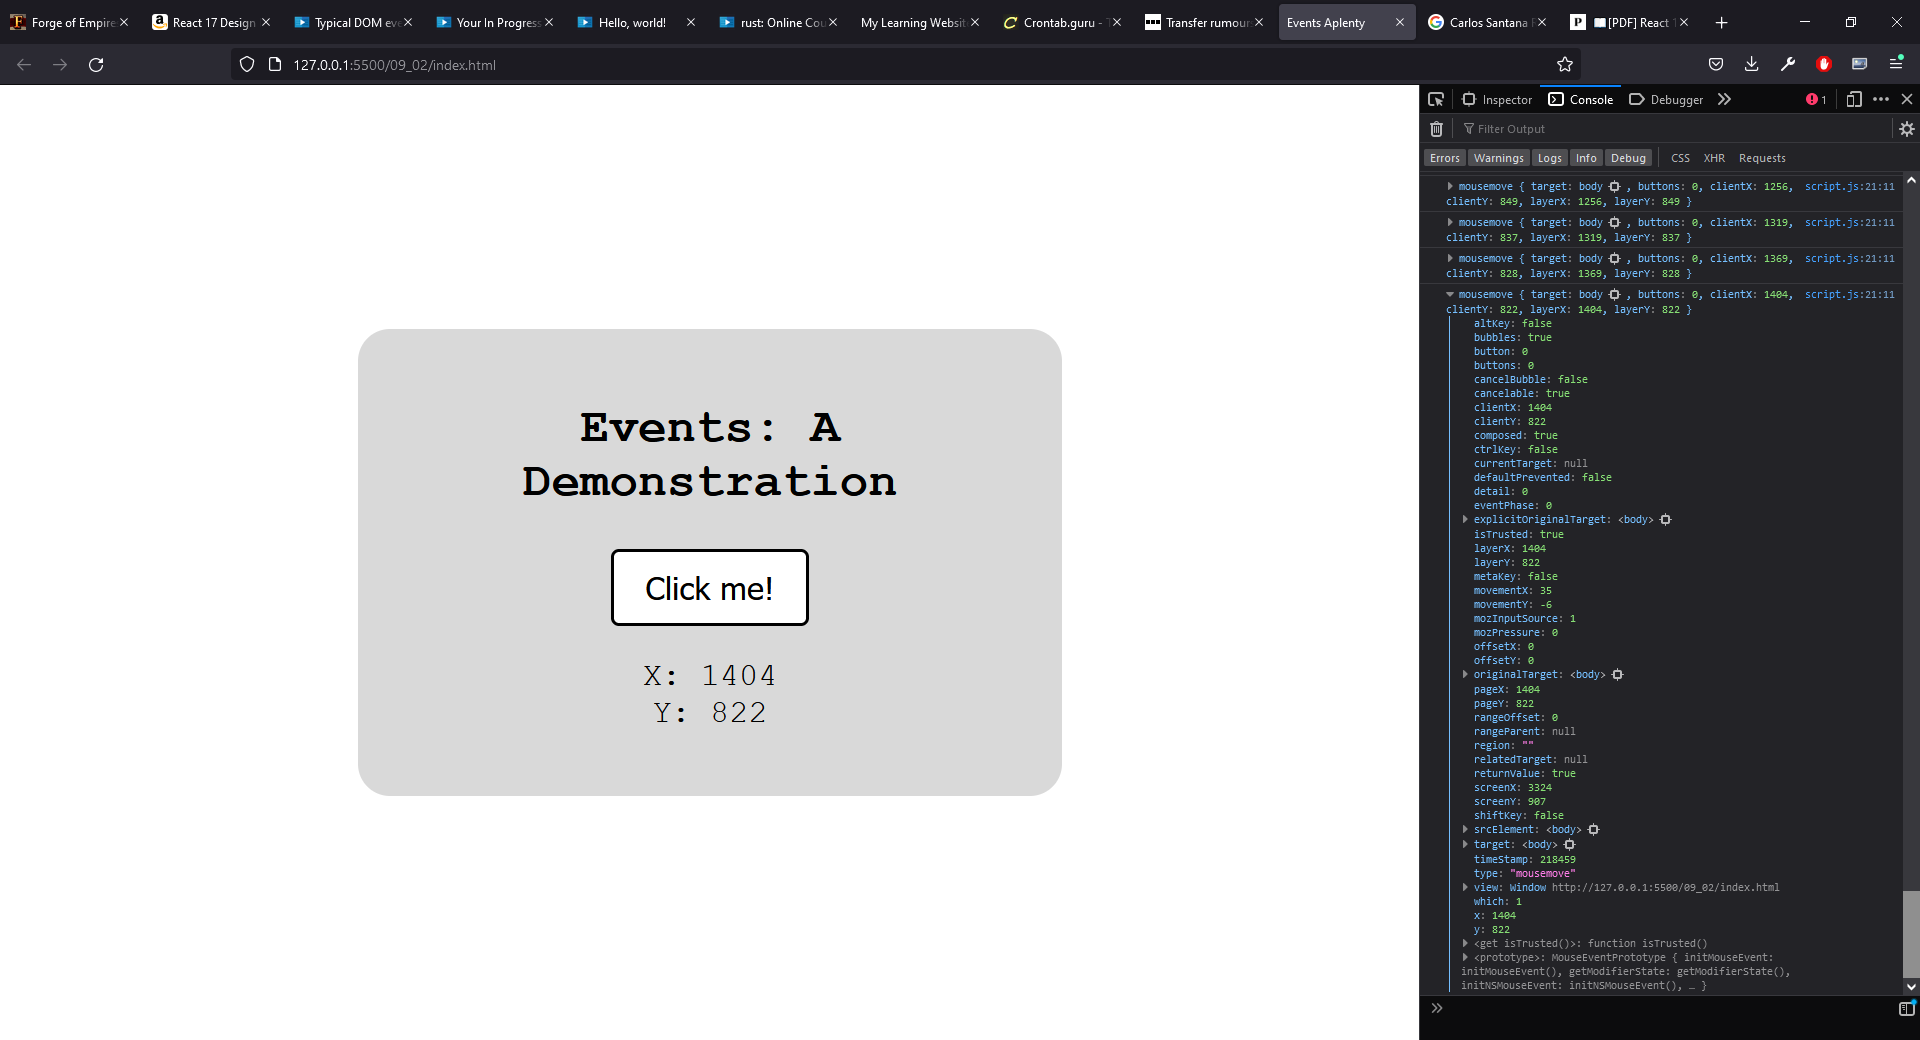
The Exercise Files contain a sample HTML page that demonstrates the use of event listeners and you can view it here. It might not be immediately obvious but there are 3 event listeners here. The HTML displays the coordinates of the mouse pointer, the block in the middle of the screen changes colour when you hover over it and the button in the centre changes colour when you click it.
In addition, there is a counter tracking the number of times you click the button. If you open up the developer tools and go to the console, you will see that a message has been output telling us the 'Button was clicked!' and it also has a counter. If you click the button while the console is visible, you will see it counting the clicks. For reference, you can see the JavaScript code here. Actually, you may notice that there are four event listeners because we have one event for when the mouse hovers over the block and one event (which changes the block colour back) when the mouse is moved away from the block.
Let's look at one of these in order to get a better idea of how an event listener is put together. We are going to add this event listener to a button and the button in this demo has a class of cta-button, which means we can grab it with
const button = document.querySelector(".cta-button");
The event listener is shown below.
	// Log when the button is clicked in the console.
	button.addEventListener("click", () => {
	  button.classList.toggle("active");
	  console.log("Button was clicked!");
	}, false);
So, we have a reference to the object, the button in this case, and we are tagging our event listener on to that and passing it (the event listener) two arguments. THe first of these is the event that it should listen for which is "click" in this case and an anonymous callback function.
When the event occurs, the class "active" is toggeld on the button and the "Button was clicked!" string is output to the console. The actual colour change is handled by CSS. The cta-button itself has a white background but the active class has a black becakground. These are both classes so there is no precedence of one over the other except the order in the script and in this case, the active class comes after the cta-button class. So, if the button has class active, it has a black background according to the CSS rule shown below.
	.cta-button.active {
        color: white;
        background: black;
   	}
If it doesn't have a class of active, then the rule that specifies only the cta-button class will be applied. For reference, you can see the html, which includes the CSS, here.
We can attach an event listener to any object in the browser. The following example
window.addEventListener("mousemove", mousePosition, false);
attaches an event listener to the browser's window object. The event we are listening for is "mousemove" and when the mouse is moved, the mousePosition function is sent to the event listener which executes the code shown below.
	// Update the x and y displays to show the current mouse position.
	const mousePosition = (event) => {
	  posX.innerText = event.pageX;
	  posY.innerText = event.pageY;
	};
This is getting a couple of event properties, pageX and pageY, which represent the x and y coordinates within the window and displays them. Note that we used a couple of querySelectors to get posX and Posy.
	const posX = document.querySelector(".posX span");
	const posY = document.querySelector(".posY span");
We are using a combination selector here so we have firstly the class name, .posX and secondly the element name which is span in this example and this implies that we are looking for a span element inside an element with class posX or posY. You can confirm this by checking the code.
    <div class="posX">X: <span></span></div>
    <div class="posY">Y: <span></span></div></pre>
The div element contains a span element. The div element has a class of posX or posY and there is no class on the span although you could also have done this by applying the class names to the span rather than the div elements. This is a little but of a sidetrack, but I thought it was worth looking at that because it helps us to understand the code and it shows that a good understanding of the HTML is important for writing JavaScript but also that a well designed HTML document makes it easier to write the JavaScript. Inm this example, the HTML is being designed so that we can update its text using JavaScript and the class name has been used to make it easy to do that.
Since the event itself is an object, we can treat is as such and we can, for instance, log it to the console. If we add this line
console.log(event);
to the mousePosition function shown above, this sends the event that was passed to this function to the console and we can see that there is an awful lot of information being logged to the console because it is logging an event whenever the mouse moves. That doesn't mean, for isntance, that if I move the mouse from the top to the bottom of the screen that a single event is logged. You will notice that as you move the mouse across the screen, the coordinates are continually changing and each change represents a mouse movement and is logged as an event.
We can look at any of these individual events and each of them aso contain a lot of information, including the pageX and pageY properties we are using to track movement of the mouse. In this example, I was looking at the last mouse movement event and so the pageX and pageY values are the same as those displayed in the HTML document.
We could take any of these other properties if we wanted to and use them in our code.
The last two event listeners we have are a pair of listeners that change the colour of the box depending on whether the mouse pointer enters or leaves the are that it covers.
	// Change the color of the box when the mouse enters.
	container.addEventListener(
	  "mouseenter",
	  () => {
		container.classList.add("blue");
	  },
	  false
	);

	container.addEventListener(
	  "mouseleave",
	  () => {
		container.classList.remove("blue");
	  },
	  false
	);
Again, we are using CSS to set the background colour as we did with the button. When the mouse enters the area and triggers mouseenter event, we add the class blue to the container and as the name suggests, this has a background colour of blue. When the mouseleave event is triggered, the blue class is removed so its CSS no longer applies and the container reverts to its original colour.
The main points to take from this are.
	•	Everything that happens in the browser is an event.
	•	You can use an event listener to listen for any event.
	•	An event listener can be added to any element inside the window or the DOM.
	•	An event listener can trigger any function you want.
	•	The function triggered by an event handler can be an anonymous function or a callback.
	•	The function can grab the event object and do something with it.
Event Listeners
We saw several event listeners in the previous section and, as you may have inferred from this, there is a quite specific syntax for an event listener and it looks like this.
target.addEventListener(event, callback [, options]);
The main parts of this are
	target	This is the browser or DOM object we want to attach the listener to.
	event		This is the event, in double quotes, we are listening for.
	callback	This is the function we want to pass to the event handler.
Notice that there are no parentheses after the callback function because of the fact that it is a callback function. We are not calling the function, it will be called inside the event handler. As we mentioned before, we can also use an anonymous function in place of a callback function.
Note that the options are an advanced feature. It is not commonly used and is not covered in this course, but is mentioned here for completeness. In most, if not all cases, your event handlers will have just the first two arguments.
Let's look at another real example. We wukk start with a statement like
const buttom - document.querySelector("button");
This creates a constant called button which represents some button in the HTML document. We need to be able to reference the object (the button in this case) in order to add our event listener so this provides us with a way to do that.
Let's say that we want to listen for a click event and we will then log a message to the console to confirm that event has happened.
	button.addEventListener(
		"click",
		(e) => {
			console.log(`Event fired: ${e}`)
		}
	);
Here, we have specified "click" as the event and then we have an anonymous function that takes the event that triggered the event handler as an argument and logs a string that includes the actual event.
Let's take this a little bit further and use this to enhance our backpack example. You might recall that when we viewed the backpack objects in a browser in the advanced function challenge in functions (as a reminder, you can view that page here, the output included the status of the lid (open or closed) but did not give the user any way to change this. We are going to add a button that allows the user to set the value to closed if the status shows it as open and vice versa.
The first thing to decide is where to put the code that adds a button. Bear in mind that we want to add a button and an event listener to any backpack object we create so it makes sense to add this to the code that creates an HTML element to display a backpack object and that is in the script.js file. In that file, we created an array called packList to hold all of the backpack objects we create. For each backpack object, we create a const called content which generates the HTML so it makes sense to add our button there so after the closing <ul> tag, we add the line
<button class="lid-toggle">Open lid</button>
We want to add an event listener to this button, so we need some way to reference it from within the JavaScript and we can do that by creating a const like this.
const button = backpackArticle.querySelector(".lid-toggle");
We can now add our event listener to this button. The event listener is going to grab the innerHTML from the lid status, so we can create a reference to that with
const status = backpackArticle.querySelector(".backpack__lid span");
For the event listener, we are going to be be listening for a click event and when it happens, we will change the status of the backpack's lid. Remember that this is displayed in our HTML document as either "open" or "closed", so we will get that innerHTML and use a ternary operator. The condition for the operator will be testing whether the innerHTML is set to "open" (we will use the === comparison operator for that so it will be a strict comparison) and if true, we will set that value to "closed". If not, we will set it to "open".
	button.addEventListener(
		"click",
		(e) => {
		  status.innerText === "open" ? status.innerText = "closed" : status.innerText = "open";
		}
	)
If we run this now, we can click the button and see the status changing as we do. Notice that each backpack object has its own button and these are independent of each other. For example, if we click the button for the first backpack object, it changes the status of the lid for that backpack, but not the other one. This is because we put the code that adds both the button and the event listener inside the function that generates the HTML for a single backpack object and our HTML document is displaying an array of these objects. So, each instance has its own copy of the button and its attached event listener.
The completed version of the page can be viewed here.
Advanced Event Listeners and "this"
In the previous section, we added a button to the backpack objects which allowed us to toggle the status of the lid as it is displayed in the HTML document, but there were a couple of problems with this. The first is that it worked by changing the text value displayed from closed to open, but the actual status is not changed. Recall that this status is represented by a Boolean value, lidOpen. The lid is open when this value is true and closed when it is false. The object does contain a function for toggling this value, but the button doesn't use it. In our example, the inital value for lidOpen is false for both the backpack objects but when we click the button, we change the text that is being displayed but we don't change the value of lidOpen.
The other problem is that the button itself displays the text "Open lid". This is true regardless of whether the lid is currently shown as open or closed so when we click the button labelled "Open lid", it will either open or close the lid depending on its current status.
In this section, we are going to address both of these issues and we will start with the button text. The little code snipper above uses a ternary operator to change the innerText property of status and status references the HTML element that is used to display the value of lidOpen. We can use a similar statement to change the innerHTML property of the button.
button.innerHTML === 'Open lid' ? button.innerText = "Close lid" : button.innerText = "Open lid";
This will check to see whether the text displayed in the button is "Open lid" and if it is, changes it to "Close lid"/ If it isn't, the text is changed to "Open lid".
You might have been tempted to write this code using "this".
this.innerHTML === 'Open lid' ? this.innerText = "Close lid" : this.innerText = "Open lid";
The buuton is an object, so you might expect this to work, but if we make the change and run our code again, we get this error.
	Uncaught TypeError: can't access property "innerHTML" of undefined
		backpackList http://127.0.0.1:5500/09_03/script.js:49
		backpackList http://127.0.0.1:5500/09_03/script.js:45
		<anonymous> http://127.0.0.1:5500/09_03/script.js:8
	script.js:49:7
This can be a tricky sort of error to diagnose. What it is telling us is that we are trying to access the innerHTML property of something that doesn't exist. To understand this, you might remember that when we looked at functions, we looked at Arrow Functions and "this". Arrow functions don't have their own "this" and since we used an arrow function here, when we referenced the button with "this", JavaScript wasn't able to identify it and we get that error message. If we convert this to a function declaration as follows:
	button.addEventListener(
    "click",
		function (e) {
		  status.innerText === "open" ? status.innerText = "closed" : status.innerText = "open";
		  this.innerHTML === 'Open lid' ? this.innerText = "Close lid" : this.innerText = "Open lid";
		}
  	)
it now works in exactly the same way as it did before. This might not seem to be important, but it does give us the flexibility to decide whether or not we want to be able to access the current object using the "this" keyword. To demonstrate this, let's look at the second problem with our code and that is the fact that we were not updating the lidOpen property for the backpack. That is, we were changing the text to show a status of "open" or "closed", but the actual value of lidOpen was always the same.
It can be a little tricky to access this property if we are using the arrow function and therefore can't use "this", but with a function declaration, we can use the fact that our button is part of a Backpack object which allows us to reference lidOpen. I tried to do this without using "this" and I wasn't able to figure out how to do it. However, if we us e the function declaration, updating the lidOpen status is as simple as
this.lidOpen === true ? this.lidOpen = false : this.lidOpen = true;
If we add a line that logs the status of lidOpen to the console
console.log(this.lidOpen);
we can see that it is being updated when the button is clicked.
With these changes, the button now provides all of the functionality we wanted, however, our event listener is now a little bit more complex so it makes sense to take that code out of the function that is being used to generate the HTML and put it into a separate function.
To start with, we will create a function called lidToggle. This function will replicate the functionality that is being added to the event handler and the function is shown below.
	const lidToggle = function() {

	  // Find the current backpack object in backpackObjectArray
	  let backpackObject = backpackObjectArray.find( ({ id }) => id === this.parentElement.id );

	  // Toggle lidOpen status
	  backpackObject.lidOpen === true
		? backpackObject.lidOpen = false
		: backpackObject.lidOpen = true;

	  // Toggle button text
	  this.innerText == "Open lid"
		? this.innerText = "Close lid"
		: this.innerText = "Open lid"

	// Set visible property status text
	let status = this.parentElement.querySelector(".backpack__lid span");
	status.innerText == "closed"
	  ? (status.innerText = "open")
	  : (status.innerText = "closed");

	}
The major difference here is the first line of code inside the function.
let backpackObject = backpackObjectArray.find( ({ id }) => id === this.parentElement.id );
Before we consider what this code does, we will look at the event handler first. The lidToggle function has been defined as a const so we can pass it to another function and that is what we will do. We have taken the functionality out of the event handler and placed it inside the lidToggle function and the event handler will call the function like this.
button.addEventListener("click", lidToggle)
So, we have two backpack objects and each has its own event handler, but they both use the same lidToggle function. When the event handler calls the function, the function needs to know which object called it. Since the backpack object called the function by invoking the event handler, it is the parent and so
id === this.parentElement.id );
returns the id of that object. The array method
backpackObjectArray.find( ({ id }) => id === this.parentElement.id );
returns the object from backpackObjectArray whose id matches the id of the object that called the function and backpackObject is then set to that object. If you wanted to write that in pseudocode, it would probably look something like this.
let backpack object = the object whose id matches the id of the object invoking the function
The resulting code looks very different from our original version, but the result is the same.
Pass Arguments Through Event Listeners
In the examples we have seen of event listeners, they use a callback function to execute some code and this is perfectly normal for event handlers. Remember that when you pass a function as a paramter where that function is to be used as the callback function, for example
button.addEventListener("click", lidToggle)
we are passing the function without parameters. That is because the function itself is a parameter, we are not calling it at this point. The disadvantage of that is that we cannot pass parameters to the function with it.
When you invoke a callback function with an event, that event is automatically passed to the function so we can reference that event in the function simply by creating a reference for it and then using that reference to the event. To illustrate this, the first line of our toggleLid function was
const lidToggle = function() {
This shows that no parameters are being passed to the function, but we know that the event itself is passed so we can create a reference for it like this.
const lidToggle = function(click_event) {
This means that inside the function, we can reference the event with click_event. For instance, we can log the event to the console with
console.log(click_event);
If we save this and run the code, we can see that the click event is being logged to the console whenever the button (either one) is clicked. So passing the event over to the callback function is not a problem. Things do, however, get a bit more complicate if we want to pass any other argument to the callback function. Strictly speaking, this is not possible, but there is a technique we can use that is essentially a workaround and this involves passing an anonymous function rather than the callback function to the event handler. Inside that anonymous function, we can call the lidToggle function, and since this is no longer being passed as a paramter, we can pass an argument with it.
To demonstrate this, we will add a line of code to declare and initialise a variable (we will add this just before the code that adds our event listener to the button. We will be essentially replacing the code that adds the event listener with a different version using an anonymous function so putting the declaration nearby makes sense. It makes it a little bit more obvious that there is a relationship between the argument and the function code and it also ensures that the argument has the appropriate scope to be called by the function.
let newArg = "The argument I want to pass to the callback functon.";
We can then change our event handler to use the anonymous function - to give a little bit of an advance warning, this is going to give us an error but we will fix it so it's not too much of a problem.
	button.addEventListener("click", () => {
		lidToggle(newArg);
	})
We need to amend the function declaration so that it includes the argument we want to pass over.
const lidToggle = function(myArg) {
Note, we could have called the argument newArg here as well which can be clearer but it also gives the impression that the parameter passed to the function and the parameter declared as a function parameter are the same thing. In this example, myArg is the formal parameter and newArg is the actual parameter.
Inside the toggle lid function, we will add a statement to the lidToggle function to output the parameter to the console. We will make it the first statement in this function so that it is executed before the function breaks, which happens very quickly!
If we save this and execute it, we can see in the console that the parameter has been logged there. The next thing we see is an error.
	Uncaught TypeError: can't access property "parentElement", this is undefined
		backpackObject http://127.0.0.1:5500/09_03/script.js:18
		lidToggle http://127.0.0.1:5500/09_03/script.js:18
		backpackList http://127.0.0.1:5500/09_03/script.js:76
		backpackList http://127.0.0.1:5500/09_03/script.js:75
		<anonymous> http://127.0.0.1:5500/09_03/script.js:38
	script.js:18:62
We have seen this error before when we tried to access the innerHTML of an object referenced with this in an earlier example. The problem there was being caused by the fact that we were using an arrow function which didn't have its own "this" and something similar is happening here.
We are passing an arrow function over as the callback function and this is being called from the button's event handler. In the lidToggle function, we are using this to refer to the button (the button being the parent element of the function that was passed over) but since the function doesn't have a this, the code breaks.
Essentially, this means that we can't use this in order to get a reference to the button. One solution to this problem would be to pass the button to the functoin along with newArg and we can then reference the button directly. Our event listener will now look like this.
	button.addEventListener("click", () => {
		lidToggle(button, newArg);
	})
In the function itself, we will now have two formal parameters which I have called myButton and myArg and all references to this in the function are replaced with myButton. The lidToggle function now looks like this.
	const lidToggle = function(myButton, myArg) {
	  console.log(myArg);

	  // Find the current backpack object in backpackObjectArray
	  let backpackObject = backpackObjectArray.find( ({ id }) => id === myButton.parentElement.id );

	  // Toggle lidOpen status
	  backpackObject.lidOpen === true
		? backpackObject.lidOpen = false
		: backpackObject.lidOpen = true;

	  // Toggle button text
	  myButton.innerText == "Open lid"
		? myButton.innerText = "Close lid"
		: myButton.innerText = "Open lid"

	// Set visible property status text
	let status = myButton.parentElement.querySelector(".backpack__lid span");
	status.innerText == "closed"
	  ? (status.innerText = "open")
	  : (status.innerText = "closed");

	}
This now works as exptected. If we also want to pass the event over and access it in the lidToggel function, we can reference it in event handler as before so
	button.addEventListener("click", (event) => {
		lidToggle(event, button, newArg);
	})
We can then add it as a formal parameter in the function
const lidToggle = function(myEvent, myButton, myArg) {
and we can use the formal parameter to reference it inside the function
console.log(myEvent);
Challenge: Create an Event Listener
For this challenge, we are going to build on the backpack example by adding a some code that will allow us to input a new value in an input box for the length of one of the straps. We will also proivde an update button which, when clicked, will set the value of the strap length to the value in the input box. We will do that with a simple form that will include both of these elements and will use an event listener triggered when the button is clicked.