Functions and Methods
These words are often used interchangeably and probably with good reason. The term method, however, is almost exclusively used to refer to a class function (that is, a function defined inside a class).
Whether you are defining a funciton inside a class or not, the syntax is the same. A very simple function is shown below.
	// Function declaration:
	function doSomeMath(a, b) {
	  let c = a + b;
	  return c;
	}
The function declaration starts with the word function followed by its name, a list of the paramters and then a code block. Inside the code block we have the code that is executed when the function is called.
A call to the function must supply the two, in this case, arguments. It is expecting numbers but will probably accept other data types, particularly one or both of the argument could be strings.
console.log("Do some math:", doSomeMath(5, 6));
Here, the string, "Do some math:" is output to the console along with the result of calling the doSomeMath function wtih 5 and 6 as arguments. The function adds the two arguments together and returns the result so the output we get from this is
Do some math: 11
Functions can be overwritten so if you define a function with the same signature as a function you have already defined, that is with the same name and bumber of arguments, the second will overwrite the first. For example, let's say that we add this function to our code after the function shown above but before the function call is made.
	function doSomeMath(a, b) {
	  let c = a * b;
	  return c;
	}
When the function call is made, it will be the second of these functions that is used. On the other hand, if we call the function before redefining it, the first function will be used. Of course, if we call the function before any function declaration is made, neither will apply and we will get an error. Having said that, if you are redefining functions in this way, you are probably coding something that doesn't need a function so this is something to be aware of only.
	function doSomeMath(a) {
	  let c = a * a;
	  return c;
	}
I have also added a line to call the function with one argument
console.log("Do some math:", doSomeMath(5));
If JavaScript supports the definition of different functions with the same name but a different number of arguments, we will see 11 and 25 in the output, if not, we will probably ge an error when we try to call the redefined function with two arguments. The output that we actually get is
	Do some math: 25
	Do some math: 25
Actually, this surprises me. Obviously we can't overload methods in this way in JavaScript and when we called the function with two arguments, the sinle argument function is called and the second argument is ignored. This might be clearer if we switch those two arguments around so that it takes the 6 and ignores the 5, this should output 36 and 25 which is what we would expect if we called the function with only a 6 and again with only a 5 and that is exactly the output that we get.
A more interesting question would be what wouyld happen if the second function had a different number of arguments, let's say just one. Would the function that matches the number of arguments use the corresponding function. To find out, I will change the function redefinition to the following.
Another thing to bear in mind when defining your functions in JavaScript is that as we know, you cannot call a function if it hasn't already been defined and that includes making a call to function from inside a function definition. This means that if your function, lets's call it function_b, makes a call to a function with the name function_a, we must put the definition for function_a before the definition of function_b.
Let's look at a perhaps less obvious example.
	// Function expression:
	const doMoreMath = function (a = 3, b = 2) {
	  let c = a * b;
	  return c;
	};
This time, we are using a function expression. An expression is anything that returns a value and we are using a function to provide that value. The most striking difference is that the function doesn't have a name. The function name is optional when defining a function expression but in most cases, it will not have one. We are defining a function inside an expression here, and the reuslt is being assigned to the const doMoreMath. The result is that doMoreMath now references a function, in other words it is a variable where the data type of the value assigned to it is function. We can put the variable inside a console.log statement and give it the values it needs to call itself.
console.log("Do more math:", doMoreMath(5, 6));
This time, the output is
Do some math: 30
This type of function is called an anonymous function and this is the most common way of declaring a function in a JavaScript framework such as React and it is considered to be best practice to place the function declaration in a const. This gives you two advantages, the first being that it removes the possibility of you accidentally overwriting the function as we saw with the ealrier function example. The second is that by assigning it to a const, the function has the same scope as that const and a const is locally or block scoped. For reference, the following snippet of code calls the doSomeMath function which was declared with a function definition and the doMoreMath function that was declared with a function expression.
	console.log("Do some math:", doSomeMath(6, 5));
	console.log("Do more math:", doMoreMath(5, 6));
As you can see from this, there is no difference between the way in which we call the function and this means that you can't tell from the function call how that function was declared.
If you call a function like that expects some arguments, but you don't provide any like this.
	console.log("Do some math:", doSomeMath());
	console.log("Do some math:", doMoreMath());
we will see NaN being returned (not a number) but we can provide default arguments like this.
function doSomeMath(a=5, b=6) {
The same applies when we use a function expression so we can do the same with the doMoreMath function. The order in which you pass the arguments (the actaul parameters) must match those listed in the function declaration (the formal parameters). For example, if you pass over two arguments, let's say 5 and 6, inside the function, a=5 and b=6. However, this also means that if you only pass in one argument, let's say 5, then a has the value 5 in the function. Consider this example.
function doSomeMath(a=5, b) {
Inside the function, b will take the value of the second argument so, again, if we pass it a single argument, a will adopt the value of the argument rather than its default value and b will not have a value. In fact, since a will always take the value of the first argument, the only scenario where the default value for a is invoked is where no argument are passed to the function and if we do that, b will not have a value. For that reason, if you have one or more arguments with a default value and one or more arguments that don't have a default value, the arguments that don't have a default value must appear before those that do in the arguments list so in this case, a doesn't really have a default value. Since the function, in this example, adds two numbers together, giving one a default value of 5 means that if you pass one argument to it, that argument will be added to 5 so it really doesn't matter which argument has that default value.
The simplest fix would therefore be
function doSomeMath(a, b=5) {
Now, if we pass a 6 to the function, a will equal 6 and b will equal 5.
If you call a function but omit the argument list, as opposed to an empty argument list, like this
	console.log("Do some math:", doSomeMath);
	console.log("Do more math:", doMoreMath);
you get the function returned. According to the course video, this should happen with functions declared with a a function expression but not for functions declared with a standard function definition. However, I tried them both and I did get the function returned both times. The output for this actually looks better in the Chrome console and the output Chrome gives you is
	Do some math: ƒ doSomeMath(a=5, b) {
		let c = a + b;
		return c;
	}
	Do more math: ƒ (a=2, b=3) {
		let c = a * b;
		return c;
	}
Functions defined with either a function definition or a function expression have one thing in common and that is they are defined and then called when needed. JavaScript also gives you the option of creating and calling a function at the same time and to do this we would use an Immediately Invoked Function Expression. Before I describe the syntax of that, let's see an example.
	// Immediately Invoked Function Expression (IIFE)
	(function () {
	  let a = 4;
	  let b = 6;
	  let c = doSomeMath(a, b);
	  console.log(`The sum of a and b is: ${c}`);
	})();
If we look at this from the inside out, we have an anonynous function so that is the keyword function followed by an empty argument list and then a code block. To that extent, it is exactly the same as a stasndard function definition but without a name for the function.
	// Immediately Invoked Function Expression (IIFE)
	(function () {
	  let a = 4;
	  let b = 6;
	  let c = doSomeMath(a, b);
	  console.log(`The sum of a and b is: ${c}`);
	})();
This function is enclosed in a set of parentheses.
	// Immediately Invoked Function Expression (IIFE)
	(function () {
	  let a = 4;
	  let b = 6;
	  let c = doSomeMath(a, b);
	  console.log(`The sum of a and b is: ${c}`);
	})();
Finally, we put an empty argument list at the end.
	// Immediately Invoked Function Expression (IIFE)
	(function () {
	  let a = 4;
	  let b = 6;
	  let c = doSomeMath(a, b);
	  console.log(`The sum of a and b is: ${c}`);
	})();
This whole expression is terminated, as usual, with a semi-colon.
For me, the thing that immediately jumps out at me when I see this is that it seems a little strange to have two empty argument lists. The first one in the inner function definition seems reasonable enough, but why did we tag another empty argument list on the end? We don't make an explicit call to this function so it looks like there is no way to pass any arguments to it, but that is exactly what the added on argument list is for. Let's say that we want to specify two arguments for the function, a and b and when it runs, we want to pass it the arguments 2 and 3.
To do that, we add the a and b arguments to the function definition in exactly the same way as we would for a standard function definition. The entire definition inside the parentheses acts as the function call and so the tagged on argument list will contain the arguments we want to pass to this function.
	// Immediately Invoked Function Expression (IIFE)
	(function (a, b) {
	  let c = doSomeMath(a, b);
	  console.log(`The sum of a and b is: ${c}`);
	})(2, 3);
In a sense, this is almost he opposite of what you would expect from a function in that you normally would set up a function so that you could call it from wherever you want to, but in this case we are creating and invoking the function at the same time and there may be times when it is useful to be able to do that.
It isn't immediately obviously, to me at least, what the benefits would be as opposed to simply having the lines of code do what they do without wrapping them up in an IIFE and that's actually key to why this is beneficial. With an IIFE, you are creating and executing the function in one statement and it is then discarded. Whilst it is being executed, it creates the variables used inside the function (in that sense, I guess it doesn't matter whether you pass the arguments to it or use it without arguments and simply define the variables you need inside the function) and these variables only exist whilst the function is running and are then discarded along with it.
This means that you can run your little bit of code without worrying about whether there is some other part of the code using these variable names which could mean either that the variables don't have the values that you expect them to or you are corrupting the variables so that when they are used elsewhere, they don't have the expected values.
So, an IFFE is a readabke and clean way to execute a small portion of code without needing to create global variables and functions and without conflicting with other functions and variables using the same names.
A Standard Function
The examples of functions we saw in the previous section are really useful for demonstrating the syntax of functions, but we would probably learn more by seeing a real-world application of a function - by that, I mean a function that is written more in the way you would write functions in the real world!
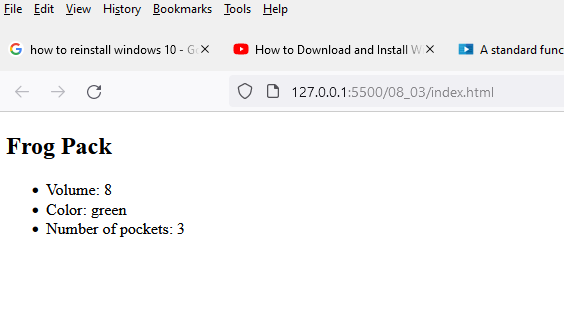
To start with, we will take a look at the function which is in the exercise files in the 08_03 folder.
	/**
	 * A standard function
	 * @link https://developer.mozilla.org/en-US/docs/Glossary/Function
	 */

	const greenPack = {
	  name: "Frog Pack",
	  color: "green",
	  volume: 8,
	  pocketNum: 3,
	};

	const addPack = function (currentPack) {
	  const newArticle = document.createElement("article");
	  newArticle.innerHTML = `
		<h1>${currentPack.name}</h1>
		<ul>
		  <li>Volume: ${currentPack.volume}</li>
		  <li>Color: ${currentPack.color}</li>
		  <li>Number of pockets: ${currentPack.pocketNum}</li>
		</ul>
	  `;
	  return newArticle;
	};

	const main = document.querySelector("main");
	main.append(addPack(greenPack));
There are a few things going on here, but the code is split into three parts, the first being a class definition which is followed by a function expression. We then have a couple of lines of code where we make use of the function.
The first part is fairly straighforward, this is creating a const value with an 'object' made up of several key value pairs. This is not an object in the strictest sense, but we can think of it as one because its key value parirs define properties. If you compare this to the backpack objects we created in an earlier chapter, this is a very simply object.
The function (in the function expression) is generating some HTML based on the properties of the backpack object. The HTML is referred to as newArticle in the function and it is this value that is returned. Notice that we passed
Now, let's look at the last two lines of code individually.
const main = document.querySelector("main");
This is creating a const called main and initialising it with the main element from the HTML document so when we refer to main in the JavaScript, we are referring to main in the HTML.
The last line
main.append(addPack(greenPack));
is doing a couple of things and it would propbably be easiest to consider these in reverse. There are two function calls, append and addPack. As we noted, addPack returns newArticle which is a snippet of HTML based on a backpack object. The greenPack object is being passed over to addFunction and addFunction uses the properties (or values) of greenPack to generate newArticle.
This function call is the argument to the append function, so essentially the thing that we are appending is the HTML element returned by addPack. The append function is being applied to main so we are appending the HTML element to main and as a result, the HTML page now displays the properties of the greenPack object. You may have noticed that the newArticle was created by calling the document method, createElement with the argument "article". The argument is the tag used to create the element so newAericle has <article> tags. If you inspect the HTML for this exercise, you will see that in the body element there is a pair of <article> tags without any content inside the <main> element.
The image below shows the HTML page after adding the newArticle.
If we inspect the HTML again, we can see that the empty article element is still there, but the article that includes the HTML generated to display the greenPack object has been added after it.
Once the function has been defined, we can create as many backpack objects as we want and use the same method to append these to the HTML page. There are also other things we can do with a value returned by a function. For example, we might assign it to a variable like this.
const theArticle = addPack(greenPack);
We can then perform operations on it as we can with any variable. In this case, for example, we might want to log it to the console.
console.log(theArticle);
The output we get from that is (again, the output is taken from Chrome).
	<article>
		<h1>Frog Pack</h1>
		<ul>
		  <li>Volume: 8</li>
		  <li>Color: green</li>
		  <li>Number of pockets: 3</li>
		</ul>
	  </article>
The Arrow Function
In JavaScript, an arrow function is essentially an alternative form of a function expression and there are several different ways to write one as detailed im the MDN Web Docs under Arrow function expressions.
To start with, let's look at a traditional anonymous function.
	function(a) {
		return a * a;
	}
The point of an arrow function is to streamline this by removing some of the elements. One version of an arrow function might therefore look like this.
	(a) => {
		return a * a
	}
Note that we have also added the 'arrow' in the form of an equals sign and a greater than symbol between the argument list and the code block. We can go a little further and take away the curly braces and the return keyword (since the return is implied) giving us
(a) => a * a
Finally, we can remove the argument parentheses.
a => a * a
This final version is the most minimal, but be aware that it makes a couple of assumptions, the first being that the function takes a single argument and has one line of code in what would normally be the code block.
If the function has zero or more than 1 arguments, the argument parentheses are required. Similarly, if there is more than one line of code in the function, the curly braces are also required.
In the previous section, we used a functon expression to generate HTML code for a backpack object. As a reminder, the code this was
	const addPack = function (currentPack) {
	  const newArticle = document.createElement("article");
	  newArticle.innerHTML = `
		<h1>${currentPack.name}</h1>
		<ul>
		  <li>Volume: ${currentPack.volume}</li>
		  <li>Color: ${currentPack.color}</li>
		  <li>Number of pockets: ${currentPack.pocketNum}</li>
		</ul>
	  `;
	  return newArticle;
	};
We want to convert this so that it uses an arrow function and for this, we only need to be concerned with the first line.
const addPack = function (currentPack) {
If we remove the keyword, function, this gives us.
const addPack = (currentPack) {
At this point, you will see some errors appearing. As a matter of interest, on my version of this code, this is line 13 and when I run the code and open the console, I am getting an error on line 14 which suggests that this line may be syntactically valid, but that it doesn't fit in here. If we add the arrow, we get.
const addPack = (currentPack) => {
and now the errors disappear. Since the function only has one arguement, we can take this a step further by removing the parentheses.
const addPack = currentPack => {
Depending on what extensions you have installed in VS Code, you might find these parentheses automatically being put back by prettify or some similar code formatter. The parentheses help to clarify that currentPack is the function argument and so it might be considered best practice to include them. In this example, we also have multiple lines of code in the function so we cannot remove the curly braces.
There isn't really much of a difference between using the arrow function and the function expression in this example, but there are also some other differences between the two approaches, particularly when it comes to scope.
A function expression can be called before it is declared, but this is considered to be bad practice and is not possible with arrow functions. This means that arrow functions impose (arguably) a better appproach.
Within an object, we can use anonymous functions, but we cannot use arrow functions - we will cover this in a little more detail later.
An arrow function also gives you more flexibility in terms of how you write the function and can be reduced quite a bit which can make it hard to read so in that sense, the arrow function does allow for some (again, arguably) bad practices when it comes to writing code. For example, if we look at the most reduced version of the arrow function which was
a => a * a
Unless you are fairly comfortable with arrow functions, it might be quite hard to figure out exactly what is going on here.
So the question of whether to use a function expression or an arrow function is largely a question of style, but there are also differences in the way they work so in some instances, one may be a better choice than the other, and we will see more of that later.
Arrow Functions and "this"
In the backpack example, the backpack has a volume of 8 and we will add a method to allow us to change that. The method is
	newVolume: function (volume) {
		console.log("this.volume in the method:", this.volume);
		this.volume = volume;
		console.log("this.volume after update:", this.volume);
	},
Since this is a method defined as part so we can call this simply by pasing the method to a backpack object like this.
greenPack.newVolume(5);
In the console, we will see output telling us the volume is 8 before it is updated and 5 after. What is happening here is that we have a regular function inside. It uses this, but more importantly, it recognises this - this being the object that the method is inside and as a result, everything works the way that we expect it to. Now, let's add a immediately invoked function expression inside that function. The code sample below is the whole file.
	// Define a default volume for the window (the entire DOM):
	window.volume = 20;

	const greenPack = {
	  name: "Frog Pack",
	  color: "green",
	  volume: 8,
	  pocketNum: 3,
	  newVolume: function (volume) {
		console.log("this.volume in the method:", this.volume);
		this.volume = volume;
		console.log("this.volume after update:", this.volume);

	  },
	};

	console.log(greenPack.newVolume(5));
If things work the way we expect them to here, we will get the same output as before showing a volume of 8 and then 5 and an additional line showing that the volume in the nested function is 5, right? Let's take a look at that output.
	this.volume in the method: 8
	this.volume after update: 5
	this.volume in nested function: 20
The reason we are seeing this output is because we used a function declaration and that function is being hoisted to the global scope and this is what allows a function to be called before it is declared. The result is that the function is looking for this.volume and it gets it from the first object that it encounters which is window. The result is that we are seeing the volume set at the start of the script.
this.volume in nested function: 20
If we comment out this line and run the code again, the function will not look inside our object for volume, it will return undefined as the volume since we no longer have a global decalaration of volume.
	(function => {
	  console.log("this.volume in nested function:", this.volume);
	})();
We will add a second function after this, this time an arrow function.
	(() => {
	  console.log("this.volume in the nestes arrow function:", this.volume);
	})();
The output we get this time is
	this.volume in the method: 8
	this.volume after update: 5
	this.volume in nested function: 20
	this.volume in nested arrow function: 5
We did get the answer we expected with the arrow function and the reason is that the arrow function does not have access to its own this, so it searches in the closest available scope, here that is the object and because of that, it does work here.
This is also the reason why methods in an object can't be declared with an arrow function, it wouldn't know which scope it should use.
If you are using this in an object and you are seeing unexpected results such as we saw above when we got a value of 20 for volume (this also applies if a variable has a value in the object, but is shown to be undefined when your code runs, this is often because of an issue with scope and will be resolved, in many cases, by switching to an arrow function for a nested function.
The MDN Web Docs provide a very detailed description of the this keyword and how it behaves in functions which you can find here.
Practice: Build a Function
For the purpose of this exerise, I will create an object, similar to the backpack object above and then add the following functions.
	•	A regular function to generate the HTML to display the object in the HTML document.
	•	A function expression which changes the colour of the <h1> element in the HTML document.
	•	An immediately invoked fuunction expression to add a second object.
	•  An arrow function to add a third object.
The point of this is to get some experience in creating functions using a variety of methods and it's also a handy reference for the mac and ip addresses of the machines on my home network.
The completed version can be viewed as a web page by clicking here. You can also inspect the HTML or the JavaScript, these don't open in a new page but you can return to this page by clicking the button at the bottom of the page.
Pass Data to a Function with Parameters
In JavaScript, we can pass parameters to a function just as we could with most programming languages such as C, Java or Python. It also works in more or less the same way, but the dynamic nature of variables in JavaScript means that these parameters are a little bit more flexible. Let's look of an example of a JavaScript function, but we will start with one where parameters are not being passed to the function.
	const tipCalculator = () => {
	  let sum = 29.95;
	  let percentage = 18;
	  let tip = sum * (percentage / 100);
	  let total = sum + tip;
	  console.log(`
	  Sum before tip: ${sum}
	  Tip percentage: ${percentage}%
	  Tip:            ${tip.toFixed(2)}
	  Total:          ${total.toFixed(2)}
	`);
	};

	tipCalculator();
In this example, we are demonstrating what the value (pardon the pun) is in passing data to a function. In this example, the function is doing something potentially useful in that it calculates the tip appropriate for a restaurant bill. In this case, the bill is $29.95 and the tip is calculated at 18%. These values are hard coded into the function, so every time it runs, we will get the same result because the bill and the percentage are the same every time.
If you are designing a function that performs this sort of task, one of the questions you will ask is what data here is variable and what is constant. It is unlikely that a restaurant bill will be the same every time, but it's possible that the percentage will. Is the tip percentage the same or does it vary between different restaurants.
Let's assume that the percentage can vary. On that basis, we can rewrite the function so that these values are passed to the function rather than being hard coded within the function. The revised function would look like this.
	const tipCalculator = (sum, percentage) => {
	  let tip = sum * (percentage / 100);
	  let total = sum + tip;
	  console.log(`
	  Sum before tip: ${sum}
	  Tip percentage: ${percentage}%
	  Tip:            ${tip.toFixed(2)}
	  Total:          ${total.toFixed(2)}
	`);
	};

	tipCalculator(29.95, 18);
If you compare these two functions, they both calculate a tip of 18% on a bill of $29.95. Think about what we would need to do in order to calulate a tip of 15% on a bill of $49.95. In the first function, we could either create a new function to work it out or modify the original function so that both sum and percentage have the correct values.
In the second function, we don't need to make any changes. We can just call the function with the sum and percentage values we want to use. We can call this function as often as we like for any bill or any percentage figure, so this gives us a lot more flexiblity and is the reason we write functions - putting the code inside a function means that we can call it with a single line of code from anywhere where that function has scope.
When you are designing a function, one of the important questions you need to answer before you even get to the point of writing code is what data the function is going to need to use and whether that data should be the same each time the function runs, if it isn't, you will probably want to pass that data to the function as a parameter. In this example, sum is an obvious candidate to be passed to the function as a parameter because you want to be able to run your function to calculate tips for any possible value of sum. Less of an obvious example is percentage. If we pass it as a parameter, the function will work for any possible value of percentage. On the other hand, if the percentage value is always the same which would suggest a predetermined percentage value, you probably don't want to pass it over because that means that the user (whoever is writing code that calls that function) is going to have to call it with the same percentage value each time. In this case, passing it as a parameter is probably the best option.
If we want to extend or enhance the function, we might have to ask this question again. For example, let's say that we want to add a currency symbol when we output monetary values. Firstly, let's assume that the currency symbol is £, so we want to produce the output as a value in British pounds, this is the simplest scenario and the revised code might look like this.
	const tipCalculator = (sum, percentage) => {
	  let tip = sum * (percentage / 100);
	  let total = sum + tip;
	  console.log(`
	  Sum before tip: £${sum}
	  Tip percentage: ${percentage}%
	  Tip:            £${tip.toFixed(2)}
	  Total:          £${total.toFixed(2)}
	`);
	};

	tipCalculator(29.95, 18);
For reference, the output we get from this is
	Sum before tip: £29.95
	Tip percentage: 18%
	Tip:            £5.39
	Total:          £35.34
This output is generate by using a combination of string literals and variables so all we have done here is add the currency symbol in the appropriate place in the string literal part of the output.
Again, this works and is an appropriate solution if we don't want or need to be able to produce output for different currencies. If we do, we will also need to pass this to the function so now, the function will look like this.
	const tipCalculator = (sum, percentage, currency) => {
	  let tip = sum * (percentage / 100);
	  let total = sum + tip;
	  console.log(`
	  Sum before tip: ${currency}${sum}
	  Tip percentage: ${percentage}%
	  Tip:            ${currency}${tip.toFixed(2)}
	  Total:          ${currency}${total.toFixed(2)}
	`);
	};

	tipCalculator(29.95, 18, '£');
So, again, we can make the function more flexible by passing in the currency as a parameter which means that we can display the output with any currency.
There is an interesting article by Caitie Gonzales on fastspring.com called How to Format 30+ Currencies from Countries All Over the World. This might be a useful read if you are developing a website or web app that deals with a variety of different currencies. The point that is relevant to us is that we have adapted our function so that it can handle any currency, but when a value is output, the format used is correct for some currencies such as British pounds or US dollars. That is, the currency symbol is placed before the numeric value (for example £100 or $100), but for some currencies, it should go after and this includes Canadian dollars (for French Canadians) and Czech Koruna (for example 100$ or 100 Kč).
There are other differences in formatting as well, but we will ignore these here. As an exercise, you might like to try to improve the function by adding the correct spacing and punctuation (whether the currency should use commas or decimal points). For now, we just want to ensure that the currency symbol is put in the right place. There is a simple solution which would involve passing a boolean parameter to the function and then having two sets of code to produce the output with the currency symbol being placed before or after the amount depening on the value of the boolean variable. I have adopted a similar solution, but I wanted to avoid having the user decide which value to pass. Instead, I wanted the function to do some sort of lookup to determine where to put the symbol so the user only has to provide the currency.
There are two advantages to this approach. One is that it makes the function easier to use since it is the function rather than the user who decides where the currency symbol should go. The second is that it gives me a little bit more practice writing a function because I want to create a function that checks in a pre-defined array of currencies and returns a boolean true value if it finds it. These are the currencies where the symbol goes after the amount. As far as I can tell, almost all currencies seem to be displayed with the symbol first, so it makes more sense to use a list of exceptions rather than try to create a much large array of currencies that conform to the more usual pattern. An added advantage here is that the more common format is going to be the default because the synbol will go first if the currenct isn't found in the array.
The revised funciton, including an immediately invoked function expression is as follows:
	const tipCalculator = (sum, percentage, currency) => {
	  let tip = sum * (percentage / 100);
	  let total = sum + tip;
	  let position = false;
	  position = (function() {
		const currencies = ["kc", "CF$", "Ft", "zl"]
		if (currencies.includes(currency)) return true ;
	  });

	  console.log("Position is ", position);

	  if (position()) {
		console.log(`
		  Sum before tip: ${sum}${currency}
		  Tip percentage: ${percentage}%
		  Tip:            ${tip.toFixed(2)}${currency}
		  Total:          ${total.toFixed(2)}${currency}
		`);
	  }

	  else {
		console.log(`
		  Sum before tip: ${currency}${sum}
		  Tip percentage: ${percentage}%
		  Tip:            ${currency}${tip.toFixed(2)}
		  Total:          ${currency}${total.toFixed(2)}
		`);
	  };
	}

	tipCalculator(29.95, 18, '£');
	tipCalculator(2995, 18, 'Ft');
The main difference between this version and the one previous is the added funciton.
	  position = (function() {
		const currencies = ["kc", "CF$", "Ft", "zl"]
		if (currencies.includes(currency)) return true ;
	  });
This is simply creating a const variable that references an array and inside that array, we have a number of currencies where the currency symbol appears at the end. We check to see if the currency provided by the user is in that array and return true if it is and this returned value is assigned to the variable, position. Note that position has a value of false, so if the currency is not in the array, we don't set it to true so false is our default value.
This seems like a reasonable way in which to handle the formatting of currency, but in the next section, we will look at a better way of doing it.
Return Values From a Function
We covered return values in the earlier section and they are reasonably straightforward in JavaScript. In this section, we will see a further example of this as well as answering a question that you may well have been asking yourself based on our previous example. We used a combination of having the user provide a currency synbol (or string) which is added to the monetary values in the output and a second function which is used to determine how these values should be formatted.
If you were developing mulitple applications that would require values to be formatted in a number of different international formats, you might consider creating a library of functions that can handle the formatting we saw in the previous example or other types of formatting such as different spacing and seperators. However, you might also wonder whether such a library already exists and, as it happens it does and we will look at that here.
I the example for this section, we have gone back to more or less the original version of our tip calculator so we have no number formatting and the only data being passed to the function are the amount of the bill and the percentage for calculating the tip.
	/**
	 * Passing data to functions through parameters.
	 * @link https://developer.mozilla.org/en-US/docs/Glossary/Function
	 * @link https://developer.mozilla.org/en-US/docs/Web/JavaScript/Reference/Global_Objects/Intl/NumberFormat
	 *
	 *
	 * List of ISO language codes:
	 * @link http://www.lingoes.net/en/translator/langcode.htm
	 */

	const tipCalculator = (sum, percentage) => {
	  let tip = sum * (percentage / 100);
	  let total = sum + tip;
	  console.log(`
		  Sum before tip: ${sum}
		  Tip percentage: ${percentage}%
		  Tip:            ${tip.toFixed(2)}
		  Total:          ${total.toFixed(2)}
		`);
	};

	tipCalculator(29.95, 18);
I have left the introductory comments in here because they provide a couple of links that are going to be really handy here. The second link takes us to the MDN Web Docs for one of JavaScripts built-in objects, this case Intl.NumberFormat object which "enables language-sensitive number formatting" and that happens to be exactly what we need here. The first example here is
	console.log(new Intl.NumberFormat('de-DE', { style: 'currency', currency: 'EUR' }).format(number));
	// expected output: "123.456,79 €"
This is creating an instance of Intl.NumberFormat and then using the format method to pass it a number which it returns appropriately formatted. Note that we are only passing it a number, we are not passing it a currency or a country-code. The object instance is created with these parameters. What this means is that we are creating our instance with both a country code and a currency so it already knows which currency/country it is dealing with when we pass it the number.
The third link is to a list of language and country codes.
We will add a function to our code that is going to format our currency values and to begin with, it's going to look like this.
	const formatter = ( value ) => {
	  let formattedValue;
	  return formattedValue
	}
This is an arrow function and we can pass a value to it. Inside the function, a new value is created called formattedValue and that value is returned. As the name suggests, our intention will be to format the value that has been passed to the function and return ready for output. We haven't added the code to format the function yet so if you run the code as is, you won't see any changes to the values and this is because the function isn't doimh anything with the values yet but also because we haven't passed any values to it to be formatted, We will do the second part first so that when we do add the code to format the values, we will see the effect straight away.
Our code has three values we want to format, sum, tip and total so we will replace these in the output with the results we get by passing each of them to the formatter function so our output code will look like this.
	Sum before tip: ${formatter(sum)}
	Tip percentage: ${percentage}%
	Tip:            ${formatter(tip)}
	Total:          ${formatter(total)}
Now we need to add the code to the formatter function to do the formatting we want and the example we copied from the MND docs above is more or less exactly what we want except that rather than logging the value to the console, we will use it to set the value for formattedValue like this.
let formattedValue = new Intl.NumberFormat('de-DE', { style: 'currency', currency: 'EUR' }).format(value);
Callbacks
There may be some instances where we want to control the sequence in which some functions are executed. One function, for instance, may rely on output coming from another function or may just need to wait for it to complete before executing. Tradtionally, callback functions have been the way in which this type of problem has been handles. To illustrate this, let's look at the code example for this section which you can see by clicking here. In this example, we have 3 functions as follows:
formatter
This is a helper function called from within the tipCaluclator function.
printHTML
This is the main function in that it is the function that prepares an HTML element and attaches it to the HTML document.
tipCalculator
This is the function that calculates the values to be presented in the HTML element generated by the printHTML function.
We have an additional line of code that calls the tipCalculator function like this.
tipCalculator(29.95, 18, "de-DE", "EUR");
When this code is executed, the tipCalculator function is called. Now, if we run this as is, nothing seems to happen and that is because we have not passed the results of tipCalculator to printHTML. We will do that now using a call back function. First, we are going to change the input parameters for tipCaclulator so that we can pass it a callback function, like this.
const tipCalculator = (sum, percentage, locale, currency, callback) => {
Next, we want to create that a call to the callback function within tip calculator so this is going on the line before the functions final curly bracket.
callback(finalTip);
Note that the callback function has been called callback to make the code a little bit clearer but this is not a requirement, you can call it anything you like. The result is that tipCalculator now expects to be passed a callback function. When it does, it will call the callback and pass finalTip to it as an argument.
The third change we want to make is to change the call to toipCalculator to pass it the callback function. Bear in mind that callback is essentially a formal parameter for tipCalculator - it just happens to be an arugument of type function. When we pass actual parameters to tipCaclulator, we would use the name of the function we want to call, which in this case is tipCalculator.
tipCalculator(29.95, 18, "de-DE", "EUR", printHTML);
Now, when we run the code, we pass the printHTML function as an argument to tipCalculator and this means that tipCalculator can call the printHTML function when it has performed all of the necessary calculations. It passes its output as an object to printHTML which then executes and displays the HTML element in the browser and if we run the code with these changes, we can now see that it has appeared as expected. For reference, the amended version of this code can be seen here.
In this example, we didn't really need to use a callback function, so the line
callback(finalTip);
could be replaced with
printHTML(finalTip);
and everything would work in exactly the same way. However, implementing this as a callback function does have several advantages, not least of which is the fact that if we have different functions that want to use the finalTip object, we can do that simply by passing the appropriate function to tipCalculator.
There are more modern and probably better ways to do that in JavaScript now but it is important to be aware of the way in which in which callback functions work because you may very well see them in existing code and also, there are other places where callbacks are used. The set timeout function uses a callback function and event handlers use them as well as we will see later.
Conditional if...else Statement
Conditional statements in JavaScript work in the same way as they do in most statements so you have an if statement with some condition and a statement or code block that is executed when the condition returns a true value or evaluates to true. For example, if we have a statement like
if (True) do_this();
The condition - True - will always evaluate to true so the function, do_this() will always be called. Compare this to
if ("True") do_this();
In the first example, we used a boolean value by itself as the condition so that value is always returned. In the second example, we have used a string on its own. Since the string has some value (it could have been "False" and the code would still work the same) we are again always going to get a true value returned and so, again, the function would always be called.
Obviously, a condition would not normally be as simple as these examples, but the condition will always end up as being true or false, even if it is not always explicitly the case. Take this example.
if (4+5) do_this();
This evaluates to 9, which is obviously not a boolean value, but it is an integer value and non-zero integer values evaluate to true so, once again, this is a condition that always evaluates to true although I should stress that this is just an illustrative example and a real example would probably be a little bit more complex. For example, you might want some function to be called if two variables, when added together, give a non-zero value sp you could replace the values in this examples with variables. You might think of this in terms of the condition is giving you an implicit result since it is simply implied that since a non-zero integer evaluates to true, the meaning of the code is therefore call this function if the two values added together give you a non-zero value. You can aslo state this as an explicit condition. let's say with variables called a and b.
if (a + b != 0) do_this();
In all of these examples, we are seeing the simplest form of a condition where something happens if the condition is true and doesn't happen if the condition is false. If we want to have something different happen when the condition is false, we can add an else clause which will include code to be executed when the condition is false. We can also add else if clauses on order to test for a sequence or multiple conditions.
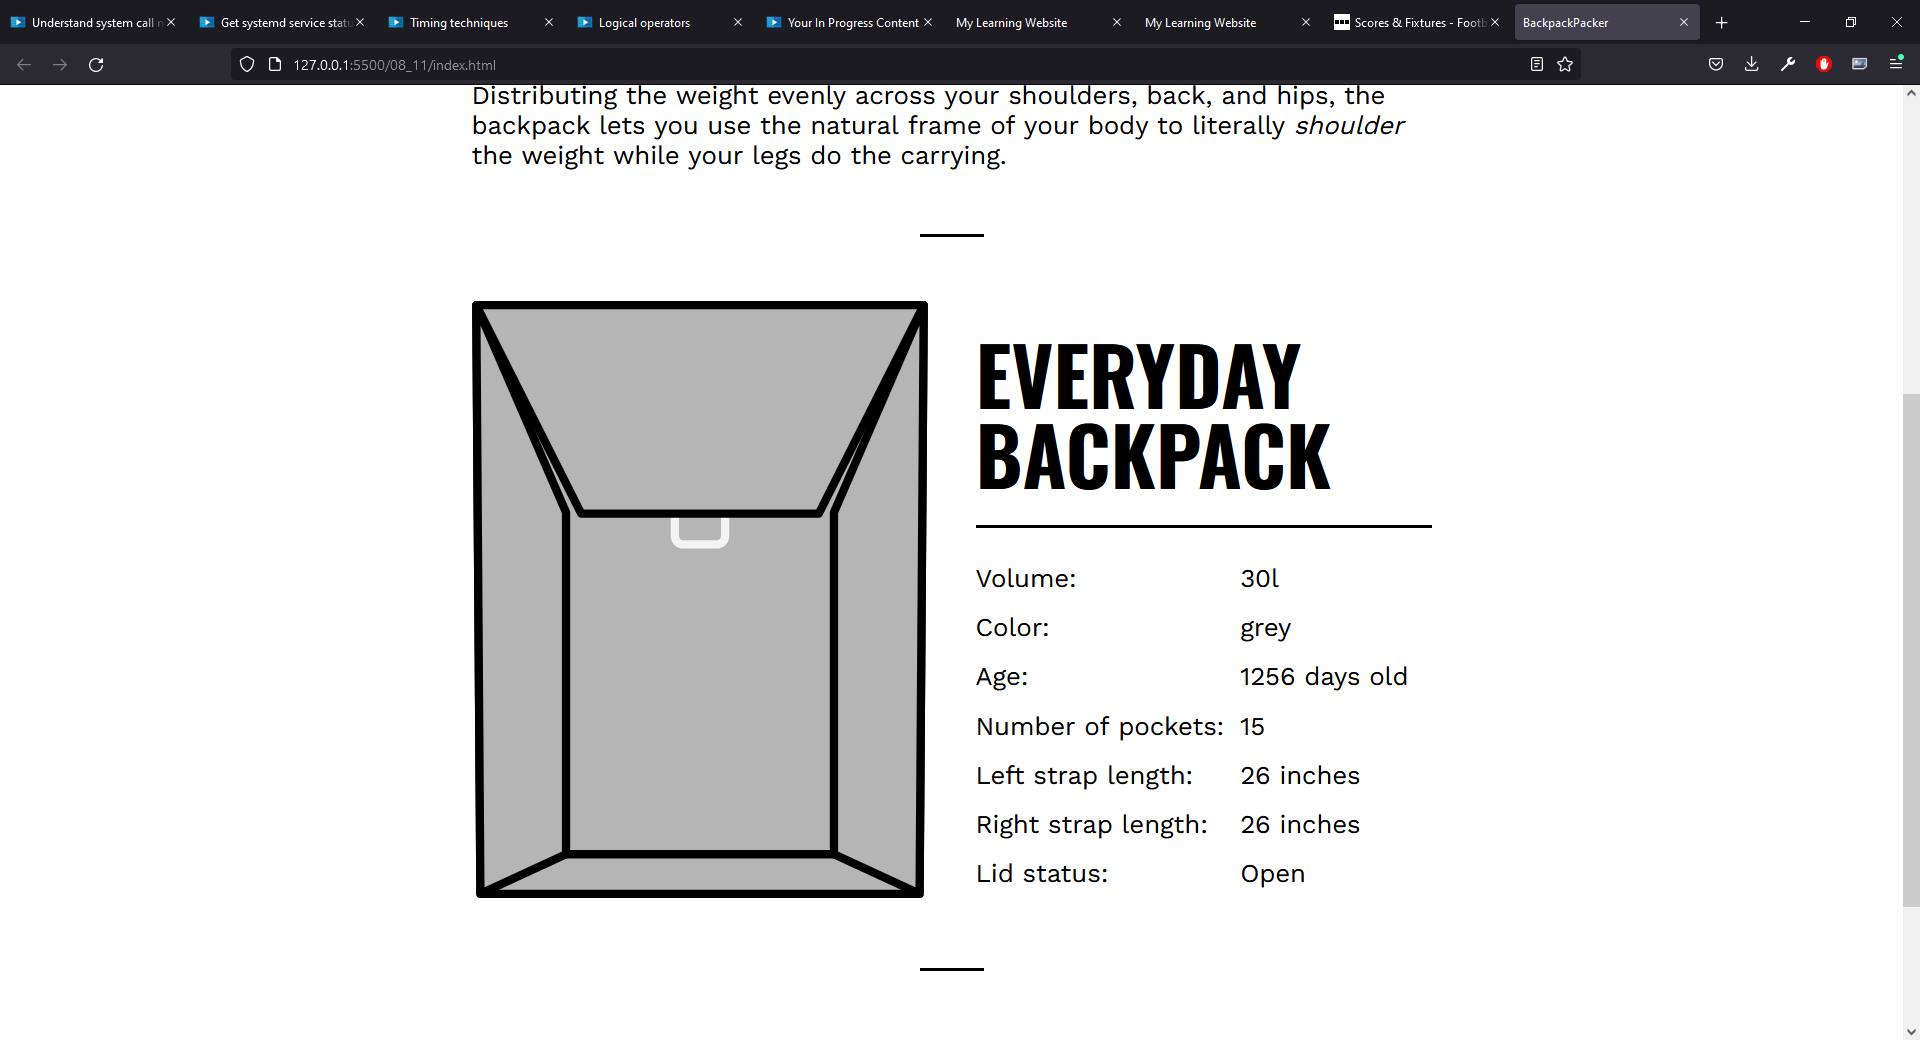
It might be helpful to see an example of this in a JavaScript file and for that purpose, we are going to go back to our Backpack objects. The code for this can be seen here.
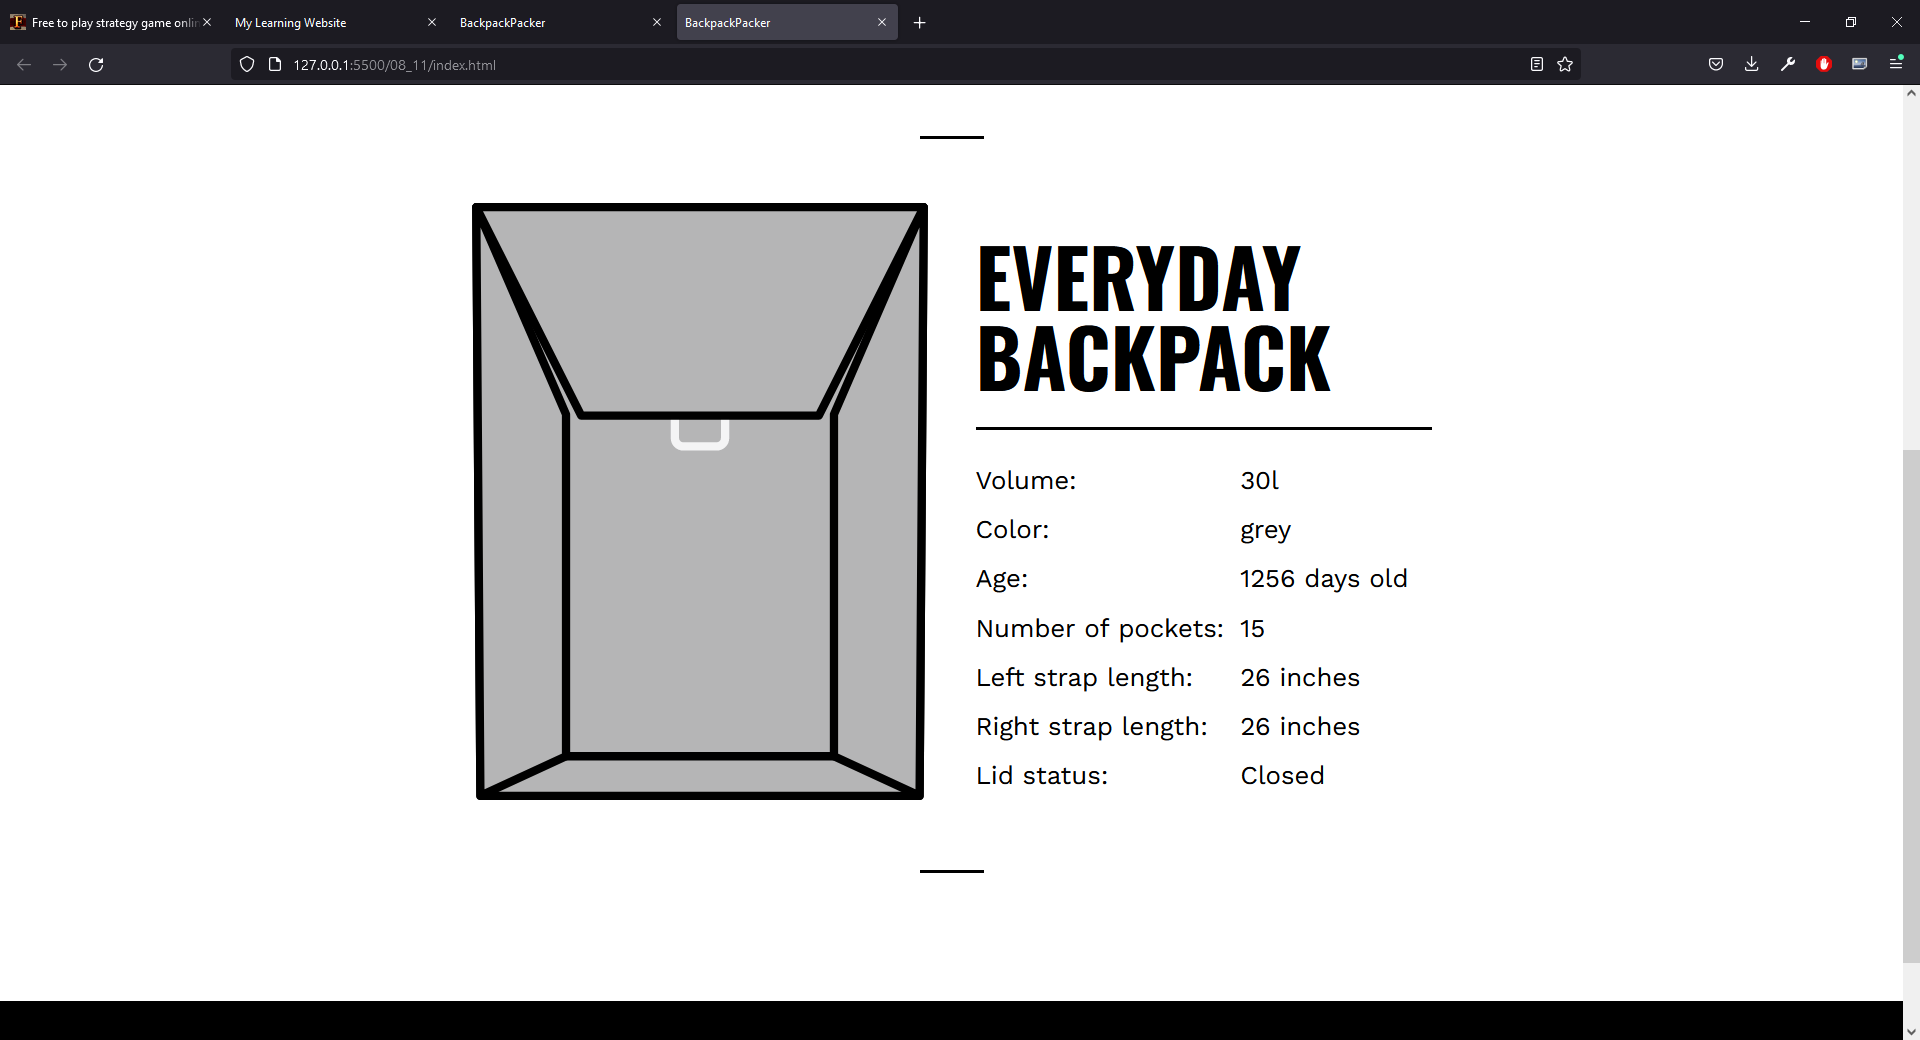
This is the lower half of the screen displaying the properites of the object. Note that lid status is determined by the value of lidOpen and this is a Boolean value. If it is true, the lid is open, if it is false, the lid is closed. The problem with this is that this is fine if you know that false corresponds to closed, but it's not really intuitive. It would be much better to display the word closed (or open).
In order to do this, I am going to amend the code for the Backpack constructor. Note that the constructor accepts a Boolean value for lidOpen and sets the corresponding value for an instance of Backpack to the same value. In other words, if you pass in false (as we did in the example shown above), the Backpack object we create will have a value of false.
We want to replace this with a string value. It has to be based on that same Boolean value, but rather than just assign the value to lidOpen in our object, we will assign it a string value of "Open" if the Boolean value is true and "Closed" if the Boolean value is false. This suggests that we will need an if else statement.
In the constructor, we have this line.
everydayPack.lidOpen
We don't need to change it, what we want to do is take the value of lidOpen, replace it with a string value and then that string will be the value displayed in our HTML document.
    if (lidOpen) {
      lidOpen="Open";
    } else {
      lidOpen="Closed";
    }
    this.lidOpen = lidOpen;
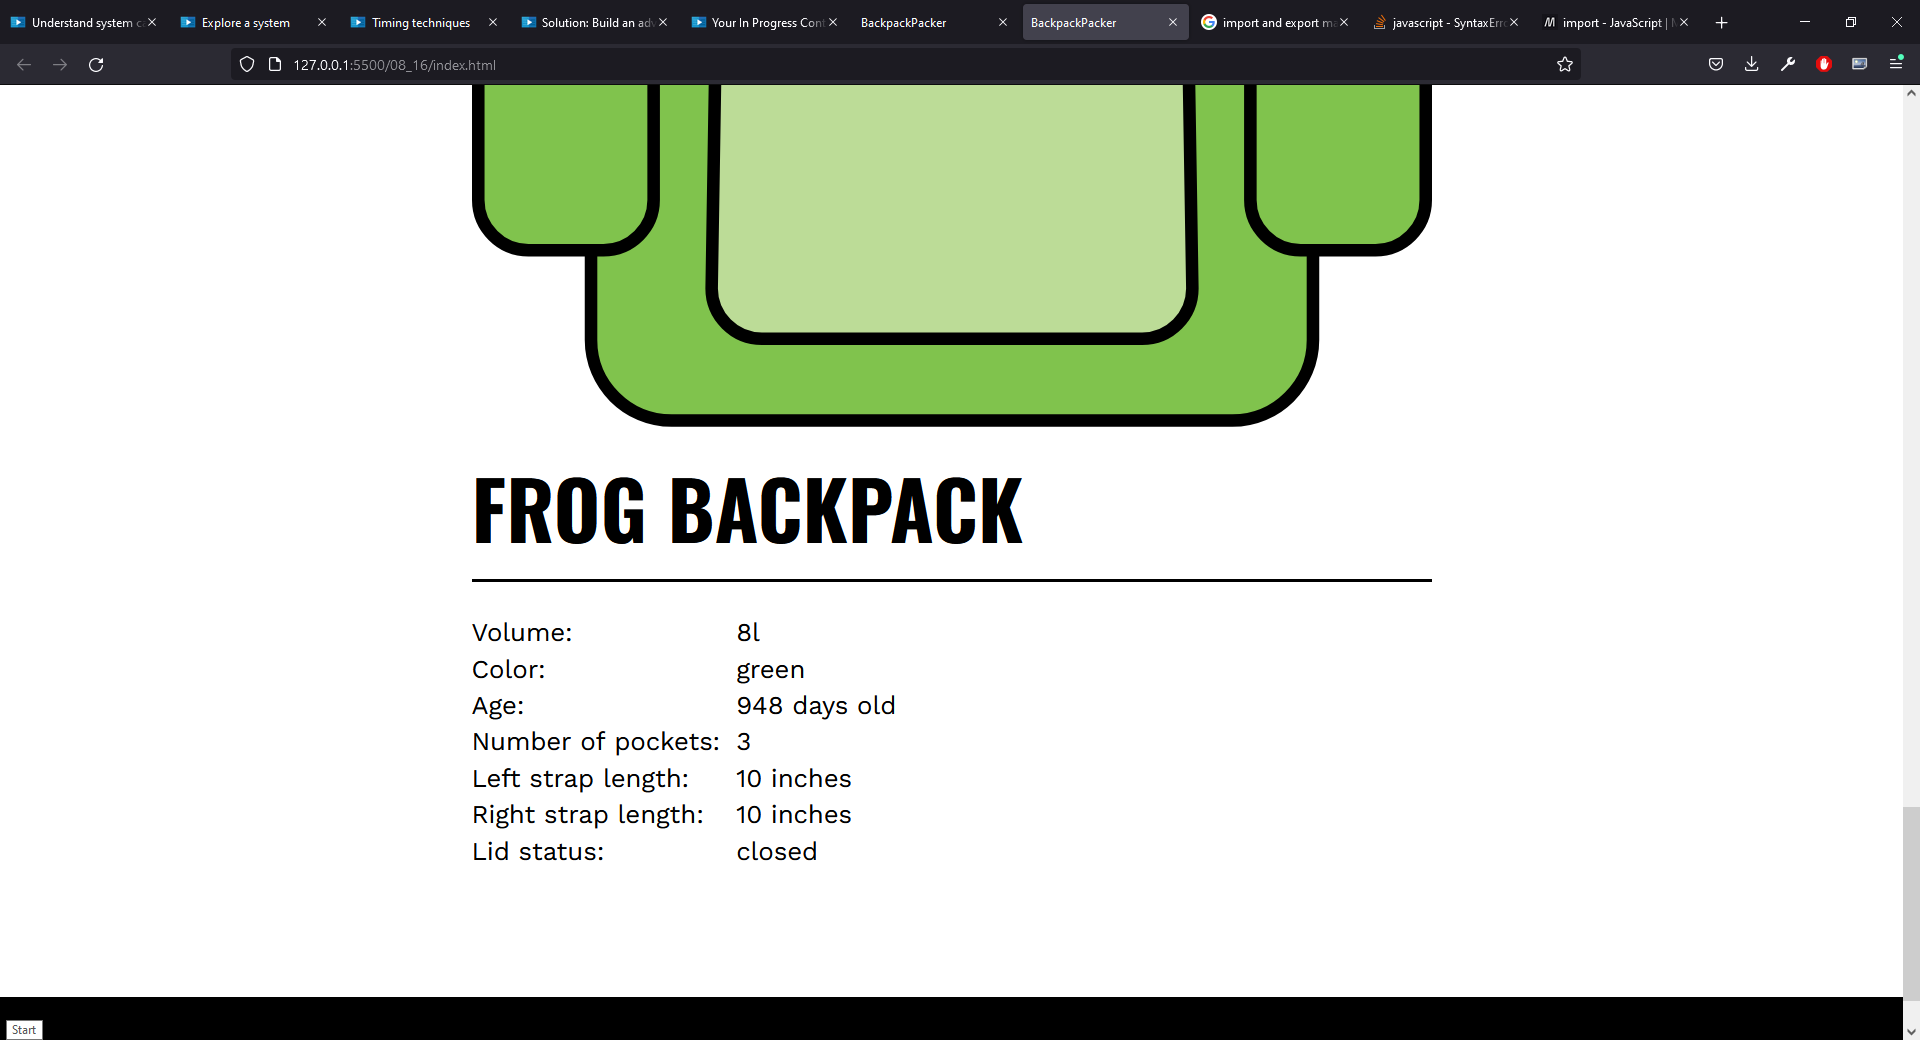
If we run this amended code, the output we get shows that the lid is closed and you can see that in the image below.
As you might imagine, if we pass it a true value, the lid will be shown as open. It is important to remember that we can pass any value to the constructor for lidOpen and our JavaScript will try to work out what we mean and one of the consequences of this is that any value we happen to pass in will result in the lid being shown as open if it evaluates to true and that includes, as you might recall, a non-empty string. So, let's say we pass it the value as
"false"
This is a non-empty string and the result with be output as shown in this image.
This is a weakness in JavaScript, but it's the trade off you get for having a language that is easier to use because it doesn't require that you specify the type of a variable. It is important to remember that this can mean fewer errors being reported. If we take this example, where we gave lidOpen a value of "false", JavaScript won't give an error. It simply accepts the fact that you provided a string argument and when we use this value in our conditional statement, it evaluates to true with the result that the lid is shown as open.
It seems reasonable to assume that the lid should be closed, but because we passed in the argument as a string rather than a Boolean argument, the status is showing as open and this is an error that JavaScript will not report. In this case, if JavaScript forced you to specify a type, this error could be avoided so this is an example where not reporting the error is really not helpful at all. The fact is that errors can be a good thing because they alert us to issues like an incorrect data type being used.
However, there is another side to this argument. You should bear in mind that in a real world application, an object might be created from data provided by a user so you also need to be careful with whatever data the user is allowed to provide. If he (or she) is able to free-type a value for lidOpen, JavaScript's failure to check types means that the code will still run and if something other than a Boolean value is provided, there is a 50/50 chance that the lid status will be incorrect, but the error won't break the webpage.
If you compare this with the what would happen if JS did check types, the user would probably see some sort of error message rather than the Backpack object they expect. You should bear this in mind when developing a website and be aware of the fact that errors like this can occur and should be dealt with gracefully where possible. That is, you can check the type of a variable, in this example, lidOpen and simply ask the user to provide a Boolean value instead. Ideally, the user would be presented with an alert where they can simply click one option or another to provide a true or false value rather than being asked to start again!
It's worth mentioning the fact that we used a very simple condition in this example.
if (lidOpen)
JavaScript has three different comparison operators using 1, 2 or 3 equals signs and I should mention that this condition is equivalent to
if (lidOpen=true)
If we change the condition to
if (lidOpen===true)
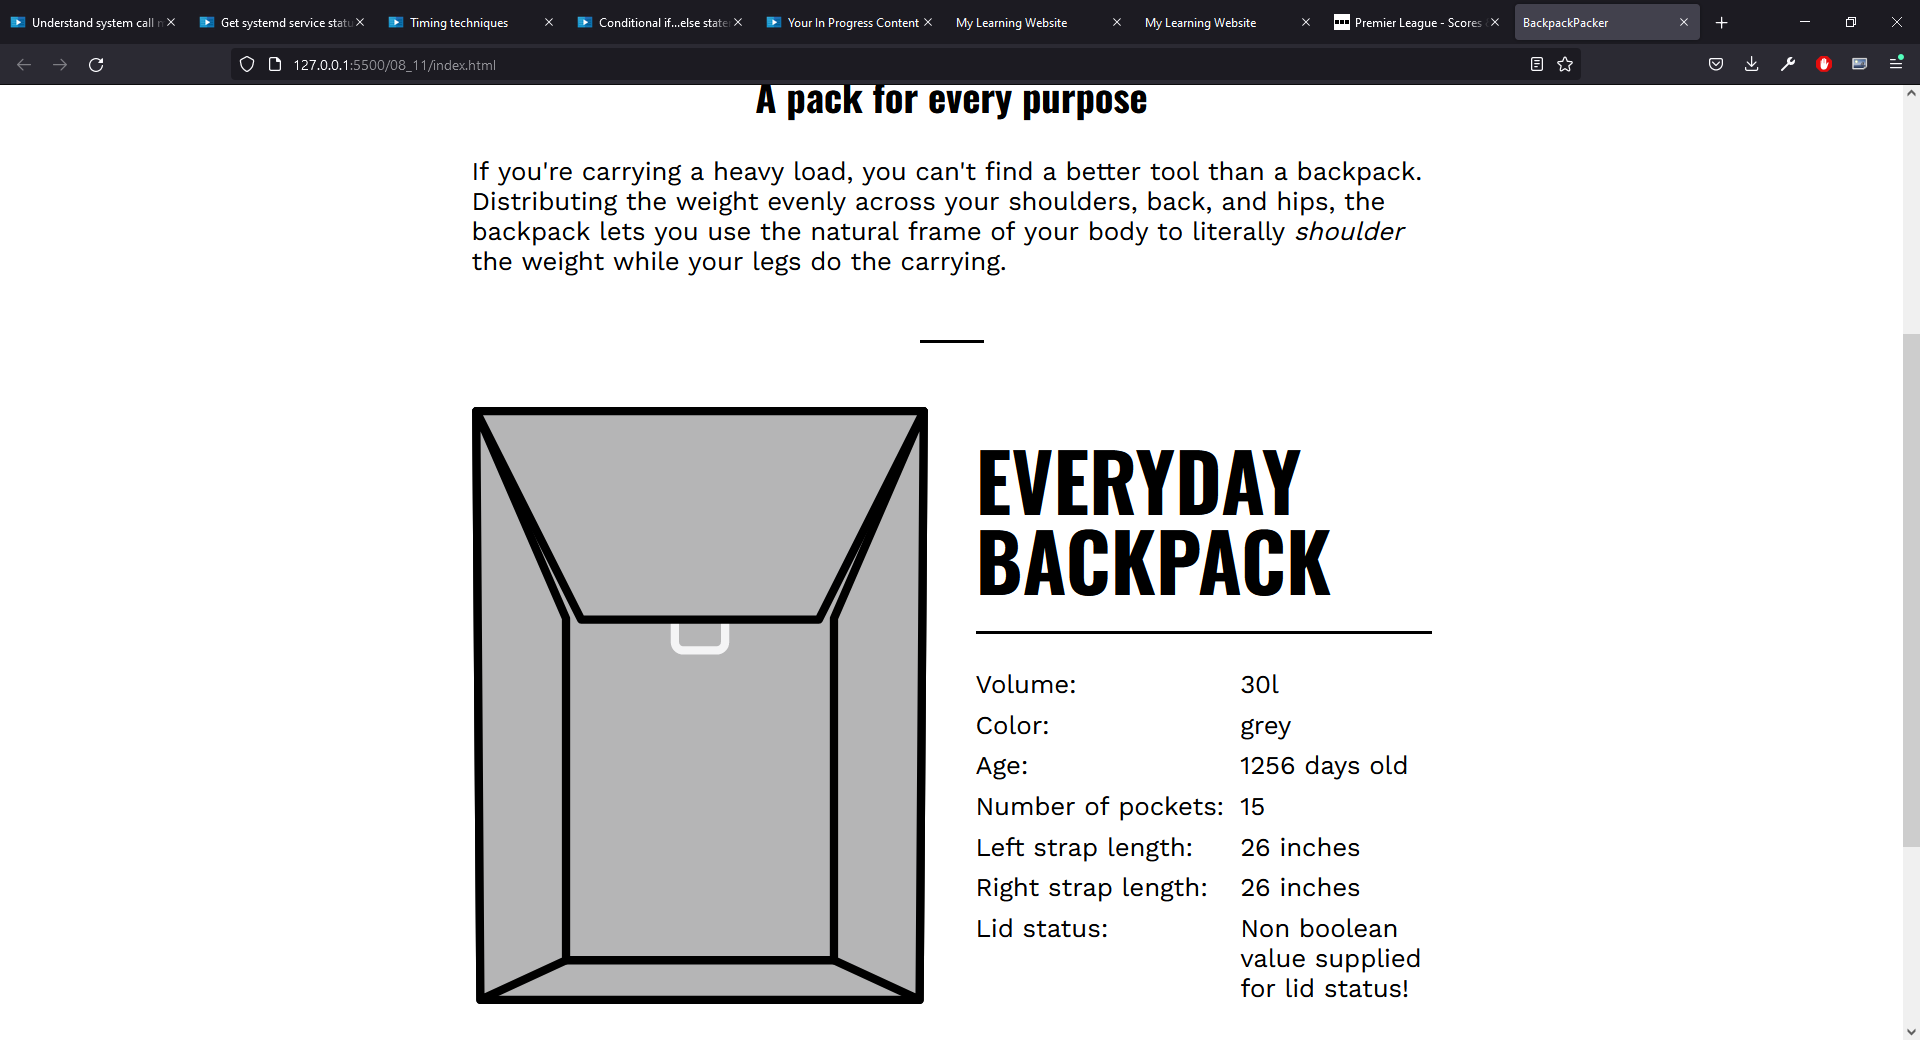
this is a stricter comparison and will only return true if the two operands have the same value AND are of the same type. But really, this is just switching things round so that any value other than Boolean true is going to be interpreted as false. If we run the code and pass in a value of true for lidOpen, we see that the status of the lid shows as open. If we pass in a value of "true", it will show as closed. This might seem like a better option since the type as well as the value is being compared, but as I say, it's really just giving you a different "default" value. You could have the code check for a value that is also false and a Boolean value using an if...else clause and use the else clause for non-boolean values like this.
    if (lidOpen===true) {
      lidOpen="Open";
    } else  if (lidOpen===false){
      lidOpen="Closed";
    } else {
      lidOpen="Non boolean value supplied for lid status!"
    }
    this.lidOpen = lidOpen;
If we run the code now, passing a non-boolean value such as "true" to the constructor, we get the output shown below.
This might be the best version of our code because the lid will only show as open if a boolean true value is provided or closed if a boolean false value is provided. If any other value is provided, we see the message shown in the image above which tells the user that an invalid value has been provided, but otherwise works exactly as expected. It doesn't break the page.
This is still not an ideal solution, since it doesn't give the user the opportunity to provide the correct value after the error has been reported, but at this stage, I just wanted to explore the pitfalls of using a boolean value in a conditional statement in JavaScript. The best solution of all would be one that tells the website developer that a mistake has been made so he (or she) is aware of it before the site goes live. JavaScript, unfortunately, doesn't offer that facility although there are other options to help avoid this type of problem. TypeScript, for example, is a language that compiles to JavaScript but does (as you might have guessed from the name) force the developer to explicitly state the type of any variable and so it would be a better option for thus type of code.
This course, of course, doesn't cover TypeScript but I am just mentioning it here because it helps to illustrate what is, in my opinion, a shortcoming of JavaScript even though, especially for developers who are new to JavaScript, in can seem like a very convenient feature!
One final thing I would like to mention is the ternary operator, which JavaScript also supports. A ternary operator is a shorthand version of an if...else statement. It will return one of two values depending on whether some condition evaluates to true or false and that's what our code does - if the condition is true, the value of lidOpen is set to "Open" and if it is false, the value of lidOpen is set to close. The general syntax of a ternary operator is
(condition) ? value1 : value2
In this case, value1 is returned if the condition is true, else value2 is returned.
In our example, we want to set the value of lidOpen to either of two strings, either "Open" or "Closed" depending on the Boolean value for lidOpen. We can therefore say that the value of lidOpen is the result of the ternary operator (that is, the value it returns). We can set the value like this
this.lidOpen = (lidOpen===true) ? "Open" : "Closed";
Again, you do need to bear in mind the fact that running the code like this, although we are checking both the value and type of the value passed to the constructor, we are returning "Closed" if a false value is returned. We are not making a similar check for a false value. This means that if we pass true to the constructor, the result will be that the lid shows as open but if we pass anything else, including a Boolean value of false or a string value of "true", the lid is going to show as closed. So only the Boolean true value will cause the lid to be shown as open, everything else will cause it to be shown as closed and there is no other possible value.
Logical Operators
The conditions we encountered in the previous section were all based on a single value. That is, we were doing something or other depending on whether lidOpen returned a true or a false value. However, there may be times when we want more complex conditions. For example, we might want to execute some code based on the values of two variables and these don't have to be Boolean variables.
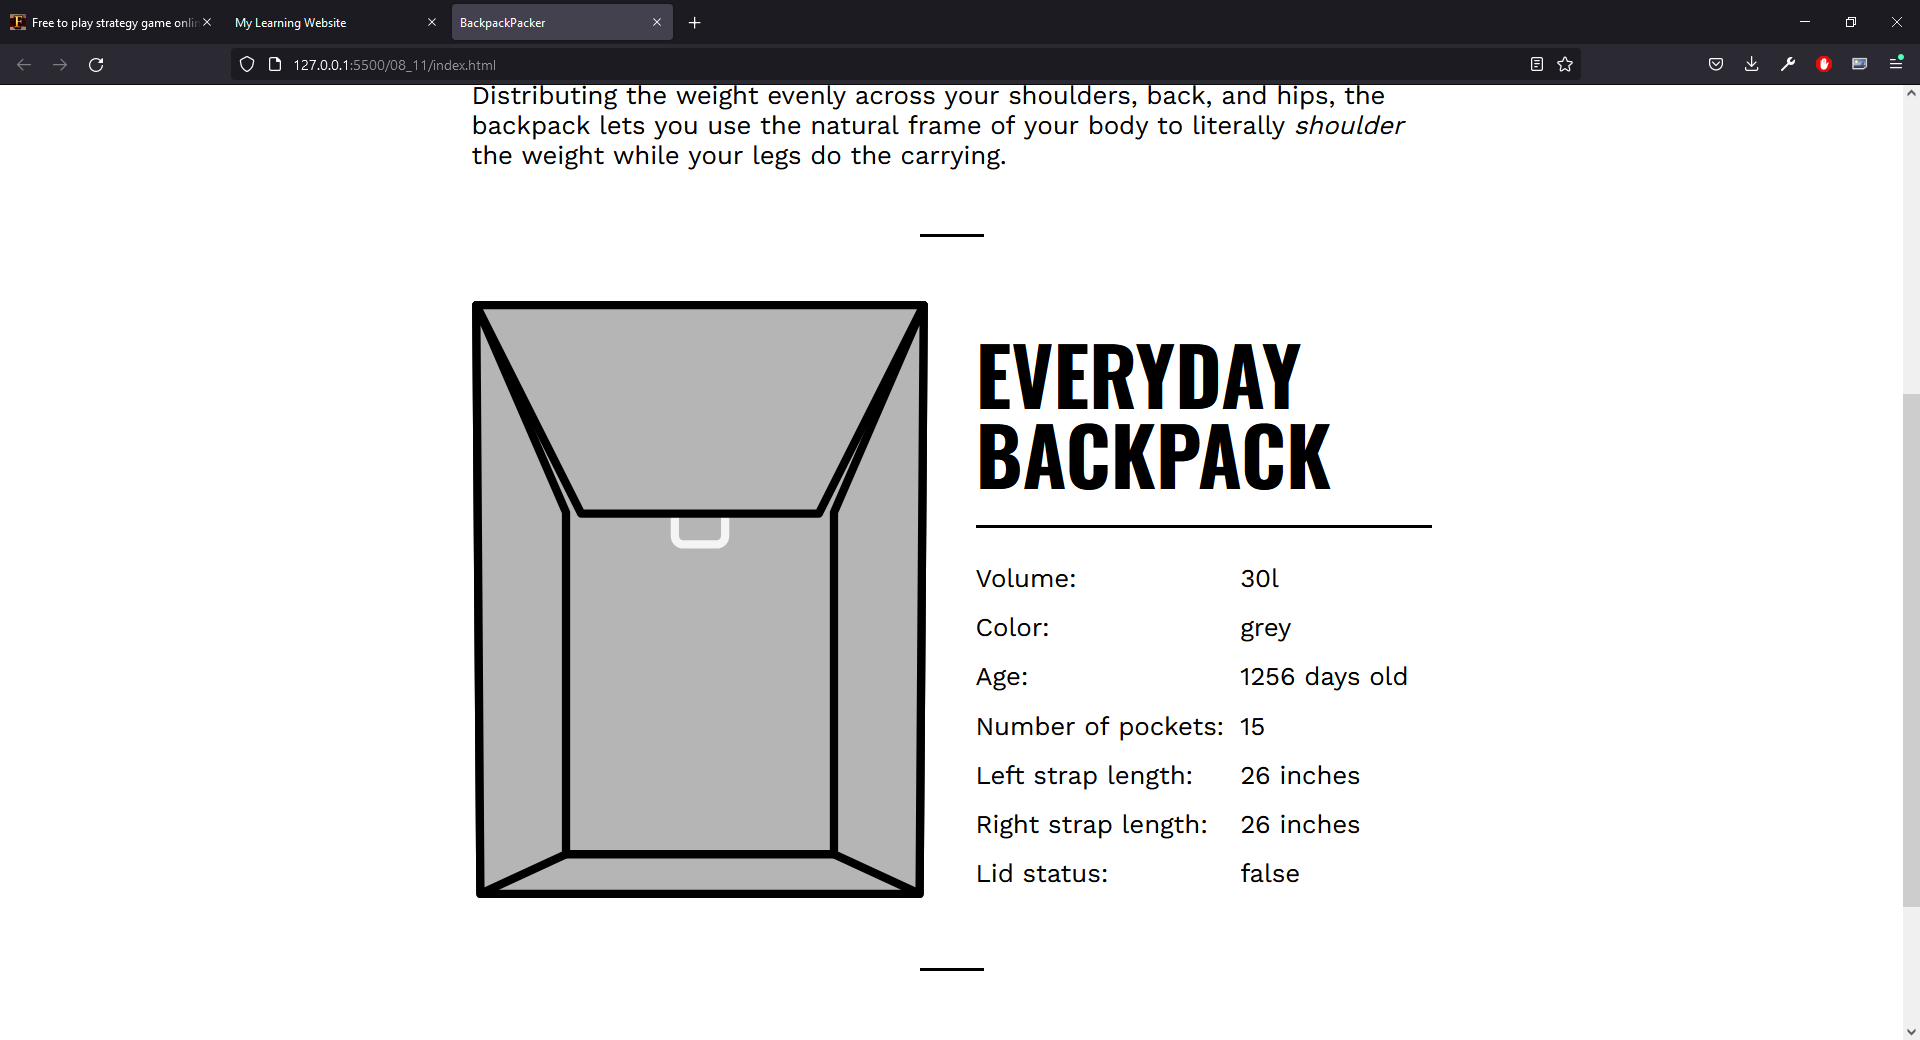
To demonstrate this, let's say that we want to identify a backpack as being large or small depending on both the volume and the number of pockets. In our example, the backpack ibject we created has a volume of 30 litres and it has 15 pockets. Let's start by assuming that a backpack is large if it has a volume that is greater than 15 litres and it has a minimum of 5 pockets and we will just log a message to the console to tell us whether the backpack has been defined as large or small. We will put tis code into the script.js file at the end so when it runs, we have already created the object, generated an HTML element to display it and placed that element into the HTML document. We want to display a message saying that the backpack is large if it meets both criteria and that it is small if it doesn't and this implies an if...else statement.
	if (everydayPack.volume > 15 && everydayPack.pocketNum >= 5) {
	  console.log("Backpack is large")
	} else {
	  console.log("Backpack is small")
	}
Notice that the and operator is represent by && and it is also worth noting that for the >= operator, the order is important, the greater than sign goes first. So this will define our backpack as large if the volume is greater than 15 litres AND the number of pockets is greater than or equal to 5. If either of these conditions is false, the overall result will be false. We can run this and the message
Backpack is large
appears in the console. If we change this so that the backpack must be over 30 litres to be considered large
	if (everydayPack.volume > 30 && everydayPack.pocketNum >= 5) {
	  console.log("Backpack is large")
	} else {
	  console.log("Backpack is small")
	}
and run this code again, we see that the message appearing in the console is now
Backpack is small
The number of pockets is still greater than or equal to 5, but the volume is not greater than 30 litres. Notice that we specified that it must be greater than 30 litres, not greater than or equal to 30 litres. Since the first condition is not met, the overall reuslt is false and so the backpack is being defined as small.
Let's say that we want to change our definition so that a backpack is defined as large even if it meets only one of these conditions. In other words, it is large if it is greater than 30 litres OR it has at least 5 pockets.
	if (everydayPack.volume > 30 || everydayPack.pocketNum >= 5) {
	  console.log("Backpack is large")
	} else {
	  console.log("Backpack is small")
	}
The logical or operator is denoted by the double pipe symbol - ||. If we run the code again, the output we get is
Backpack is large
The first condtion is still false - the backpack is still not greater than 30 litres in volume, but the second condition is true since the backpack does have more than 5 pockets. Since we now only need to meet one of the criteria (only one of the conditions has to be true) the overall result is true and the backpack is defined as large.
As you might expect, if the backpack meets both of these conditions - it is still defined as large. We can sum this up in a truth table as shown below.
| Value_1 | Value_2 | Value_1 && Value_2 | Value_2 || Value_2 |
|---|---|---|---|
| false | false | false | false |
| true | false | false | true |
| false | true | false | true |
| true | true | true | true |
As you can see from the table, when you have two Boolean values that you want to combine with each other using an AND or an OR operator, there are four possibilies. For the AND operator, a true value is returned only if both conditions return a true value. For the OR operator, a false value is returned only if both conditions are false. It is worth noting that in programming in general, there is an operator that will return a true value if one or the other of the conditions is true but not if both are true. This is the XOR or exclusing or operator. JavaScript doesn't have this operator but it is possible to acheive the same effect using both the AND and OR operators. Consider this example, which I would stress is NOT a JavaScript example.
condition_1 XOR condition_2
This returns true if one of the conditons is true, but false if they are both true. Compare this to an example you could find in JavaScript.
((condition_1 || condition_2) && (!condition_1 || !condition_2))
Let's assume that both condition_1 and condition_2 are true. The first part of this
(condition_1 || condition_2)
returns a true value since at least one of these conditions is true. The second part
(!condition_1 && !condition_2)
looks a little bit more complex. This negates both conditions (true becomes false) and then performs the OR operation so this will return a false value. If we perform an AND operation with both of these, we will get a false value since the second condition is false. The second part is the key because it will always return false if both conditions are true so the whole statement boild down to return true is one of the operands is true, return false if both operands are true and then perform an AND operation with both of them. The overall result is that you will get a true value returned if one of the conditions is true but not if they are both true and so you have, in effect, an XOR operator.
Conditional switch Statement
We saw a very basic example of a condtional statements and then we saw how it was possible to add complexity by adding else...if clauses and/or an else clause. We can use these to give some quite complex behaviour. For instance, let's say that we want to write some code that sets the value of a variable, let's call it grade, based on the value of some other variable, we'll call that one mark.
I will briefly describe the goal, first of all and that is to assign a grade from A to F.
| Grade | Mark |
|---|---|
| A | 85 or higher |
| B | 70 or higher but less than 85 |
| C | 60 or higher but less than 70 |
| D | 50 or higher but less than 60 |
| E | 40 or higher but less than 50 |
| F | Less than 40 |
We could code this using if and if...else statements like this.
	let mark = 62;
	let grade = "";
	if (mark >= 85) grade = "A";
	else if (mark >= 70) grade = "B";
	else if (mark >= 60) grade = "C";
	else if (mark >= 50) grade = "D";
	else if (mark >= 40) grade = "E";
	else grade = "F";
	console.log("Student has achieved a grade of ",grade);
Notice that we don't need to check both limits. For example, we simply assign B as a grade if the mark is higher than 70. We don't need to specify the fact that the mark must also be less than 85. The reason for this is that if the mark is 85 or higher, a grade of A will be assigned and we wouldn't check the other conditions.
We can test this with values such as 98, 70, 52 and 30 and we see the expected grade each time so it does work and it might be a perfectly acceptable solution in this case, but it is a little bit messy, it can be hard to read and if you add more options, it will just get more complicated.
A better approach to a problem like this is to use a switch statement. This will evaluate the expression and you can add as many vase clauses as you like to accomodate all the possible options you want to check for. Using a switch statement, the code would look like this.
	let mark = 85;
	let grade = "";
	switch (true) {
	  case (mark >= 85):
		grade = "A";
		break;
	  case (mark >= 70):
		grade = "B";
		break;
	  case (mark >= 60):
		grade = "C";
		break;
	   case (mark >= 50):
		grade = "D";
		break;
	  case (mark >= 40):
		grade = "E";
		break;
	  default:
		grade = "F";
		break;
	}
	console.log("Student has achieved a grade of ",grade);
This is much easier to read and you can add as many clauses as you like without really increasing the complexity of the code. A couple of points I would like to make about this code. The expression we check initially is just true. The reason for this is because we don't really need to check anything here because we are checking the values in each clause. We would put a more complex expression in here if we wanted to execute clauses based on the result of that expression, but in this case we are just assigning a value to mark and then executing code based on that value.
The other thing I want to mention is that, as with the previous example, we are only checking the lower limit. If we take the second case as an example
case (mark >= 70):
This is a minimalistic approach and again, we don't need to specifiy that the value must be less than 85. Let's assume the value is 85. The first clause would assign a grade of A and the break statement would cause the code to exit from the switch statement without checking any other cases.
It is worth noting that this is not automatically the case (excure the pun) - that only happens if you insert the break command. If you did want to express both limits, the case would look like this.
case (mark >= 70 && make < 85):
Strictly speaking, if you do that, you don't need to include the break statements since any possible value (in this case, we would expect mark to be somewhere between 0 and 100) will only match with one clause.
That being said, many people take the view that it would be best practice to include both the upper and lower limits (where appropriate) and also include the break statement becuase this gives you code that is clearer and nothing is implied. It certainly makes the code easier to read, but at the same time, I think that it is important to be aware of issues like this because you may encounter code written in either way and being able to read and understand code like this is a key skill for a developer.
Looping Through Content
Like any other programming language (that I know of) JavaScript provides several mechanisms for iterating through some collection and that collection might be, for example, an array or a an object that contains a number of elements which may also be objects. In this section, we are going to be looking at a for loop and several variations on it.
To begin with, let's assume that we have an array called stuff which contains 6 string elements like this.
const stuff = ["piggy", "headlamp", "pen", "pencil", "eraser", "water bottle"];
We can iterate through this with a very simple for loop like this.
	for (let i = 0; i < stuff.length; i++) {
	  let listItem = document.createElement("li");
	  listItem.innerHTML = stuff[i];
	  stuffList.append(listItem);
	}
Note that we had created an HTML element called stuffList with this command.
let stuffList = document.createElement("ul");
The loop is creating a variable called i with an initial value of 0 and each time the loop is executed, i is incremented and this continues until i has the same value as the length of the array. That is, the array has 6 elements so its length is 6 and so the loop will continue until i has a value of 6. When it does reach 6, the loop will stop so it doesn't run when i has a value of 6. It runs for every value of i from 0 to 5 so it does run 6 times, once for each element in the array.
This might be a little clearer if you understand that each element in an array can be accessed via it's index which is essentially its position in the array and these index values start form 0. So, if you have an array containing x elements, the first element will have an index value of 0 and the last will have a value of x - 1.
Inside the loop, we start by creating a new HTML element of type i and we call this listItem. We use the value we got from the array to set the innerHTML of listItem and finally, we add that list item to the value we got from the array.
The first time we execute the loop, i has a value of 0 so the element we are getting from the array is the first element and that is "piggy" (the array element with an index value of 0. When the listItem is created, this is an HTML element of type <li> - in other words it is an HTML list item. This is then added to stuffList. As we saw, stuffList itself is an HTML item of type ul - an unordered list. So essentially, what is happening here is that we are creating an undordered list, then generating a list of items to be inserted in the list and appending each one in turn to the unordered list.
This is a pretty standard for loop and it is not designed specifically for iterating through a collection like an array, it is usually intended to perform some action or actions a set number of times which is why we have to use a variable to control the iterations and we have to use the length of the array to determine the number of iterations.
We do have some versions of the for loop that are specifically designed to iterate through a collection such as an array. One example of this is for of syntax shown below.
	for (const item of stuff) {
	  let listItem = document.createElement("li");
	  listItem.innerHTML = item;
	  stuffList.append(listItem);
	}
This will take each item from the array in turn and refer to it inside the loop as item so we don't need to use a control variable and we don't need to use the index of the array element to find it. What we are doing with the array item is exactly the same.
The next version of the loop is a for each loop.
	stuff.forEach((item) => {
	  let listItem = document.createElement("li");
	  listItem.innerHTML = item;
	  stuffList.append(listItem);
	});
This is a similar loop, again it is grabbing each element from the array in turn. Inside the loop, it is referring to this element as item and is executing the code inside the loop on that item. The code inside the loop is the same for a for each loop as it is for a for of loop. The only difference is the way loop is specified.
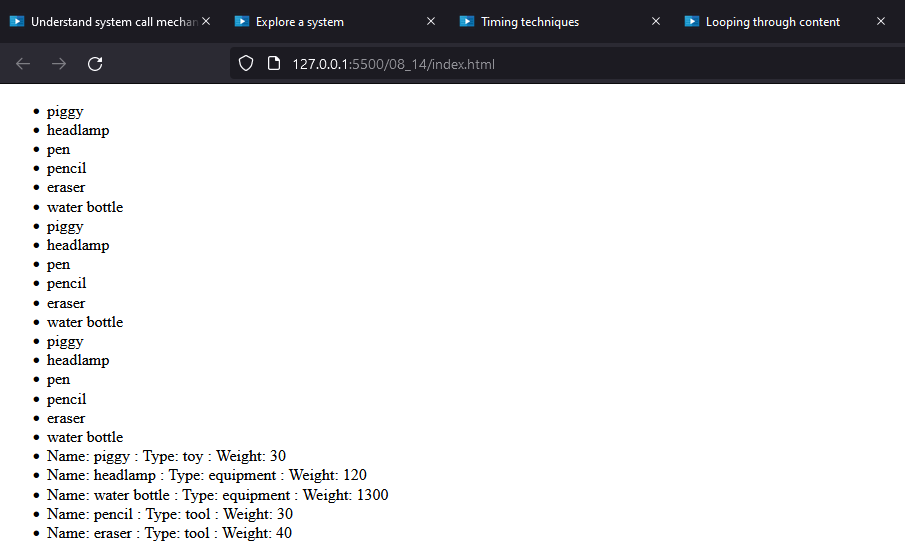
Our final version is designed to work with nested oibjects sich as an object that contains a number of other objects. In this case, that is nestedObjects and this includes a number of items each of which are made up of three values, a name and type which are string values and an integer value called weight.
	const nestedObjects = {
	  item01: {
		name: "piggy",
		type: "toy",
		weight: 30,
	  },
	  item02: {
		name: "headlamp",
		type: "equipment",
		weight: 120,
	  },
	  item03: {
		name: "pen",
		type: "tool",
		weight: 30,
	  },
	  item04: {
		name: "pencil",
		type: "tool",
		weight: 30,
	  },
	  item05: {
		name: "eraser",
		type: "tool",
		weight: 40,
	  },
	  item03: {
		name: "water bottle",
		type: "equipment",
		weight: 1300,
	  },
	};
The only real difference, semantically, between the loop we use to iterate over the objects in nestedObjects and the elements in stuff is that we are dealing with a different type of value, an object rather than a single element so in the loop, you will see that rather than reference the item, we are referencing just one of it's properties and that is name. So, rather than referencing this as item and setting the value of the <li> elements innerHTML to it, we are using somenthing a little more complex.
listItem.innerHTML = `Name: ${nestedObjects[singleObject].name}`;
To generate the innerHTML, we have some plain text that identifies the property, name in this case, followed by the name of the collection, nestedObjects and a reference to the specific object from this collection which is referenced by singleObject. This gives us the first object from nestedObjects which is
	item01: {
		name: "piggy",
		type: "toy",
		weight: 30,
	},
We are using dot notation (remember that item01 is an object) in order to access the name property so this returns piggy. Essentially, this is the same thing as we saw returned in the first iteration of the other loops, but with the name of the property included. We could rewrite this line as
listItem.innerHTML = `${nestedObjects[singleObject].name}`;
Since the name property is the same as each element of the array, this results in the output being indistinguishable from the output of the other loops.
Arguably, if we are displaying more than one of the properties, it is more important to include the property. Let's say that we want to display a list that includes all three properties of each object, we could amend the code again to do that.
listItem.innerHTML = `Name: ${nestedObjects[singleObject].name} : Type: ${nestedObjects[singleObject].type} : Weight: ${nestedObjects[singleObject].weight}`;
The final version of the code, including output showing all three elements of each object in nestedObjects can be seen here and the output from running this version of the code is shown below.
THere are other types of loop, including both a while and do while loop which we are not going to cover here, but they work in the same way as in other programming languages and if you click on either of these, this will take you to the relevant page in the MDN Web Docs.
Using the map() Array Method
If you think about how something like a for each loop works on an array, essntially it is just retrieving each element from the array in turn and then doing some proxessing with it such as using it as the text for an HTML element (as we saw in the previous examples). This doesn't change the array which will remain as it is unless you use the loop to write new values to the array.
The map method for arrays is similar in that it will take each element from an array in turn and do some processing on it. The key difference is that it then writes the element into a new array. This is perhaps apparent from the name, it is mapping the elements of one array into the elements of a new array. It is a very important method in JavaScript because it is often used with complex data lists and is also very common in frameworks such as React.
For reference, the online docs for the function can be found here.
In order to demonstrate this, we will take the for each loop from the previous example and convert it to use the map() array method. As a reminder, the for each loop was
	stuff.forEach((item) => {
	  let listItem = document.createElement("li");
	  listItem.innerHTML = item;
	  stuffList.append(listItem);
	});
This loop took each element from the array in turn and used it as the text of an <li> element so it used the value, but didn't change anything. When the loop was finished, we still had the array, stuff. Notice that each time, we create a new <li> element, we added it to stuffList. Recall that stuffList is itself a <ul> element so once the loop is created, we don't have an easy way to access the new <li> elements.
With the map method, we will create a new array, which we will call stuffItems, to hold the modified value and since this array will take the output of the map function, we can assign the it the result of running that function, like this.
const stuffItems = stuff.map((item) => {
The body of the loop can remain the same with the exception that we will add a return statement to return the new listItem. This means that every time the loop iterates, it returns a list item and that is being added to the new array, stuffItems. The resulting loop looks like this.
	// map() array method
	const stuffItems = stuff.map((item) => {
	  let listItem = document.createElement("li");
	  listItem.innerHTML = item;
	  stuffList.append(listItem);
	  return listItem;
	});
The approach taken in the video is slightly different. Here, the line of code that appends the listItem to stuffList is taken out of the map function and a new for each loop is created to iterate through the loop and add they are added to stuffList there. After running the above loop, I have two lines of code to log both stuff and stuffItems to the console, as the version in the video does and they look the same.
The code from the vide looks like this.
	// map() array method
	const stuffItems = stuff.map((item) => {
	  let listItem = document.createElement("li");
	  listItem.innerHTML = item;
	  return listItem;
	});

	stuffItems.forEach((Item) => {
	  stuffList.append(Item);
	})
This may be a bad, or at least unnecessary example, because you can actually do the same thing without needing to use the map method at all. Bear in mind that the map method is doing exactly the same thing as the for each loop except that, in the code from the video, it isn't adding the listItem to stuffList which it does in a separate for each loop. In addition, it is 'mapping' list item to our new array, stuffItems.
An alternative approach would be to create a new array with a line
const stuffItems=[];
We can then use the original for each loop, adding a line to push listItem onto this array.
	stuff.forEach((item) => {
	  let listItem = document.createElement("li");
	  listItem.innerHTML = item;
	  stuffList.append(listItem);
	  stuffItems.push(listItem);
	});
Again, this works in exactly the same way! In essence, this suggests that the map function is really adding any functionality since you can simply stick with a for each loop and just add each item in turn to a new array. The example shown in the MDN Web Docs for the map array function might make the point a little better.
	const uint8 = new Uint8Array([25, 36, 49]);
	const roots = uint8.map(Math.sqrt);

	console.log(roots);
	// expected output: Uint8Array [5, 6, 7]
In this example, we are creating an array with three integers, 25, 36 and 49. We then create a second array called roots and we initialise it by passing the map function with a function (Math.sqrt) as a parameter and the map function iterates through uint8 and finds the square root for each element which is then added to the array, roots. So, in this case, we really mapping the values in uint8 to a related value in roots and that makes a lot more sense!
Challenge: Build an Advanced Function
For this challenge, we will be doing something a little bit more advanced than in previous challenges and so the structure of the JavaScript files is also a little bit more complex than we are used to. We have a file called advancedfunction.html which displays some backpack objects and a JavaScript file, script.js which is initially blank but will hold the code that brings everything together and adds the backpacl objects to the HTML document.
We also have a folder called components and this contains two additional JavaScript files called Backpack.js which sets up the Backpack class and data.js which imports Backpack.js and creates two Backpack objects which it then exports in the form of an array called backpackObjectArray.
The challenge is to import the object into script.js and write a function that loops thourgh the array and generates an HTML element for each of the Backpack objects which is added to the HTML document so this document will display them both. The steps to do this are as follows:
	•	Map through the data array to grab each object.
	•	Append each of the objects to the main element.
Solution: Build an Advanced Function
To start with, I have imported the array created in data.js that holds our two backpack objects.
import backpackObjectArray from "./components/data.js";
Next, I created a variable called article that references the main element in the HTML file.
const article = document.querySelector("main");
I then used the map array method to grab each of the backpack objects in turn and create a content string using the properties of that item. The array to which the elements are being mapped is called packList. Inside the loop, I then create a <div> element and set its innerHTML property to the HTML containing the specific properties of that backpack and this is returned. So the items being mapped to packList are <div> elements.
When the loop has finished, I thin use a for each loop to iterate over packList and add each of the <div> elements in turn to article - which means that they are being applied to the main element of the HTML document.
	packList.forEach((item) => {
	  article.append(item)
	});
The completed version of the script.js file, including the loop can be seen here and the image below shows part of the HTML document displaying the details of the second backpack object.