Secure Access with SSL
SSL (also known as TLS) stands for Secure Sockets Layer and it encrypts communications between a web server and a client.
The client and server agree on a shared secret and the server has a cryptographic certificate for this purpose. This can come from a trusted third party in order to establish trust or it can be a self-signed certificate. Self-signed certificates are generally not trustworthy but if you have signed the certificate yourself, it can be trusted within your own network.
There is usually some visible sign in the browser that the server has such a certificate and this can be a green padlock (indicating the server has a trusted certificate) or a red warning sign (indicating that it doesn’t). If you have a self-signed certificate, you won’t see the green padlock since the certificate is not signed by a trusted authority.
More information on these can be found in the LinkedIn courses, Learning SSL/TLS and SSL Certificates for Web Developers. More general information on the topic can be found in the LinkedIn course, Learning Cryptography and Network Security.
Create a Self-Signed Certificate
The steps involved in doing this are
- Ceate a Private Key (using the OpenSSL tool).
- Create a Certificate Signing Request.
- Create a Certificate, signed by our Private Key using the Certificate Signing Request.
More details on this can be found on the CentOS wiki page, Setting up an SSL secured Webserver with CentOS. Interesting side-note here, the URL in this case (pardon the pun) is actually case-sensitive which is a little bit strange! More info on this can be found here, it seems that document names are case sensitive but domains are not.
The command to generate the key is
sudo openssl genrsa -out ca.key 2048
The -out option is used to specify the file we output the ley to and 2048 is the number of bits for the key, so it is a measure of the key’s strength and therefore also the level of security.
It’s worth remembering that this will put the key into the current directory since we didn’t specify a path for the output so you may want to navigate to the appropriate location (probably your home folder) first to avoid having to specify a location.
If we already had a key we trusted, whether it’s our own or is from a trusted 3rd party, we would use this to sign the certificate so this step will not always be necessary.
The command to generate the Certificate Signing Request is
sudo openssl req -new ca.key -out ca.csr
Most of this is self-explanatory, req -new creates a new request, we specify the key to be used to sign the request and (similar to the previous step) the file to output the request to.
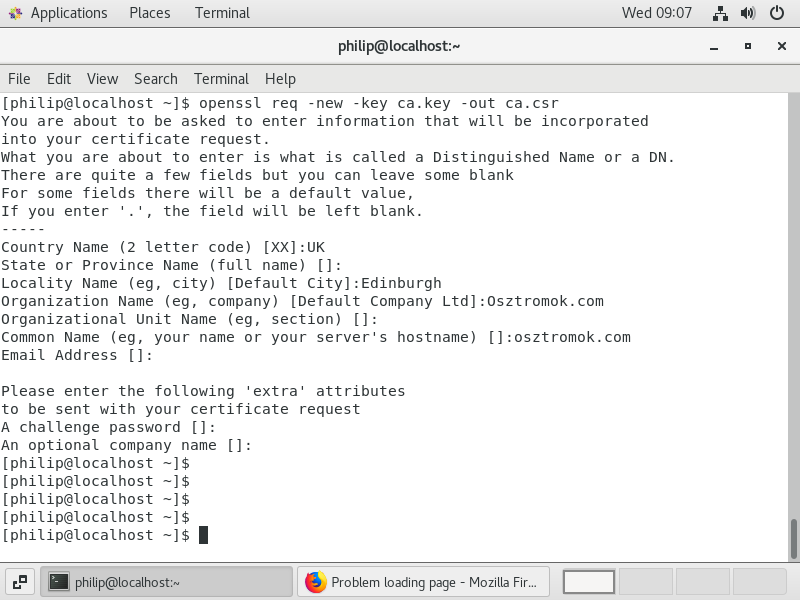
We are then asked to provide some information about the organisation as shown in figure 31.
So, this creates a certificate which we have vouched for by signing it with our own private key. The final step is to create the certificate and the command to do that is
sudo openssl x509 -req -days90 -n ca.csr -signkey ca.key -out ca.crt
In the command, x509 is a standard that describes how a certificate is managed, 90 days is the period before the certificate expires and we also specify the private key, the certificate signing request (both of which are used to create the certificate) and the certificate itself. The output from this command is shown in figure 32.
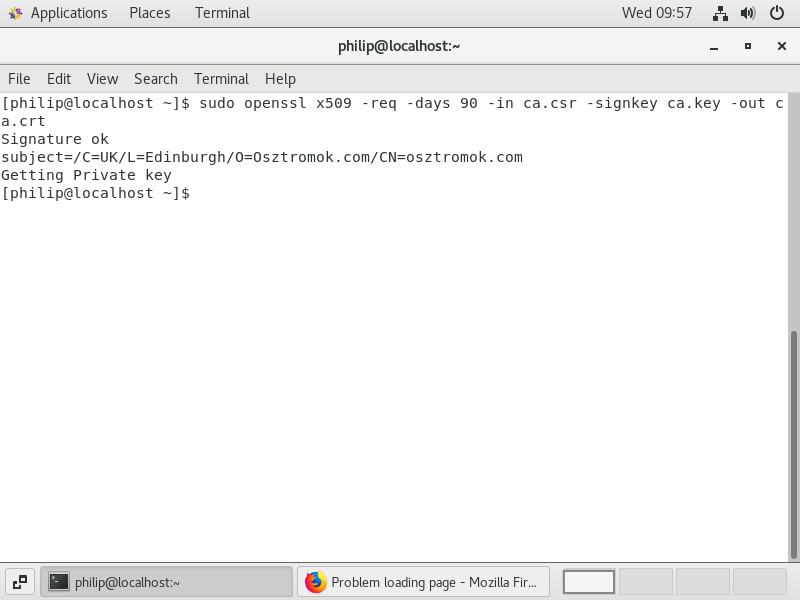
Figure 33 shows a listing of my home directory after creating the certificate.
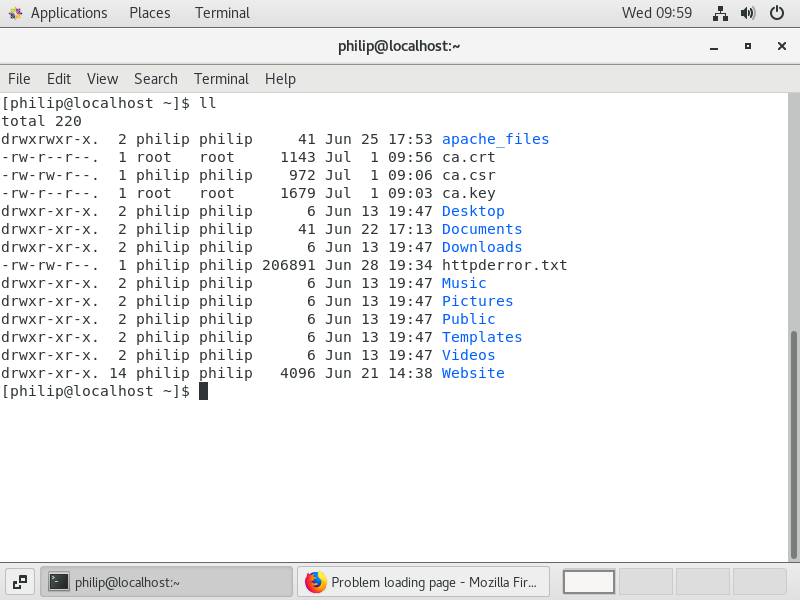
The process has created three files
- ca.key - the private key
- ca.csr - the certificate signing request
- ca.crt - the actual certificate
Obviously, we will want to keep all three files safe and secure!
Use a Certificate from a Certificate Authority (CA)
Obtaining a certificate from a Certificate Authority (CA) can take a while and when it is done, you will either have two files or will have access to two pieces of text. If the latter, you will want to copy them into plain text files with a .key extension for the key and a .crt extension for the certificate.
The easiest way to do this is to copy the text from the website of the CA and paste into files called something like mycert.key ad mycert.crt in your home directory.
Add an SSL Certificate to Your Site
To use the certificate, whether self-signed or from a CA, we need to configure the web server to use SSL by installing the appropriate module with
sudo yum install -y mod_ssl
As we saw with php, installing this module creates a conf file, ssl.conf, in the /etc/httpd/conf.d folder and we will edit this so that it points to our certificate.
Before we do that, we will need to move our certificate over to the /etc/pki/tls/certs directory with
sudo cp ~/ca.crt /etc/pki/tls/certs
Similarly, we need to copy the key into the private folder which is in tls with
sudo cp ~/ca.key /etc/pki/tls/private
Now that the files are in the right place, we can edit the ssl.conf file to make sure that it is pointing to these files with
sudo vim /etc/httpd/conf.d/ssl.conf
If we scroll down, we should see a couple of sections for Server Certificate and Server Private Key. The directories should be pointing to the directories we put the certificate and the key in but you will want to double check that.
We will also want to change the names of the files to the names of our files.
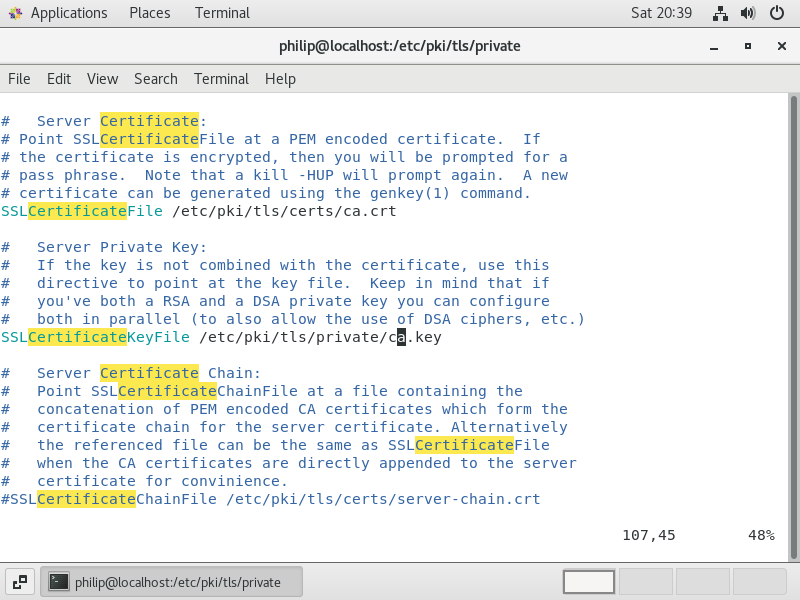
Figure 34 shows the relevant part of the ssl.file and by default, these files are localhost.key and localhost.crt and these have been changed to ca.key and ca.crt.
We need to restart the web server again and we will try to access the site with the new certicate using the URL, httpss://osztromok.com. In all likelihood, we will find that we are unable to connect to the site. This is because we have configured our site on the understanding that web traffic would come in on port 80, but https uses port 443.
Actually, the likeliest cause of the problem here is that the firewall is blocking traffic on port 443 so let’s add a rule to allow the traffic with
sudo firewall-cmd --zone=public --add-service thhps --permanent
and reload the firewall with
sudo firewall-cmd --reload
Now, if we go back to the browser and reload, we should see a warning telling us that the connection is not secure. If we click on Learn more, we will see that the security certificate is invalid and that the cause of this is a self-signed certificate.
If we trust the issuer (which is easy since we signed the certificate ourselves) we can click on Add Exception and the page should then load. However, since it is a self-signed certificate, we will not see the usual visual signs associated with a secure connection.
If we obtain a certificate signed by a trusted source, the procedure would be exactly the same, but we would then see a secure connection when we connect to the site.
One final thing we want to do is to ensure that all traffic that comes to our website comes through the secure connection. To do this, we will edit the sites config file which you may recall is in the /etc/httpd/conf.d folder and is called welcome-site.conf. So
sudo vim /etc/httpd/conf.d/welcome-site.conf
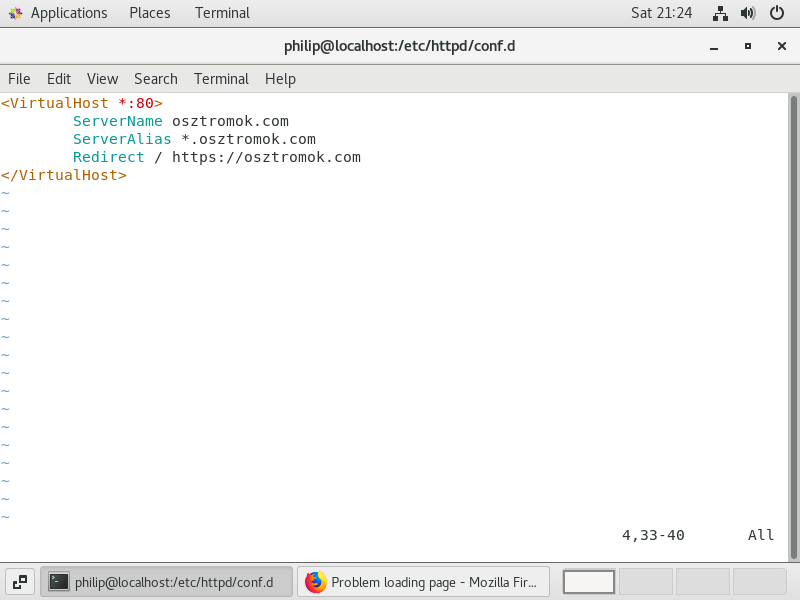
We will add a Redirect to this file as shown in figure 35 and after restarting the website again, we should see that even if we specify a URL such as http://osztromok.com, we are redirected to the secure connection (bearing in mind that if we are using a self-signed certificate, it may not look like a secure connection).
Protect a Site with a .htaccess File
Previously, we saw how our website (perhaps it would be more accurate to say the web server) can be configured in general terms via the httpd.conf file. For instance, any settings which apply to the entire site are likely to be found here.
However, we can use a .htacess file to add more specific rules targeting individual parts of our site.
Unlike the httpd.conf file, changes made to the .htaccess file do not require a restart of the web server in order to take effect. For this reason, it is quite useful in development work or for a temporary redirect on a single part of the site.
Recall that there is a directive in the httpd.conf file that prevents its settings from being overridden so this must be changed before we are able to make use of the .htaccess file. Within the httpd.conf file, we can sure for the direct we are interested in, AllowOverride. There are a number of these and the one we are interested in is the one that controls the site and it can be identified by the reference to .htaccess files.
By default, it has a value of none and there are several options available here. We won’t go into too much details for these at this stage but will simply set the value to all and then save the file. We don’t really need to restart the web server at this stage since we haven’t actually created a .htaccess file but it is as well to do this to avoid confusion later on.
In order to be able to do some testing here, it may be advisable to create a test folder and copy your site there so that you can work on it without risking damage to the site. I will do that by creating a folder within /var/www/html called test and I’ll copy the site into that folder with
sudo cp -Rv * test
In the test folder, we will amend the index.html file so that it can easily be distinguished from the main site and we can view it with
www.osztromok.com/test
Now, we will create a file inside the test folder called .htaccess. Inside the file, we will put the line
Require all denied
We don’t need to put this into a directory block to tell the server what folder we are referring to because it will operate on the folder it is found in. The Require directive specifies what conditions are required for access to the resource and so all denied simply denies all requests. If we wanted to accept all requests, we could specify this as
Require all granted
but since this is the default, we wouldn’t normally need to put in in the .htaccess file, but it can be useful in more fine-grained access control.
We can now try to access the index.html file in the test folder and we will see a permission denied message. If we then delete the .htaccess file, permissions will be restored.
If we want to create more complex access control, we do that with sets of that include other Require directives. There are three groupings
- Require all - demands that no directive within it fails and at least one succeeds.
- Require any - demands that one or more directives within it succeeds, regardless of the other.
- Require any - demands that none of the directives within it succeeds.
If the conditions for the evaluation of a block are met, the rule within it is applied.
We can place Require directives within these blocks and it succeeds if it is presented with a condition that matches it.
We can specify either an IP address or an IP address range and we can also negate a condition with not. To demonstrate this, let’s say that we want to deny access to everyone unless their IP address is in the 216 IP block.
					<RequireAny>
						Require all denied
						Require ip 216.0.0.0/8
					</Require any>
An example of the type of block we might use is shown in figure 36. Note that we have specified the IP address range with CIDR notation, but we can also specify this with a netmask.
Since this is a Require any block, at least one of the directives inside it must succeed. The first directive, Require all denied, will always succeed and deny access. The second directive will only succeed if the IP address is in the 216 IP block and will grant access, overriding the previous directive and giving us the result we want.
Let’s switch this around and assume that we want to deny access to anyone in the 216 IP block and grant it to everyone else.
					<RequireAny>
						Require all granted
						Require ip 216.0.0.0/8
					</Require any>
The block for this is shown in figure 37. Again, it is a Require any block and the first directive, Require all granted, always succeeds, granting access to everyone. The second directive succeeds for IP addresses not in the specified range, but fails for any IP address that is in the specified range (that is, for any address in the IP block 216. So in this case, we again start by granting access to everyone but then deny access to those in IP block 216, overriding the previous directive.
There is more that can be done with these directives so it is worth checking out the relevant documentation here. It is worth noting here that the blocks shown in figures 36 and 37 specify a single IP range, but we can specify more than one range or address.
For any problems with the access, such as it granting access when it shouldn’t or vice versa, you should see more information on this in error_log.
Rewrite a URL with a .htaccess File
Another useful module we can add to Apache is mod_rewrite which can take a URL request and rewrite it. This is a kind of shortcut where you might have a very long URL, but you don’t want users to have to type it all in or to give them a long link.
Let’s say, for instance, we have a file in our site where the pathway to it (inside the /var/www/html folder) is something like
/test/linux/learning/terminal/usage/docs/reference/pdfs/linuxcommands.pdf
If we gave this out as a link, this would look like
www.osztromok.com/test/linux/learning/terminal/usage/docs/reference/pdfs/linuxcommands.pdf
In the site folder, we will put a .htaccess file and we will put two directives in here. The first is RewriteEngine on. This tells the server to interpret rewrite rules and we can switch this off by changing the directive to RewriteEngine off. This can be useful for testing purposes.
The second directive is a rewrite rule and figure 38 shows the complete file.

The first part of the rewrite rule is a regular expression. The reason for this is that if we had simply put “commandlines”, the webserver would recognise this and request the file with the full path name. It would then say, I recognise “commandlines and make the same request again and so on. Apache after 10 redirects (by default) and throws an error.
In the regular expression, the caret (^) at the start means we are looking for strings with “commandlines” at the start of the string. The $ at the end means that we are looking for a string with nothing after “commandlines”. Note, we are not matching this with the filename, commandlines.pdf, we are matching it with the URL typed in by the user in order to access the file.
With the rewrite rule in place, we can then access our pdf with the URL
www.osztromok.com/commandlines
A couple of additional points about rewrite rules, they have to be unique for obvious reasons. They can also be more powerful than this simple example. For instance, we can use dynamic rewrite rules that match a number of things including user agents and host names. The online documentation for rewrite rules can be found here.