Links
In it's most basic form, a link is actually very simple. It consists of two parts, the part that points to wherever you want to go and the part that is displayed on your web page, the part that the user clicks to be taken to the website or resource that you are linking to.
To demonstrate this, I want to create a link to a web page in the MDN Web Docs called Test your skills: Links. Now, the first part I mentioned is the URL which is https://developer.mozilla.org/en-US/docs/Learn/HTML/Introduction_to_HTML/Test_your_skills:_Links. Feel free to click on that, but it won't take you anywhere, I will explain why in a second. The second part is the text and I think U will just use the title of the page, Test your skills: Links. Again, clicking on this won't do anything because the link hasn't been created yet!
In order to make some text act as a link, we need to wrap it in an anchor tag which looks like this - <a>. This is an inline tag and it uses an attribute called href to point to wherever you want to link to. This can be a different website or a different page in the current website. It can also be a different part of the current page.
Without a link, our code might look something like this.
<p>Please click on Test your skills: Links for more information.</p>
If we add in the link, the code will look something like this.
<p>Please click on <a href="https://developer.mozilla.org/en-US/docs/Learn/HTML/Introduction_to_HTML/Test_your_skills:_Links">Test your skills: Links</a> for more information.</p>
So we have the a tag with an appropriate href attribute and the text that we want to be clickable, what we might call the actual link, is between the opening and closing tags. Links can appear to be more complex than this. A relatively simple example is the navigation bar at the top of this page that allows you to jump to any section or any page within the site. In this case, the complexity (such as it is) is derived from the drop down menus themselves. Each item on each menu list has a link that is no more complex than the one we just looked at.
A final point to make here is that it is probably reasonable to say that we are all now pretty much conditioned to accept that links exist on web pages (and elsewhere such as in web documents) and certain things just look clickable. That's why I expect that some people will be surprised that when they see the URL shown above is not clickable. You can, of course, copy and paste it into a browser window and that would work.
If you are used to working with products like Word, you may have added links to your document and you may know that if you copy a URL such as https://developer.mozilla.org/en-US/docs/Learn/HTML/Introduction_to_HTML/Test_your_skills:_Links into a document, it is then clickable. This is because Word recognises it as a link and automatically adds the href attribute to that text. You can right click on a link and choose Edit Hyperlink and you will see something like this.
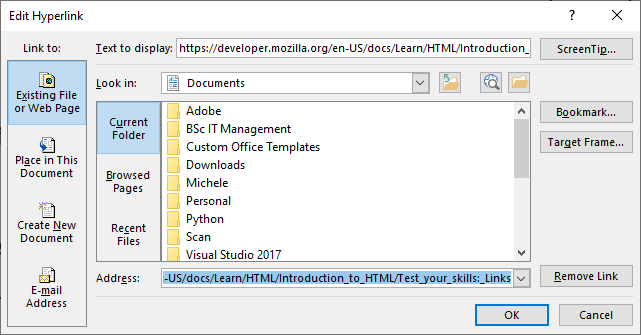
At the top of the Edit Hyperlink, there is a box labelled Text to Display and this is the text that will be shown in your Word document that a user can click. At the bottom is the address and that is the href attribute.
If you are hand coding your website, or even if you are using an editor such as Dreamweaver (as I am), this automatic link conversion doesn't happen and you need to add the <a> tag yourself and also add the href attribute. Be aware that because these are two separate things, the text you see is NOT the address you are linking to. For example, if you click on this link - www.amazon.co.uk, it will open up Google. This is because the text provides one address but the href is a different address so be aware of that. It is the href attribute that determines where a link will take you.
Another point worth mentioning is that most of us are conditioned to accept that https://www.google.co.uk/ or www.google.co.uk or even just google.co.uk are the same thing. If you type any of these into a browser address bar, the effect will be the same and you will open up the home page for Google UK. However, this is because the browser is taking what you type in there and working out what the correct address is for whatever you have typed. If you are creating a link, the chances are that only the first of these, https://www.google.co.uk/, is going to do what you want it to. For example, if you type your href attribute as google or google.co.uk, the browser is going to look for a page that matches it on the current site. That is, it will look in the folder on your web server to see if it can find the page you want to link to.
This is because an address such as https://www.google.co.uk/ is absolute. Wherever you are on the web, this address will take you to the correct address for Google. When you type google.co.uk into a browser window, the browser is converting this to the absolute address and that's why it is able to find the page you want. But this is not an absolute address, it is actually what we would call a relative address. A relative address is based on a known starting point.
I wanted to mention something else about complexity with links and it is worth bringing that up now because it is something that uses relative links. You may notice that there are some buttons at the bottom of this page. One will take you to the previous chapter, the other will take you to the next chapter so you can use these to navigate through the various chapters on HTML Essential Training.
A button is more complex than a link. If we take one of these buttons as an example, if it were not a link, the code might look something like this.
	<button class="previous">
		Previous Chapter - Understanding the Power of HTML
	</button>
This would make a dull button, clicking on it doesn't do anything. To make it do something when the user clicks, we need to add something that is possibly a little advanced for this stage of the training. I'm not sure if it is covered in the course, but it may come under the chapter on
Forms and Interactive Elements. If I add an onclick event to link to the appropriate chapter, the code will look like this.
	<button class="previous" onclick="window.location.href='power.html';">
		Previous Chapter - Understanding the Power of HTML
	</button>
So that doesn't really look like a link because we are not using the <a> tag. Instead, we are using a property of the window to attach a href to it, the window in this case being the button and so it acts like a link.
Another thing that looks different is the value of the href attribute which is power.html. On my web server, in the folder where the files for this website are stored, I have a folder called webdevelopment and this contains all the pages on the site relating to web development. Within that folder, I have a folder called htmlessentualtraining and inside that folder, there are HTML documents for the various chapters. The previous chapter is called the power of HTML and the HTML file has the name power.html. When you click the link, because there is no information on where to find this page, the web browser will assume that it is in the same directory as the page you are currently on and will therefore look in that directory for a page called power.html. When it finds it, it loads it up.
So this is a relative path in that it only works because there is a known starting point so we are just telling the browser to look in the current folder for the page. The absolute address for this is
http://osztromok.com/webdevelopment/htmlessentialtraining/power.html
Notice that the URL includes those directory names.
An absolute address will work from anywhere, including anywhere where we use a relative address so we could use that as the href attribute. In general, when you have a choice, it is probably best to use the relative address since it allows the web server to access the page more directly. We will also cover these absolute and relative paths when we look at URL Paths next.
URL Paths
Relative paths actual offer a huge advantage over absolute paths in addition to what we saw in the previous section. For example, my website was originally hosted by wedos in the Czech Republic with the domain name osztromok.eu. If all of the navigation links in my site were using absolute addresses, when I moved my site over to osztromok.com, I would have needed to update each link from osztromok.eu to osztromok.com. The reality is that you will not find the domain name in any of the links on this site. Internally, the site uses relative links. This means that I can move my site over to another domain name without making any changes to the links.
Something else that is worth mentioning here is that other moves can happen within the web site. As an example, under the 'Others' menu, I have a link to a photographic diary. AT some point in the future, I may decide that I have enough pages devoted to photography to make it worth my while to create a new section for them.
From the point of view of the site, this would mean moving the file (or directory, if I have a separate directory just for that page) out of the 'Others' directory and into a new directory. I would probably call that directory photography. Not very imaginative, perhaps, but there is a time and a place for being creative and naming the files and directories on your website is neither!
I would need to edit the 'Others' page to remove the link to the photographic diary and any links to the file would have to be updated. I don't know if Dreamweaver would automatically update the links if I used it to move the folder. If it did, that would be hugely helpful. Regardless, the point is that these links need to be updated somehow and that would apply whether they were absolute or relative links. However, any links within the page or to other pages that form part of some grouping would still be the same.
If you consider this page, the benefits are more obvious because I have a directory for the HTML Essential Training course and within that directory, I have a separate page for each chapter. As well as the usual links pointing to the HTML Essential Training page, I have internal links so links from the landing page to individual chapters and links between the pages (that is, the buttons at the bottom that allow you to move to the previous or next chapter. These are all absolute links so if I moved the page to a different directory, these links would still all work.
Another point on this is that all the files for our website would most likely be stored locally when they are being developed and uploaded to the website when they are ready. It is normal to test these on your local machine before you do upload them to the server. For example, this page is being written on a PC. When it is ready to go live, I will upload it to the server, which is, as I mentioned, a Raspberry Pi 4.
I wouldn't be able to test the links if I used absolute URLs because these would be linking to pages on the server that haven't been uploaded yet. With relative URLs, these should work just fine on the development machine (assuming they are correct, of course which is part of the testing). If they do work on the local machine, they will work on the web server because the directory structure and the relative locations of the various files are the same on both machines so the relative paths are also the same.
Another point worth remembering when it comes to both relative and absolute URLs is that they are not just used with links. We can use a path to find other types of resource, including
	•		Image Files
	•		Video Files
	•		Audio Files
	•		CSS Files
	•		JavaScript Files
	•		and so on....
So, basically files! To give an example of this, if I have a page that uses a lot of files, I probably want to have the file that contains the HTML code in a particular folder and inside that folder, I will have another folder containing the images, usually I will call this images. I don't have any audio or video files on the site but if I did, these would similarly go into folders called video or audio and they would be in the same folder as the page that they are going to be used in.
To add the image to my page, I will use an <img> tag with a src attribute that has a value like "images/image1.jpg". So, this is a relative path which tells the browser to look for a folder called images in the same directory as the current page and load the image called image1.jpg from that directory. That's nice and simple and I can move the folder around or move the whole site to a new location (for instance, when I copy the files to the web server) and the links will just work.
With CSS and JavaScript, it's a little bit more complicated because I may want the CSS to apply to more than one file. This might be a little clearer if we look at the output I get from running the tree command on the directory that contains the files for my website on the web server (I have edited this a bit so that it isn't too large but still shows the structure).
					.
			├── android
			│   ├── AboutPageAssets
			│   │   └── styles
			│   │       └── aboutPageStyle.css
			│   ├── AndroidDevelopmentEssentialTraining-CreateYourFirstApp.html
			│   ├── android.html
			│   ├── AndroidStudioEssentialTraining.html
			│   ├── ASEssentialTraining
			│   │   ├── figure10.png
			│   │   ├── figure9.png
			│   │   └── Git-Logo-2Color.png
			│   ├── FirstAppImages
			│   │   ├── figure5.png
			│   │   ├── figure7.png
			│   │   └── monster01.png
			│   ├── images.html
			│   ├── javaFX_Diary.html
			│   ├── KotlinEssentialTraining.html
			│   ├── Kotlin Images
			│   │   ├── cover.gif
			│   │   ├── figure10.png
			│   │   ├── figure1.png
			│   └── styles
			│       └── style.css
			├── index.html
			├── linux
			│   ├── AboutPageAssets
			│   │   └── styles
			│   │       └── aboutPageStyle.css
			│   ├── commandline
			│   │   ├── images
			│   │   │   ├── appendixAimage1.png
			│   │   │   ├── appendixAimage2.png
			│   │   │   ├── appendixAimage3.png
			│   │   │   ├── appendixAimage4.png
			│   │   │   ├── figure10.png
			│   │   └── LearningLinuxCommandLine.html
			│   ├── compile_the_kernel.html
			│   ├── diary
			│   │   ├── images
			│   │   │   ├── Linux_Diary_html_42d462de.png
			│   │   │   ├── Linux_Diary_html_5549e10b.png
			│   │   └── LinuxDiary.html
			│   ├── downloads.html
			│   ├── filesandpermissions
			│   │   ├── images
			│   │   │   ├── figure11.png
			│   │   │   ├── figure12.png
			│   │   └── LinuxFilesandPermissions.html
			│   ├── linux.html
			│   ├── LINUX Links.html
			│   ├── LinuxWebServices
			│   │   ├── images
			│   │   │   ├── figure10.png
			│   │   │   ├── figure11.png
			│   │   │   ├── figure1.png
			│   │   └── LinuxWebServices.html
			│   ├── overview
			│   │   ├── images
			│   │   │   ├── figure10.png
			│   │   │   ├── figure1.png
			│   │   └── LinuxOverviewandInstallation.html
			│   ├── packages.html
			│   ├── scripting
			│   │   ├── images
			│   │   │   ├── figure10.png
			│   │   │   ├── figure12.png
			│   │   └── LearningBashScripting.html
			│   └── styles
			│       └── style.css
			├── others
			│   ├── AboutPageAssets
			│   │   └── styles
			│   │       └── aboutPageStyle.css
			│   ├── diary.html
			│   ├── others.html
			│   ├── photos
			│   │   ├── photo1.JPG
			│   └── styles
			│       └── style.css
			├── programming
			│   ├── perl5
			│   │   ├── images
			│   │   │   ├── image10.png
			│   │   │   ├── image1.png
			│   │   └── perl5.html
			│   ├── programming.html
			│   ├── pythonDiary.html
			│   ├── ruby.html
			│   └── styles
			│       └── style.css
			├── raspberrypi
			│   ├── AboutPageAssets
			│   │   └── styles
			│   │       └── aboutPageStyle.css
			│   ├── raspberrypi.html
			│   ├── styles
			│   │   └── style.css
			│   └── web_server.html
			├── styles
			│   ├── homepagestyles.css
			│   ├── homestyles.css
			│   ├── navigation_styles.css
			│   └── style.css
			└── webdevelopment
				├── htmlessentialtraining
				│   ├── formattingtext.html
				│   ├── htmlessentialtraining.html
				│   ├── images
				│   │   ├── accessibility_tree_1.png
				│   │   ├── accessibility_tree_2.png
				│   │   └── image1.png
				│   └── power.html
				├── learningreactjs
				│   ├── components.html
				│   ├── elements.html
				│   ├── enhancements.html
				│   ├── gettingstarted.html
				│   ├── hooks.html
				│   ├── images
				│   │   ├── 5176.jpg
				│   │   ├── image10.png
				│   │   ├── image11.png
				│   ├── learningreactjs.html
				│   └── nextsteps.html
				├── styles
				│   └── style.css
				└── webdevelopment.html
You might notice that there are several places where I am storing CSS files. At the highest level, we have a directory called styles where I put any style sheets that are going to apply to the while site. For example, the CSS file used to create the drop down menus is here. If we go into the webdevelopment folder, there is another directory called styles, and this contains any style sheets that only apply to pages related to web development. For instance, I might want the background colour for the web pages to be different in order to make those pages stand out from the rest of the site so I would put the CSS for that in this folder. That's really all I have for style sheets (although I do have similar folders in other directories at the same level as webdevelopment, ie the programming directory, linux directory and so on.
This makes it easier to style each part of the website differently and it makes it easier to see which style sheets apply to which pages.
If you look at the code for this page, you will see that there are four links to stylesheets as follows:
	<link href="../../styles/style.css" rel="stylesheet" type="text/css">
	<link href="../../styles/navigation_styles.css" rel="stylesheet" type="text/css">
	<link href="../styles/homestyles.css" rel="stylesheet" type="text/css">
	<link href="../styles/styles.css" rel="stylesheet" type="text/css">
Again, these are relative paths. The ../ means that the browser should go up a level in order to find the folder indicated. So, to access the style sheets for the whole web site, it is going to go up two levels (../../) and then look for a folder called styles. For the styles that I only want to apply to pages in the web development directory, it only has to go up one level in order to find the appropriate styles folder. The advantage of this is that I can use these links on almost any page on my site. For example, if I copied these links to a page in the perl5 folder which is in the programming folder, they would still work just as well. However, the browser would now be looking for styles in the styles folder found inside the programming folder.
I mentioned earlier that in a path, you can use .. to go to the next directory up. For example, a file in the htmlesseential training folder needs to access the stylesheet for pages in the web development folder. So, inside that web development folder we have several sub-folders including styles and htmlessential training. To access the stylessheet, we need to access the styles folder. For a page inside the htmlessentialtraining folder, this is going to mean going back up to the webdevelopment folder and accessing the styles folder from there. Let's assume that we want to access the file called styles.css. The path for this is going to be
../styles/styles.css
This is addressing the file by providing it's path relative to the current page. There is another option, and that is to provide the whole path, which is a little bit like using an absolute path, but it is the absolute path to the file inside the folder that contains the website so it is still a relative path, in fact. It is relative to the root directory of the site. That root directory is represented by a / and inside that directory we have the webdevelopment folder which contains the styles folder which contains the styles.css file we want to access. Using this method, the path is
/webdevelopment/styles/styles.css
This is probably the best option for navigation within a website for two reasons. Firstly, it removes the need to work out where the path is relative to the current file. Secondly, and probably most importantly, since the path is relative to the whole site, any page within the site that needs to access the file can do that using the same path. To illustrate this, let's say that we want the webdevelopment.html file to access the same stylesheet. This file is inside the webdevelopment folder, but it isn't inside a subfolder so in order to access the styles folder, it doesn't have to go up a level. This means that using the first of these methods, the path will be
styles/styles.css
Using the second method, the path will be
/webdevelopment/styles/styles.css
So, this second method of locating the file can be copied from a file in the htmlessentialtraining folder to the webdevelopment.html file without needing to be changed. Obviously, the benefits of that are going to be greater if you have a more complicated directory structure, especially one with more levels.
One other character which you can use in a path is the single dot and this represents the current directory. To my knowledge, this is not used very often these days since the browser is usually smart enough to know when you are referring to the current directory, but it may be useful to know about it and there may be times when you do need to use it.
To give an example of this, if we want to access the stlyes.css file from the webdevelopment folder, we could use the path
./styles/styles.css
This is essentially the same as
styles/styles.css
The only advantage I can see is that using the single dot makes it more explicit in that there is no assumption that we are looking in the current directory because we are telling the browser to do that. Since it would do that anyway, I'm not sure if there is any real reason to use it. It may also be worth noting that this becomes irrelevant anyway if you use paths relative to the site's root.
Navigation
I mentioned before that navigation menus can be quite complex, but the links within those menus are just straightforward links. Nevertheless, there are some good reasons for treating this type of link differently.
Firstly, we can add links anywhere within a page, but the navigation links are a special case. They normally appear on every page in a given site and are used to navigate around the site so it makes sense to treat them as a special group of link. One way to do this is to wrap all of the navigation links up in a <nav> element. Putting them together in this way is good, semantically, but it is also good for a slightly more prosaic reason! It just makes it easier for users to navigate around the site if your navigation links are in the same place and easy to find. Also, if they are in the same place on the different pages of the site, again that makes it easier for your site.
On this site, for example, the navigation links are enclosed in a <nav> tag and I copy these over to each page so that gives the whole site some consistency with the links. The <tag> provides some semantic context. It allows a screen reader, for example, to recognise which links are part of the navigation. We can also add an attribute, role="navigation" to the <nav> element. This is an aria role which marks the main navigation on the page and it adds a level of importance that we might usually convey visually in the positioning and designing of the main navigation links. In addition, an aria-label attribute of "main tag" would allow a screenreader to read this aloud so a visually impaired user will know what the links are.