Install Virtual Guest Box Additions on Linux
Guest Additions are pieces of software installed in the Guest OS that allow it to communicate with Virtual Box better so this will, for instance, allow us to see our CentOS installation in proper full screen mode rather than as a square in the middle of the screen which is what we have seen in full screen mode up to this point.
As with updates, we need an internet connection and administrator privileges (as we will for any software updates or installations) and again, we will do this from a terminal with the command:
$sudo yum groupinstall “Development Tools”
This installs, amongst other things, a C compiler and source code so that you can compile kernel drivers. When the installation is finished, if you bring your mouse down to the bottom of the screen (you must be in full screen mode for this), you should see a popup VirtualBox menu and from this, you should select Devices and then Insert Guest Addition CD (this is a virtual CD of course) and it should execute the CDs autorun program so click on Run when prompted and enter your password again when requested.
When done, we can eject the virtual CD by mousing over the desktop image, right-clicking and selecting Eject.
Configure Basic Settings
We can configure settings by clicking Applications, System Tools and Settings. From here, we can changes settings relating to a variety of things including Region & Language, Sounds, Network, Privacy and so on. Some notable settings are:
• Automatic Screen Lock under Privacy. We can set this to on or off and set the amount of time before the screen locks. • Connect automatically under network. To access this, we need to select Network in the left-hand pane and then click on the gear icon associated with the wired connection. Setting this means that we don’t have to turn the network on every time the machine is restarted. • Under Devices in the left-hand pane (it may be necessary to scroll the pane to see this) we have keyboard and from here we can access the keyboard shortcuts. It may be worthwhile to spend some time examining these. • Under Details (which is below Devices in the left-hand pane) is the device name (or host name) which defaults to localhost.localdomain but can be changed to something more meaningful such as CentOS7.DVD.
Customize GNOME 3 Desktop
We can also use the GNOME Tweaks tool which is found under Applications > Accessories . This has a number of options for customising the desktop and can be used to set the them, startup applications and so on.
Explore GMOME 3 Desktop
In Linux, a desktop is just another set of running programs. This makes it easy to switch between desktop or environments or GIUs quite easily.
By default, the GNOME 3 desktop does not have an applications menu but as we have seen in CentOS, the desktop has been customised to include this with applications sorted by category.
We also have a places menu which provides shortcuts to various folders and drives on the system.
In the top right, next to the clock, is a systems menu and this provides a shortcut to the Settings which we had previously accessed via the Applications menu as well as buttons to lock the screen or power down the machine.
At the bottom of the screen we have a task bar, a notifications panel and a desktop workspace switcher.
If no applications are open, the taskbar will be empty and the notification panel is also only visible when there are notifications available. When this happens, we should see a blue circle in the bottom right with a number representing the number of notifications. If we click on this, we will have access to the notifications as well as a shortcut to settings from where we can turn notifications on or off.
GNOME3 Overview Mode
To enter GNOME3 overview mode, press the Windows key. Note that you must be in full screen mode for this to work. In overview mode, we have the following:
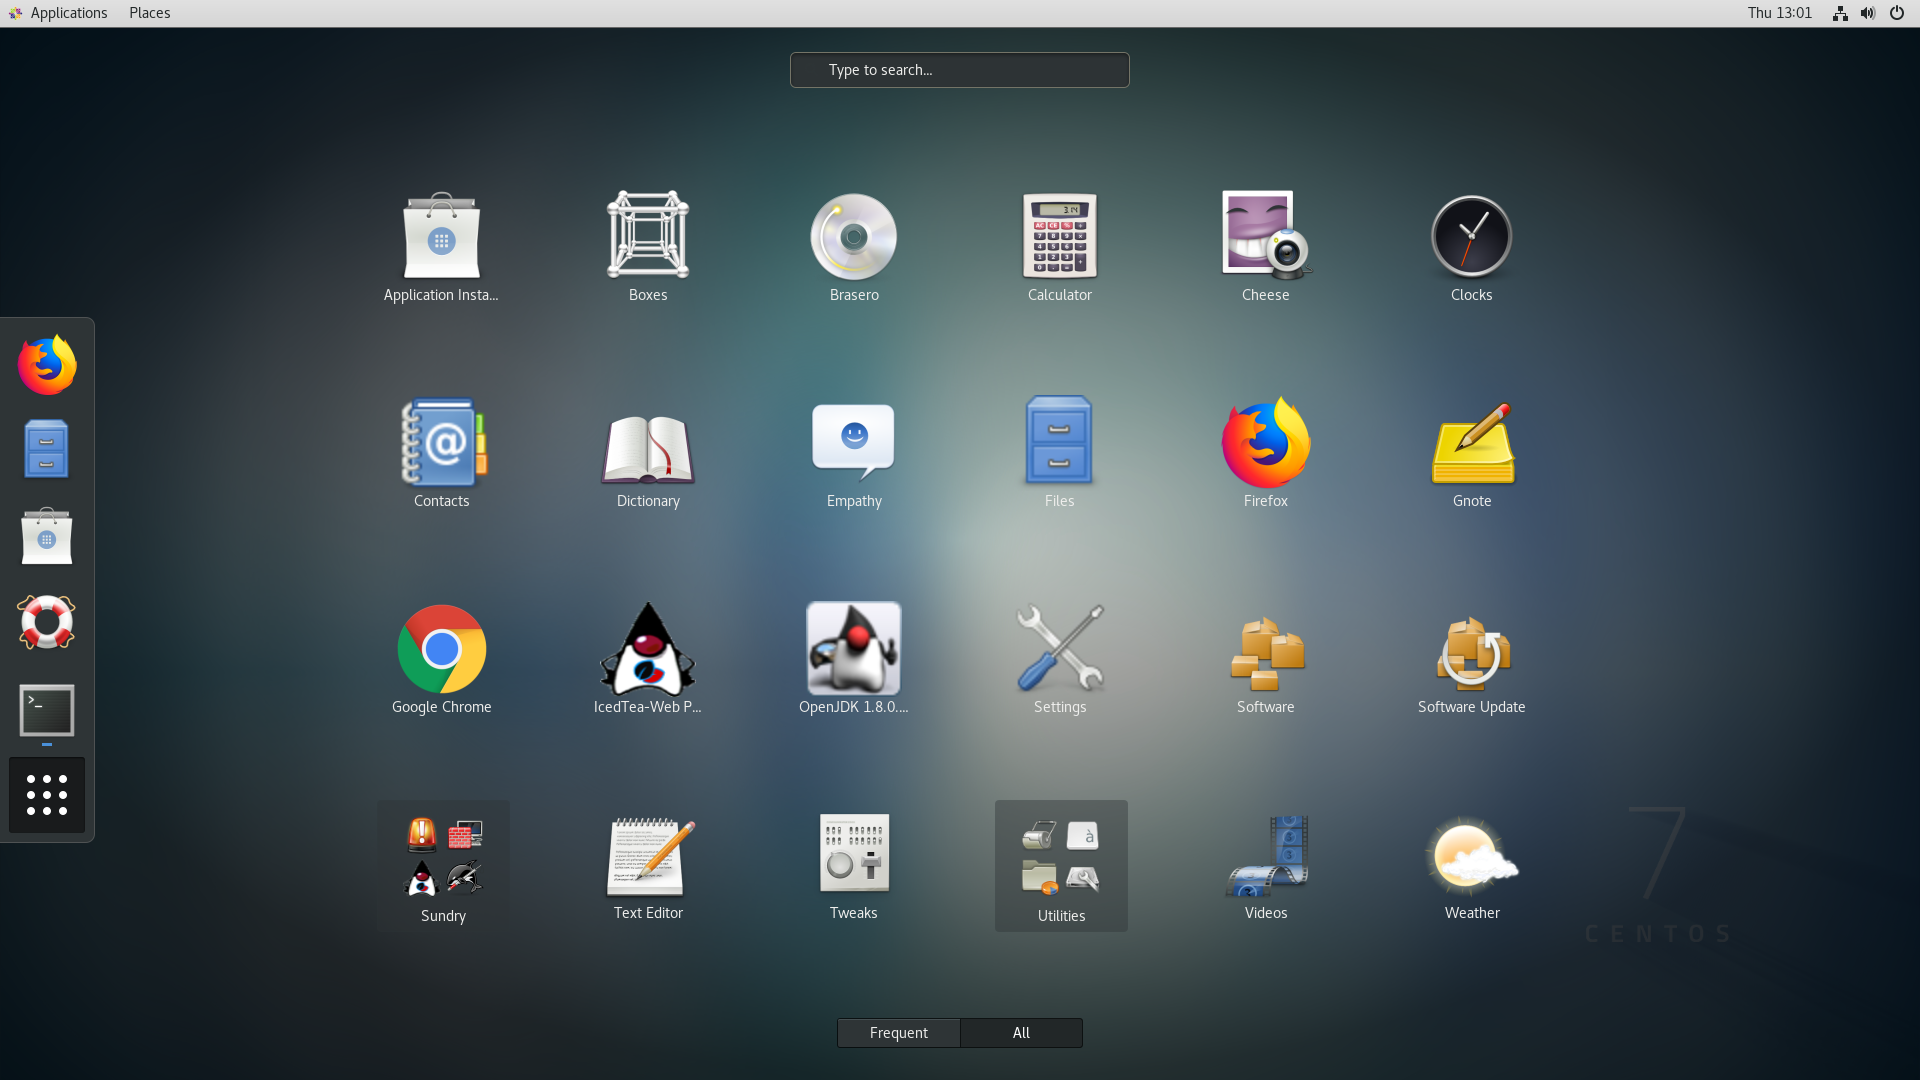
• On the left hand side is a bar with quick launch icons for some applications, actually the applications that are in the Favourites menu on the Applications menu. • In addition to favourites, the bar on the left has an icon to access all applications. If we click on this, the screen displays icons for all available applications although they can be filtered to show only frequently used applications. In fact, the default is to display frequently used applications but you can click on all at the bottom to display all (see figure 10). To go back to the overview mode we can click the icon again. • If we want to add an icon to the taskbar on the left, we can right-click it in the display shown in figure 10 and select Add to Favourites or drag it onto the bar. We can also remove icons from the bar and select Remove from Favourites to remove them from here (and of course it will remove them from the favourites menu).
• At the top of the screen, we also have a search bar so we can search for an application from there (bear in mind that the GNOME 3 desktop does not have an applications menu by default so this option may be very useful if you are using some other RedHat based distro). • On the right-hand side we have snapshots of all of the available desktops and these are updated in real-time so, for example, if a video is playing on one of them, we will see it playing away in the snapshot. With the snapshots, we can also drag and drop applications between the desktops. • If we right-click on an icon (this can be in the bar on the left, from one of the sub-menus of the Applications menu or on the screen shown above), we can select Show Details. This provides some details on the app including, in some cases, the website from which it was installed.
For more information on GNOME, you can select Help from the Favourites menu (or the bar in Overview mode) and then click on Getting Started with Gnome. From here, you can access various tutorials and videos to help you familiarise yourself with the environment.