How to Upgrade the Linux Kernel on CentOS 7
For this, I am following the process found on the How to Forge website.
STEP 1
The first step is to update and upgrade CentOS 7 with
$sudo yum -y update
The y option has the effect of automatically answering yes to any question the user might be asked such as “Do you want to continue?”.
Next, we will install (if it is not already installed) yum-plugin-fastestmirror with
$sudo yum -y install yum-plugin-fastestmirror
In my case, it is already installed so the command has no effect.
STEP 2
The second step is to check the existing kernel version which we can do with
$uname -snr
Of course, we had already done this in an earlier lesson although we are using different options with uname but the result is the same – the command confirms that we are using version 3.10.0 of the kernel.
STEP 3
The next step is to add a repository, the ELRepo repository and we will start this process by adding the ELRepo gpg key to the system. Note that gpg stands for GNU Private Guard and more information can be found here.
The command to do this is
rpm --import https://www.elrepo.org/RPM-GPG-KEY-elrepo.org
We can now add the ELRepo repository with the command
$rpm -Uvh https://www.elrepo.org/elrepo-release-7.0-3.e17.elrepo.noarch.rpm
Before we move on to step 4, we will list our repositories just to make sure elrepo is there and we do that with
$yum repolist
I can see that ELRepo is listed and it looks the same as that listed on the tutorial website I am following so I am satisfied that this step was successful.
Step 4
In this step, we are going to install the latest kernel version which is 5.3.10, the latest version on kernel.org (kernel.org is the Linux Kernel Archives and can be found here and it also displays the version number of the latest stable kernel quite prominently).
The command to do this is
$sudo yum --enablerepo=repo-kernel install kernel-ml
The --enablerepo option is used to enable a specific repository in CentOS. The elrepo repository is enabled by default, but the elrepo-kernel repository is not.
We listed repositories in step 3 but this only listed enabled repositories. We will list them again, but this time we will list all of them whether enabled or not.
$yum repolist all
Actually, it looks as though elrepo-kernel is disabled so I guess that the option used in this way only enables it for the purpose of running the command and then disables it again.
Step 5
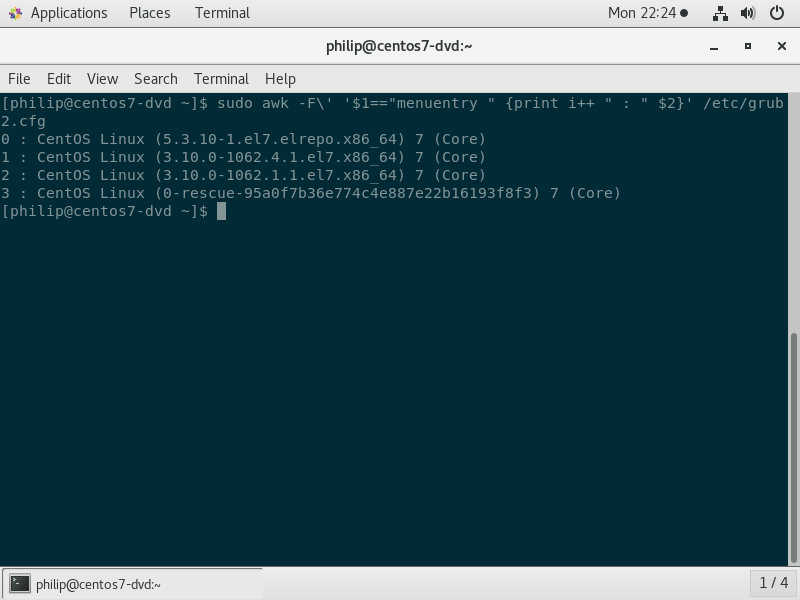
At this stage, we have already installed the new kernel but we need to configure Grub to load it when the system starts up. We can see what versions of the kernel are available in Grub with
$sudo awl -F\ ‘ ‘$1==”menuentry” {print i++ “:“ $2}’ /etc.grub2.cfg
From this, I can see that we have several versions of 3.10.0 available with minor differences and we also have 5.3.10 available.
We can also see that each version of the kernel has an ordinal number with 0 being at the top and in this case, it runs to 4 at the bottom and these are the order in which these appear on the screen when booting up.
We want our upgrade kernel to be the default option so that we don’t have to select it every time the system starts and we can do that with
$sudo grub2-set-default 0
If we need to return to the previous kernel version, we can obviously select it when the system starts up or we can set it to the default value with the same command but with a default of 1.
Next, we need to generate the grub2 config file with
$sudo grub2-mkconfig -o /boot/grub2/grub.cfg
and we can restart the system from the command line with
$sudo reboot
Once the system has rebooted, we can run uname again and see that we now have version 5.3.1.
Step 6
The final step is optional and this is to remove the old kernel which you may want to do if you are short of disk space.
To start with, we need to install yum-utils from the repository with
$yum install yum-utils
Again, this did nothing on my system because I already had the package installed. The final step is to run the package-cleanup command. This will actually not remove all the old kernels, but if you have more than three, it will get rid of all of them except the three most up to date versions.
To demonstrate this, let’s take a quick look at our kernel versions again. The results are shown in figure 14.

The package-cleanup command is
$package-cleanup --oldkernels
and we can run this command and check the outcome. Note that if you only have 3 or fewer kernels, you will see a message stating that there are no old kernels to remove (although you can actually set an option with package-cleanup to change the number of versions it keeps). Otherwise you will see a confirmation of the kernel to be removed as it executes and a summary showing which version or versions were removed when the command is completed.
Now, we can check the kernel versions for a last time and we see the results shown in figure 15.
Comparing figures 14 and 15, we can see that one old kernel has been removed leaving us with three versions as well as the rescue disk.
For more information on this see
	•    https://elrepo.org/
	•    https://wiki.centos.org/HowTos/Grub2