What is CSS
There are three ways in which CSS can be applied to your HTML.
The simplest is probably inline which works by applying a style attribute to the HTML element. For instance, let's say you want to change the font size of an <h1> element to 24 pixels. We would do it like this.
<h1 style="font-size: 24px;"">Some text</h1>
This is also the least flexible method because it only applies to that specific HTML element.
The next method is to add a block of CSS directly into the HTML document. This is known as a style block.
	/*
			h1 {
				font-size: 24px;
			}
	*/
This is a better option than inline because we can apply the styles to the whole sheet if we need to. However, it is limited by the fact that the CSS is specific to that page so if we want to apply this to multiple HTML documents, we have to copy the code block into each of them.
The most flexible, probably also the most common way to apply CSS is via an external stylesheet. We can add whatever CSS rules we need to that stylesheet and then link it to as many HTML documents as required using a <link> tag. A <link> tag has two required attributes and these are src and rel. The src attribute provides the location of the stylesheet and the rel attribute specifies what type of file we are linking to, in this case a CSS stylesheet. To give an example of this, I have several stylesheets linked to this page and one of these is
<link href="/webdevelopment/styles/styles.css" rel="stylesheet" type="text/css">
These links go in the head of the HTML document. You may notice that there is a third attribute and that is type. This was required for older browsers so you won't always see it nowadays since modern browsers don't require it. It doesn't do any harm to include it when it is not required so you can leave it in or remove it without any likely consequences.
There is no reason why you can't apply CSS using all three methods (or any combination) on the same page, but there is a good chance that this will lead to conflicts. For example, you might style a <h1> element in an external stylesheet and again using an inline CSS rule with different values. For example, the stylesheet might specify as font size of 18 pixels and the inline rule might specify 24 pixels. In these situations, the most specific rule will apply. As an example, let's say the page has 12 <h1> element and we apply the inline CSS to the first of these. This will give it a font size of 24 pixels, but the other 11 <h1> elements will have a font size of 18 pixels.
In essence, what this does is to create a global rule with the external stylesheet which the inline rule overrides for one specific <h1> element.
My personal preference is to use external stylesheets only. There are other ways to target specific HTML elements (generally by using a class if you want to target multiple instances of the element or an id for a specific instance of the element.
The approach I have taken in this website is to have a folder called styles in the root directory and I put one or more stylesheets in there that are going to apply to every page on the site. For example, there is a stylesheet there specifically for styling the navigation menu which incorporate the CSS rules required to create the drop down menus. Each of the other folders in the directory root such as the webdevelopment folder (which contains all of my pages relating to web development including this one) contains another styles folder and I use this to contain stylesheets for that group of pages. For example, I like to have one colour scheme for the web development pages, another for the Linux pages and so on so this folder contains the CSS rules for that group of pages.
Default Browser Styles
You should remember that even without any CSS, you would still see some basic styling. Consider this example.
	<html>
		<head>
			<title>Default Browser Styles</title>
			<style>
			/* Put your styles here, between the style tags. */
			</style>
		</head>
		<header class="header">
			<h1>This is an h1 element</h1>
			<p>This is a paragraph in the header</p>
		</header>
		<section class="content">
			<h2>This is an h2 element</h2>
			<p>Learning CSS is fun! You can make the web a prettier place.</p>
		</section>
		<footer class="footer">
			<p>You could put a copyright here.</p>
		</footer>
	</html>
This is a very basic HTML page with some paragraphs, one <h1> element and one <h2> element. There is no CSS attached to it, so if I open this up in Firefox, I will see something like this.
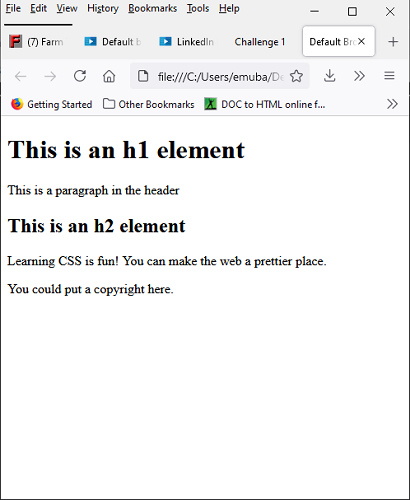
So, not particularly interesting or pretty, but note that the <h1< element has a larger font-size than the <h2> element and both are larger than the <p> elements. In addition, both are bold whereas the <p> elements are not. These are the default browser styles, the browser has identified the fact that the <h1> element is the most important heading and that the <h2> heading is less important, but more important than those <p> elements.
However, you will very rarely, if ever, want to use these default styles. Applying your own styles gives you much more control over the look of your site. This is especially true when you consider that different browsers may have different default styles.
Now, let's add some styles into the style tag for this page.
	<style>
		h1 {
			font-size: 36px;
			color: darkblue;
		}

		h2 {
			font-size: 24px;
			color: blue;
		}

		p {
		color: darkblue;
		}
	</style>
If we reload the page with these changes, it now looks like this.
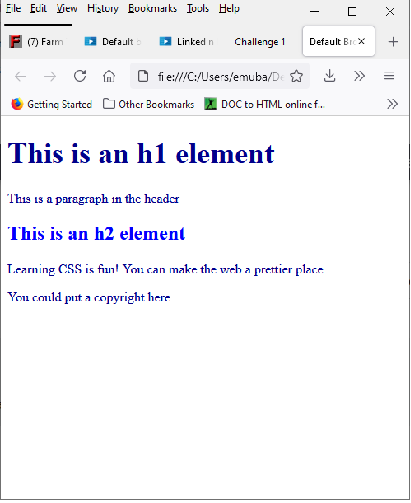
This isn't really much of an improvement, perhaps not an improvement at all! But it does serve to demonstrate that my own styles have over-ridden those imposed by the browser.
In general, you won't see any problems with your own styles being applied, but there is potential for there to be a conflict. For this reason, developers will often use a CSS Reset since this effectively removes the browser default styling and allows you to style the page precisely as you want it.
Another important consideration with styles is that users can override your styles. For example, they can change the font-size or the colour contrast and this will often be because they have special requirements to make the content more accessible.
CSS Syntax
CSS syntax is pretty straightforward. You have the selector which will identify the element you want to apply the style to and this is followed by a declaration block enclosed in curly braces and containing one or more declarations or CSS rules.
Each rule is made up of two parts, the property and the value. We saw some examples of this in the previous section such as
	h1 {
		font-size: 36px;
		color: darkblue;
	}
In this example, the selector is h1 so this rule will target any <h1> element that the CSS applies to. That is, if we use a CSS style block, that means any <h1> element where the HTML document includes that block. If we use an external stylesheet, this means any <h1> element where the page links to the stylesheet with that rule.
Inside the declaration block, we have two rules. The first has a property of font-size and a value of 36px - notice that each rule is terminated by a semi-colon. The second has a property of color and a value of darkblue. We can add as many rules as are required within the declaration block provided each rule is terminated with a semi-colon.
We can also apply a declaration block to as many selectors as we like provided these are separated by a comma. For instance, let's say that we want our <h1> and <h2> elements to look exactly the same. We could do that by replacing the <h2> elements with <h1> elements. This would have the desired effect, but we would lose something in the semantics since the browser will consider all of these elements to carry the same importance.
A better way is to simply apply the same styling to both types of element like this.
	h1, h2 {
		font-size: 36px;
		color: darkblue;
	}
As a side note, when I started creating these pages, I was really just starting to learn about HTML although I did some courses at University, so I didn't really appreciate the importance of the semantic information conveyed by different elements. As a result, I decide that the main headings and the section headings would both use <h1> tags. This is the reverse of the example I just mentioned because I actually wanted the section headings to look different from the main heading. To style, I gave these headings a class attribute with a value that reflected the type of the heading. Now that I have learned a little more, I realize that this is absolutely not the way to do things, but it does illustrate some important points, I think. The first is that class can be used as a selector (more about this in the next section). The second is that using a class as the selector is really helpful if you want to fix this. I can locate the headings in my HTML code and simply change the tag from <h1> to <h2>. Provided the class remains the same, this will have no effect on the styling. It also means that if I start to fix these and I miss one or leave some to fix later, again this will not have any effect on the styling so it won't change the way the page looks.
You can add comments to your CSS and these are started with /* and terminated with */.
There are other syntax rules in CSS including
I'm not sure if these will be covered later in this course or in the CSS Essential Training course. If not, it may be worth looking these up so I have added links to the Mozilla docs for the first three items in the list and a link for the fourth, which is a more general subject, to a tutorial on inline CSS style on the tutorialmines.net site. However, in almost all cases, the simple rules outline above will be sufficient to allow you to use CSS effectively.
Basic Selector Types
Selectors are used to target HTML elements and we have seen these already where we used a p as a selector to target all <p> elements, for example. This is referred to as the element selector. I also discussed the use of class to target elements and this is referred to as the class selector. Along with the id selector and the descendant selector, these are the four most common types of selector used in CSS.
The element selector is a global selector, by which I mean that if you use a p selector to target <p> elements, this is going to target all <p> elements in the page. It is worth remembering that because they are global and therefore have a very broad scope, element selectors are often used for very general styling. As an example, let's say we use a p selector to set fint-size like this.
p { font-size: 14px; }
It is normal where a web page contains a lot of text, that the main text is going to be contained inside <p> elements so this is going to set the font size for pretty much all of the text in the page. As an example, the text on this page is all in <p> elements with the exeption of the headings, the titles at the top, the text in the buttons at the bottom and the code examples. I actually noticed when creating this page that the text didn't look very good. It was using a serif font that was difficult to read with the yellow background. I mentioned earlier that I had a CSS stylesheet specifically for my Web Development pages and I added a rule to that with the p selector to change the font to sans-serif. If you look at my other Web Development pages, you will see that they are also using this same sans-serif font, but if you look at a page such as one of the Linux pages (an example is the Linux Web Services page (clicking the link here will open the page in a new tab), the serif font actually works quite well on the antique white background. So, by changing one style rule with a p selector, I have changed the font style for almost all of the text on all of my Web Development pages without affecting any other pages on the site.
The class selector is a little more selective, but it is still really a global selector in the sense that it will target all elements with a given class attribute. The example I gave earlier is the section titles on this page (and others) which have a class attribute with a value of "sectiontitle". It doesn't matter what the actual HTML element type is. In most cases, these are <h1> elements but as I write this, some of these have been changed to <h2> elements (eventually, I will change them all to <h2> elements). However, as long as these elements belong to the class, sectiontitle, they will all be target using the class selector sectiontitle.
Using this is a selector is slightly different compared to an element selector which just used the tag name. A class selector uses a . followed by the class name.
To give an example of this, the following is the actual style rules (as at time of writing) used to style the section titles in my Web Development pages.
	.sectiontitle {
		font-size: 20px;
		padding: 10px 25px 10px 25px;
		color: darkblue;
	}
The id selectors are pretty similar to classes in that we can give an HTML element an id attribute with some identifying value. There are two major differences. The first is that when targeting elements with a CSS rule, we use a # symbol. More significantly, whereas we can use a class to target as many HTML elements as we like, including elements with different tags, id values have to be unique. For example, if I wanted to amend one of my section headings so that sectiontitle was an id rather than a class, I could only do this for one specific section heading. If I wanted each section heading to have an id, I would have to give a different id to each one. For this reason, using an id selector is far less common than using a class selector. One reason you might want to use it is if you wanted one of the section headings to look different from all of the others so the id selector is really only used when we want an element on the page to have a unique look.
To give some idea of this, the stylesheet for my Web Development page currently has 30 different selectors. None of these are id selectors, but there are 18 class selectors and 12 element selectors and I would say that this is fairly typical.
So, I don't have an actual example from my Web Development style sheet to demonstrate the id selector so I will make one up! Here is a fake section heading.
This is a Fake Section Heading
I have given this an id of "sectiontitle" and then copied the styles associate with the class selector of section title and added them in with an id selector. I also changed the colour so that it stands out a bit more, so the CSS looks like this.
	#sectiontitle {
		font-size: 20px;
		padding: 10px 25px 10px 25px;
		color: darkred;
	}
This helps to illustrate the fact that an id is probably the best choice if you want to style an element in a way that is different from other elements. There is potential for conflict here, especially if you use an element selector such as h2 to style some headings and then give one of these an id of, let's say "bigger". Let's say that we use the elements selector (h2) to apply a rule setting the font-size to 14 pixels and we also use the id selector (bigger) to set a font-size of 18 px. The element selector and the id selector will both target the heading with the id.
I mentioned earlier that in these situation, the most specific rule wins out. Since the h2 selector targets all <h2> elements and the id selector only targets the <h2> element with an if of "bigger", the id selector is more specific and so in the browser, this heading will have a font size of 18 pixels.
Even so, it is worth remembering that there is a potential for conflict which can lead to styles being applied in an unexpected way. However, it is generally the case that an id will be the most specific selector so it is usually reasonable to expect that rules associate with an id selector will overrule anything else.
It is also possible to drill down using a combination of both an element selector and a class selector. For example, let's say that we want to set a font-size of 20 pixels to any <h1> element with a class of page-title (bearing in mind that there may be other types of element with the same class), we can combine them like this.
	h1.page-title {
		font-size: 20px;
	}
In essence, this simply means select any <h1> elements with class page-title. Obviously, if the class is only applied to <h1> elements, this will have exactly the same effect as
	h1.page-title {
		font-size: 20px;
	}
In theory, you can do the same with an id selector, so if we want to target <h1> elements with an id of page-title, we can do that with
	h1#page-title {
		font-size: 20px;
	}
Unlike the class selector, the id is unique so there is no possibility of having different element types with the same id so this is in a sense always equivalent to
	#page-title {
		font-size: 20px;
	}
The only exception I can think of is where the id is actually applied to a different type of element. For instance, let's say it is applied to a <h2> element, using the combination of element and id selectors will fail to target the element. You might think of this as a little bit of conditional logic which says set the font-size of the element with id page-title to 20 pixels if, and only if, it is inside a <h1> tag. That's a little bit of a stretch for me so for the time being, I would say that combining an element selector with an id selector is pointless. In addition, if you find that you need to combine element and class selectors, this may be an indication that the class name should be different for the different element types so again, I suspect this is largely pointless.
Nevertheless, it is possible and it should be noted that there is no space between the element selector and the id or class selector. Also, you are not allowed to have spaces embedded in class or id names. On the whole, these CSS selectors are actually case-insensitive, but there may be exceptional circumstances where a browser does treat them as case-insensitive (potentially including future releases of the browser) so it is probably safer to treat them as case-insensitive to avoid potential pitfalls.
The descendant selector also combines different selectors in order to target specific elements. Consider the following rule and note that the selectors are all element selectors and there are spaces between them.
div p a { color: blue; }
This will target any anchor tag that is inside a <p> tag which is, itself, inside a <div> tag. You can actually string as many of these together as you like, but if you have more than three, that is probably too many unless the element is part of a normally nested structure such as a <th> element (which is inside a <tr> element which is inside a <table> element). If you are using longer strings of selectors, your HTML is probably overly nested and over-complicated. In addition, using long strings of selectors can have a negative impact on performance. In addition, because these nested selectors are quite specific, it can be difficult to override the CSS.
A typical example of where nested selectors can be very useful is when targeting the links in your navigation menu. The following set of rules is from the stylesheet used to style the navigation menus on this page.
	nav ul li a {
		display: block;
		font-family: arial;
		color: #222;
		font-size: 14px;
		padding: 22px 14px;
		text-decoration: none;
	}
Here, we are styling any anchor tags that are part of a link item in an unordered list which are part of a <nav> element. So this styles, quite specifically, the anchor tags in the navigation menu but have no effect on any other anchor tags on the page.
I did mention earlier that it is possible to group selectors. For example, the following
	h1, p, .content {
		font-family: Arial;
	}
will set the font to Arial for any element that matches any one of these selectors. This allows you to write your CSS more efficiently. Notice that there are spaces between the selectors because we are not combining them, we are just writing a rule that can match with any of these three selectors. As was the case with my Web Development stylesheet, however, you will probably find that in practice you will almost always use class and element selectors without combining or grouping them.
If you do combine selectors, this will generally be because you want to be more specific with the elements you want to target. If you do group selectors, this would probably be because you want to have some styling that applies to different types of element so in the example shown above, you would most likely have rules that apply only to the h1 selector, the p selector or the .class selector. You can then add a separate rule that groups the three for a style you want to apply to all of them. In the example shown above, the rule set a font for <h1> and <p> elements together with all elements with class content to Arial and you would probably want to apply such a rule for greater consistency of the font across different elements. This has the advantage that you only have to write the rule once and also makes it easier to change the font for all these elements because you only have to change it in one rule.
You should exercise caution with this, because there is a danger that you may duplicate a rule like this.
	h1, p, .content {
		font-family: Arial;
	}

	h1 {
		font-family: Callibri;
	}
In this case, each of these rules is using the same selector but neither is more specific than the other so it is the order in which they appear in the CSS that determines which will be applied. I'm not sure whether it is the one that appears first or the one that appears last that will be applied, but there is a fair chance that if you do apply CSS rules in this kind of way, that it will not be the style that you want. If you know which is more likely to take precedence, this implies that you know you have written the same rule twice and so the more sensible course of action is to delete one of them.
How CSS Works with HTML
The relationship between HTML and CSS is something that you can't ignore. The first step in styling a web page comes when you are writing the HTML. What I mean by this is that if you follow best practices when writing HTML documents and you apply these practices consistently, it then becomes much easier for you to target those HTML elements with CSS. Well written HTML should define both the content and meaning of the text. Take the following example.
<h3 class="red-text">Subheader</h3>
The name of the class provides us with some information, that the colour of the text should be red, but it doesn't tell us what the heading is for. If the colour of this text is later changed to blue, you may then have a discrepancy between the look of the heading and its class name. Both class and id names should be meaningful.
In an example like this, you may not have a suitable name for the class and this leads to the question of whether you actually need it to have a class attribute at all. Let's see this example and the context in which it appears.
	<html>
	<head>…</head>
	<body>
		<div id="wrapper">
			<section id="main-content">
				..
			</section>
			<aside id="sidebar>
				<h2>A header</h2>
				<p>Paragraph text</p>
				<p>This is important!!</p>
				<h3>Red Text</h3>
				<p>Some more text</p>
				<p>A quote from Shakespeare</p>
			</aside>
		</div>
	</body>
	</html>
The first thing to note is that I have removed the class attribute from the <h3> tag and replaced the text with Red Text so that you can easily see which element we are looking at. Notice that this element is inside an <aside> element which has an id of sidebar. We cam therefore target our h3 header by using a combination of an id selector with an element selector which will look like this in the CSS.
	#sidebar h3 {
		font-color: red;
	}
You might want to use class or id attributes when you need to add some styling to specific elements in a block of HTML. For example, in the example above, there is a paragraph with some (apparently) important text and another paragraph with a quote. If we want to style these differently to the other paragraphs, we can't use an element selector because it is a <p&gr; element, so the element selector would target all <p> elements on the page or all <p> elements in the sidebar if we combined it with the id selector. This is likely a case where a class attribute is going to be useful. We might give this a value of "quote" for our quote paragraph. The value for the paragraph with the important text will depend on whether we want to apply a style for this and all paragraphs containing important text, in which case a value of "important" might work, of it is special. For instance, it might hold an author's name so perhaps "author" would be a suitable value.
Whether we use a class or an id attribute really depends on whether the element is unique. In this example, we may well have additional paragraphs with important text and if we have already styled our important text paragraph and we like the way it looks, we can easily add this style to another important paragraph simply by adding the same class attribute.
I think that it is important to remember that 'unique' is not quite the same things as only having one of something. You may have only one <p> element containing important text, but you might want to add another at a later date so a class attribute gives you the flexibility to do that very easily, but an id attribute doesn't.
I think that the only real reason for adding an id attribute is when an element is unique, will always be unique and perhaps might be difficult to target with your CSS. So an id in this case may make sense, but bear in mind that you might also be able to use a class attribute. Essentially, if you have a choice, I would suggest using the id attribute only if there is a compelling reason not to use a class attribute.
This also helps to illustrate the point that using HTML structures consistently is essential in allowing you to style the content consistently. Consider the following examples.
	EXAMPLE 1
	<div class="quote">
		<p>I pity the fool!</p>
		<cite>Mr T</cite>
	</div>

	EXAMPLE 2
	<blockquote>
		<p>I pity the fool!</p>
		<cite>Mr T</cite>
	</div>

	EXAMPLE 3
	<p class="quote">
		<p>I pity the fool!</p>
		<cite>Mr T</cite>
	</p>
All of these examples contain a paragraph that includes the quote and citation, but they each wrap these up in a different element, with two of them being generic elements which use a class attribute to allow the paragraph to be styled as a quote. Note that the exception is using a <blockquote> element. If all three examples appear on the same site, it will be difficult to ensure that they are all styled consistently. The most important thing is to be consistent, so using any of these styles to wrap up any quotes is going to be better than using different styles (note that in this context, style refers to the way of specifying the HTML rather than a CSS style).
However, the <blockquote> element is the best option because it is intended to contain this type of paragraph so it is semantically better and if you use the correct semantic elements, it is easier to be consistent across an entire website and easier to style (okay, this time I do mean CSS style!) your HTML consistently.
Finally, I want to reiterate the point that you should write your HTML first without thinking about the CSS. Remember that when your HTML is well-structured, consistent and semantically correct (as with the example using a <blockquote> element, writing the CSS is then so much easier.
CSS Authoring Options
I mentioned earlier that there are three places where you can put CSS rules, inline, inside a block of CSS contained in a web page or in an external stylesheet. Personally, I tend to use only external stylesheets for CSS and I think that most developers probably do this as well, perhaps just out of habit. Nevertheless, each of these has both advantages and disadvantages and it may be useful to be aware of these.
External stylesheets can hold all of the styles for a website. The main disadvantage of using a single sheet is that it becomes difficult to target specific elements with different styles. By this, I mean that this page (and all of my Web Development pages) have a yellow background, for example. My Android and Linux pages both have an antique white background and other pages have a white background. The solution here is to use more than one stylesheet.
I have mentioned this before, this is achieved by grouping pages such as Web Development, Linux and so on and giving them their own stylesheet. I do also have an overall stylesheet so this page, for example, will be getting some of its styles from the Web Development stylesheet and some from the site stylesheet. This can add complications as well because, as an example, we might set the background colour for the page by applying a CSS rule to the body like this.
	body {
		background-color: lightgoldenrodyellow;
		padding-left: 60px;
		padding-right: 60px;
	}
This is an example from my Web Development stylesheet and is the rule that is responsible for the yellow background on this page. Now, let's assume this page is also linked to a stylesheet that covers the whole site. This stylesheet might have a similar rule such as
	body {
		background-color: white;
		padding-left: 60px;
		padding-right: 60px;
	}
Notice that both rules are targeting the <body> element on this page so there is no difference in terms of how specific they are. So which rule takes precedence? We will look at that in more detail in the next section.
The second way to apply styles to a page is by using a style block. This can be a quick and easy way to apply styles if you have a single page and not very many CSS rules to apply. It is also quite useful when you want to apply styles on a site where those styles only apply to a single page. I think that our previous discussion of external stylesheets make it clear why a style block (which, incidentally, is sometimes referred to as an internal stylesheet) is not very flexible. You can't apply these rules to another page without copying the styles into the new page. In the interest of balance, I should say that when I am creating new pages for this site, I usually use a pre-existing page as a starting point and copy it with the name of a new page so any internal stylesheet (or indeed inline styles) would automatically be copied to the new page. However, if you use a link to an external stylesheet, that would also be copied automatically. I should also add that I prefer to use absolute paths for these links when the link is to a stylesheet covers the whole site and relative links to a stylesheet applied to a group of pages. Let's say that I have a list of external links to pages of interest to Linux users. This will have an absolute path to the site-wide style sheet and a relative path to the Linux website. Now, I should add that the Linux links will be a page, probably called links.html. It will have an absolute path to the styles folder which is at the root level of the website and an absolute path to the styles folder insider the Linux folder.
Now, if I copy this to a new page called links.html in the webdevelopment folder, it will still have the same absolute link but the relative link will now point to the styles folder inside the webdevelopment folder. So each of these pages will be styled according to the page type (Linux, Web Development and so on).
Sorry, that was a bit of a digression but it shows another weakness of internal stylesheets. If I change the styles, with an external stylesheet, I just need to change the style in that sheet and any page linking to it will automatically get the new styling. If I am using internal stylesheets, I will need to amend the rule in every page that uses that style in order for it to use the updated rule.
Finally, inline styles are very easy to use in that you don't need to use a selector to determine which element you want to style. You just add the style attribute to that element. However, it is normally very difficult to override these, so if you want to amend the styling, you will probably need to locate every element to which the style has been applied and amend the value of the style attribute manually. It is also the least flexible method of applying styles because it only applies to the element you add your style attribute to.
In all honesty, I have never used an inline style and I don't anticipate this changing so I'm not going to cover them in any greater detail than this.
How Browsers Apply Styles
A browser will display your content before applying any styles. I remember this being painfully obvious when opening a page over a modem in Netscape in the early to mid-nineties. With fast broadband connections, this whole process takes fractions of a second so the effect is not noticeable in any way. However, it can be useful to know how the styles are being applied.
The C in CSS stands for cascading. This is because there is a kind of cascading effect where rules from external stylesheets are applied first followed by internal stylesheets and finally inline styles. We already know that where there is a conflict, the most specific rule is applied. If this isn't enough to resolve the conflict, the most recently applied rule takes precedence meaning that an inline rule would take precedence over an internal stylesheet and this would take precedence over an external stylesheet.
This is based on the assumption, which is normally valid, that the link to the external sheet comes before the internal stylesheet (or the style block). If it comes after the style block, the styles in the external sheet would take precedence over the style block.
If, like me, you normally stick to external stylesheets but you use multiple stylesheets, this raises the question of which sheet would take precedence and again, this is determined by the order in which they appear in the page with the last one taking precedence over any earlier listed sheets.
As a general rule, I would advise listing the more generic stylesheets first. For example, these are the links to external stylesheets for this page.
	<link href="/styles/homestyles.css" rel="stylesheet" type="text/css">
	<link href="/styles/navigation_styles.css" rel="stylesheet" type="text/css">
	<link href="/webdevelopment/styles/styles.css" rel="stylesheet" type="text/css">
The first sheet applies styles that relate to all of my subject home pages. That is, my webdevelopment page, my programming page and so on but I also link it to other pages so that the styles can actually be applied to all of the pages in the site. Initially, I had a stylesheet called styles.css which was intended to cover the whole site but I wasn't using it very much so I decided to have just one stylesheet for general site-wide styles. With hindsight, styles.css would be a better and less confusing name so I may change this at some point.
The second style sheet applies styling to the navigation menus and since these appear on almost every page in the site, it makes sense to keep it in a higher level styles directory.
The third stylesheet is the most targeted in that it only applies styles to a specific group of pages. In this case, that means my Web Development folder so this is in a folder inside the webdevelopment folder. Each group of pages has its own similar stylesheet. This means I can create a look that is specific to my Web Development pages and a different look for each of the other groups.
The ordering of the stylesheets here means that it is styles applying to this group of pages which take precedence over any other styles. I should add that in spite of this, it is almost always better not to have these conflicts and I do always try to avoid them but there will be some situations where a conflict can be a good thing. Generally, this would be where you have a style that applies site wide where you want to override it for a single group of pages. In some instances, you may also want to apply styles to a single page only. A good example of this is the index page for my notes on Perl 5 Essential Training. This course has more chapters than is normal for a course on LinkedIn so I made the text smaller to make it more readable without needing to scroll. The way I did this is probably not ideal. I simply used a target class attribute like this.
<a class="perlchapter" href="/programming/perl5essentialtraining/quickstart.html">Chapter 1 - Quick Start</a>
The styles are then placed in the programming styles file like this.
	.perlchapter {
		color: darkblue;
		font-size: 24px;
	}
I don't have any similar pages under programming (I used to put all notes for a course on a single page and only recently started using a page per chapter with an index page to link to each chapter) so this second example is taken from this Introduction to CSS course.
<a class="chapter" href="../introductiontocss/cssbasics.html">Chapter 1 - CSS Basics</a>
Notice that there is a more generic class name for the chapter so the styling can be applied to all the courses under a group. In the future, I will add other courses to the programming group so I will be able to do that with each new course having access to the generic styles for chapter titles. I think it is important to point out that this is a solution that does work, but it probably isn't the best solution. As I learn more about Web Development, I am changing and improving the design of the pages on this site so in the future, I nay have adopted a completely different approach.
I think it is normal that as you take your first steps in learning Web Development, you look for solutions that work without knowing whether they are good or bad approaches and in fact, a few months ago, I completely re-wrote my website from the ground up when I switched from hosting by Wedos in the Czech Republic to self-hosting on a Raspberry Pi. I still have a domain name with Wedos, I originally used osztromok.eu but had to give that up post-Brexit so I now have osztromok.site. I may at some point put my old web site up there so I can look at it in the future and see how far I have come!
There are a couple of other points to bear in mind here and one is that we mentioned the fact that the last rule applied takes precedence. That is, for example, if you apply an external style followed by an internal style sheet followed by inline styles, the inline style is the one that will take effect. That's not to say that the rules in the external and internal stylesheets are ignored, just that if there is more than one rule to style the same element in the same way (such as font-color for a paragraph) it is the last applied that wins. This assumes that the rules are equal in terms of specificity. If not, the most specific rule wins.
The concept of order also applies with a style sheet (external or internal). For example, let's say you have this rule in an external stylesheet
	p {
		color: red;
	}
and later in the same stylesheet you have this rule
	p {
		color: blue;
	}
Of the two, the 'blue' rule is applied last and so the text will be blue.
The idea that the most specific rule applies has been mentioned several times and this is more important than the precedence rule. That is, the precedence rules have to be followed only when there is a conflict between two or more rules that target the same element and have the same level of specificity. If one rule is more specific that any others, it will apply regardless of precedence.
A browser will actually do a little bit of arithmetic to determine which rules are most specific and it use a scoring system like this.
	If a rule specifies an id - this gives it a score of 100.
	If a rule specifies a class - this gives it a score of 10.
	If a rule specifies an element - this gives it a score of 1.
Let's see an example of that.
	#content p .alert {
		color: red
	}
Here, we have a class selector (.alert), an element selector (p) and an id selector (#content). These are being combined here so we are targeting any element with the class .alert that is inside a <p> element that is inside an element with the id .alert. So that gives a score of
100 + 1 + 10 = 111
The simple rule here is that the higher the score, the more specific a selector or group of selectors so if a rule uses an id selector, this would always be higher than a rule that doesn't since it has a score of 100 and the highest score possible without an id selector is 11.
It may also be worth mentioning the fact that CSS rules are cumulative so if you have multiple rules to apply styling to an element and these rules have different levels of specificity and precedence, for any particular property - such as font-size, the most specific is applied and where two rules have the same specificity, the precedence rules apply.
You might also have another rule setting the font-color and again the same specificity and precedence rules apply but they may not be the same and in fact, there may not even be a conflict if the rule for font-size only appears once.
So, for any aspect of the styling, font, font-size, background-color, height, width padding and so on, each one may present a conflict and each one must be resolved!
One final point which I haven't mentioned previously is inheritance and it is important to be aware of this, although it is possibly intuitive and we may have already made some oblique reference to it and certainly do so in the solution to the challenge shown below.
The gist of this is that for some CSS styles, if you apply the style to a given element, the style also applies to any element contained in it unless overridden. To give an example, the text you are reading now is inside a <p> element which is, itself, inside an <article> element. Similarly, each of the section headings, CSS examples and so on are inside elements that are contained in the <article>.
One approach to styling might therefore be to apply some styles such as font size using article as an element selector and then styling anything that needs to be styled different such as headings use the h1 and h2 element selectors.
Personally, I prefer a more explicit approach which is to target the elements with a p selector and then those with an h1 or h2 selector (if the site were designed better I would treat these as being different and this will be the case when I have fixed my subheadings to all use <h2> tags.
I guess if I could sum up, I would say that the best approach is to design your site from the start with a good structure. For example, I have folders in the site directory for different subjects and these all have menus at the top of this page. For instance, if you click on the Web Development menu, you will see the pages that are stored inside the webdevelopment folder. The first item on the menu is the Web Development home page and this document is inside the webdevelopment folder. The other items are notes for various courses I have completed or am currently studying and these all have folders of their own.
Once you have a solid structure to the site, you can then start adding HTML documents and making sure the content and the organization of these is good. At this point, you don't really need to think about styling and in some ways, it makes sense to create as much as possible of your site without adding any styling.
When you have that in place, you can then think about where to put your stylesheets, what styles you want to apply site wide (for instance, should every page on the site have the same colour scheme, font sizes and so on) and what styles are going to be more specific. If you want some styles to apply only to pages in the Web Development section, it makes sense to put these somewhere inside the webdevelopment folder. For consistency, I always put stylesheets inside a folder called styles so that may mean having a styles folder in the root directory and another in the webdevelopment directory (and linux directory and so on).
And do bear in mind, you are applying styles to make your page look better so in all cases, whether your styling is correct is determined by one simple factor. Does your page look good?
Challenge
The challenge here is to take an unstyled page and apply some styles to it via an internal stylesheet. The starting point is an HTML document as follows.
	<html>
		<head>
			<title>Challenge 1</title>
			<style>
			/* Put your styles here, between the style tags. */
			</style>
		</head>
		<header class="header">
			<h1>This is a challenge!</h1>
			<p>This is a paragraph in the header</p>
		</header>
		<section class="content">
			<h2>Fun with CSS</h2>
			<p>Learning CSS is fun! You can make the web a prettier place.</p>
		</section>
		<footer class="footer">
			<p>You could put a copyright here.</p>
		</footer>
	</html>
If you would like to see the page without styling, it is stored under the name challenge.html and clicking the link here will open it in a new tab so you can check it out and close the tab when you have seen enough. I don't expect that to take long, it is a pretty dull site at the moment and probably won't be too much better when the challenge is complete! The following is copied directly from the transcript for the course files and it details the CSS we want to apply to challenge.html.
Well, you're gonna use embedded styles to set all the text to gray, to set paragraph text that happens within the content class to purple, and to set the background color of the header to black. This will take you about three minutes to complete, and here, on the right side, you can see what the finished product will be. Go ahead, try it out; and in the next movie, I'll show you how I worked this out.
From the course, Introduction to CSS by Carrie Dils
Notice that all of the text is in three elements, <header&ht; which has a class header, <section&ht; which has a class content and <footer&ht; which has a class footer. In theory, we can use either the class or the element to target these and style all of the elements in each. In practice, for some reason the class section doesn't seem to work, I'm not sure why, so I am targeting the classes .header and .footer and the element <section&ht; to style all of the text on the page with a grey colour. Note the grouped selectors.
			header, section, footer {
					color: gray;
			}
Next, I want to apply a style, the colour purple to the paragraph which is inside the <section>, class content. In this case, I will use an inheritance selector.
	.content p {
			color: purple;
	}
In CSS terms, this saying target the paragraph element which is inside the element with class content.
Finally, we are changing the background colour for the element with class header, so we can use a simple class selector.
	.header {
			background-color: black;
	}
The styled page can be found at solution.html and again this opens in a new tab.
Solution
Carrie's solution is the same as mine with one exception. The rule she uses to make all of the text grey is
	body {
			color: gray;
	}
This is the solution I would have used but there is no body element in the original HTML file. I forgot that a browser will always try to make sense of your HTML so although the body was omitted, the browser knows that the page should have a body element so it creates one for us. The moral there is that you can always assume that all of your HTML is wrapped inside a <body> element even if it is missing from your HTML!