Create Your First Kotlin Project
There are no major differences between creating a Java project and creating a Kotlin project but there are a couple of things worth mentioning
When you select File > New > Project, you can then select Kotlin project but you also have several further options, so you can create more than one different type of Kotlin project.
At the moment, there are three options available in the version I am running and these are Kotlin/JVM, Kotlin JS and Kotlin (Multiplatform -Experimental). At this stage, I’m not completely sure of the difference but it seems that the first is going to create an app that will run on any Java machine and I guess that the second is going to be used for creating a web application.
For the time being and until I know the difference between these I will work on the assumption that the first option is the one needed and that when I study Android Development with Kotlin, either the difference will become apparent or I will just continue with this option.
Adding a Kotlin class is also similar to the process we would see with Java – that is, right click where you want to place the file which will be either in the src folder or in a package.
One difference (as far as I’m aware) is that in the new class we can type main to generate a template main class which is quite cool.
Check Out the Exercise Files From GitHub
First, go to the GitHub page and copy the URL (ensuring that the Master Branch has been selected). Next, go to IntelliJ, select New on the File menu and then Project from Version Control and finally GitHub. You can log into GitHub via the dialog box that appears and select either login from password or login from token, I’m not sure about the login from token option so I used my password.
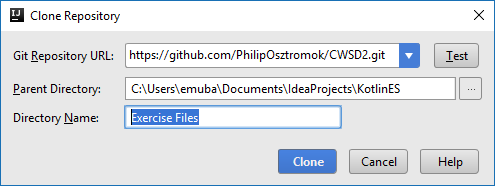
Figure 1 shows what the dialog box looks like after you have logged in. Note that the repository URL has been pasted in here and the parent directory and directory name specify where the projects will be saved on the local machine.
Changes to the files can be committed locally but with the exercise files, we won’t be able to push these back to the repository since we are not authorised to do that. Commit is performed by clicking on Version Control (bottom left) and clicking the commit button which has (on my version) the letters VCS in the icon. From here, we can add a commit message and select Commit or Commit & Push (which won’t work in this case!). There is also a Create Patch option which I will ignore for now.
If we want to check out the exercise file for a particular chapter, these are all separate branches in the repository. We can select a new branch in a couple of ways. Firstly, we can click on Branch Master in the bottom right corner and a list of available branches will appear (see figure 2).

Alternatively, we can select the VCS menu followed by Git and then Branches and this will bring up the same list (it may be necessary to expand the Remote Branches to actually see the list. The numbering system is the same as for any Lynda video course so, for instance, the branch to obtain the file for chapter 4 part 2 will be origin/04_02 or origin/04_02_e (I guess these are the starting point and the completed file for each exercise).
Use Command Line Arguments
		fun main(args: Array<String>) {
			println("Welcome to Kotlin Essential Training!")
		}
		fun main(args: Array<String>) {
			println("Hi, " + args[0] + ".  Welcome to Kotlin Essential Training!")
		}
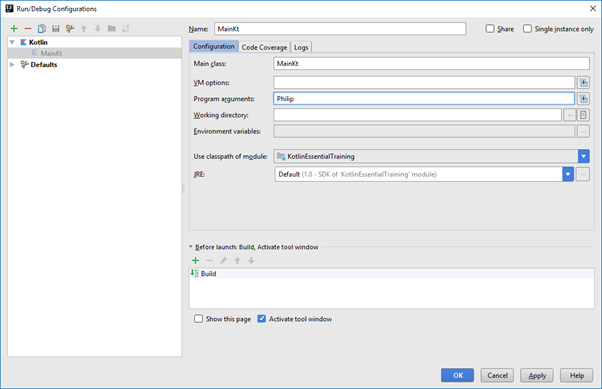
In figure 4, we can see the Edit Configuration wizard and note that I have added a string as a program argument.
Bearing in mind the fact that the arguments passed to the function are in the form of an array, in this case called args[] (note, that it is conventional but not compulsory to call this array args), within the program the argument is accessed using simple array syntax and we can see this in figure 5 with the reference to args[0].
Note that the output is generated using a conventional form of string concatenation which will be familiar to Java programmers. However, Kotlin actually provides a slightly more elegant alternative to string concatenation and that is the string template. In essence it means that we can incorporate our string variable within the output string simply by referencing it with a dollar sign followed by the string reference inside a pair of braces.
		fun main(args: Array<String>) {
			println("Hi, ${args[0]}.  Welcome to Kotlin Essential Training!!!")
		}
If we compare figures 5 and 6, both show essentially the same main function, but the one in figure 6 makes use of the string template. Note that this syntax is not specific to an argument passed to the program. The only requirement is that the contents of the braces returns a string. You can even put a string literal in there (so we would have something like ${“Philip”} and it would work although this is obviously pointless!
We can of course use a simple variable name here and it is worth noting that if we do, the braces can be omitted but the dollar sign must always be present.
Use the API Documentation
Whenever there is a class or interface in your code in IntelliJ, you can hover over it and press the control key and this will display a little dialog box that tells you where this is defined, particularly whether it is defined as a Kotlin or a Java class.
If we take String as an example, we can see that the word String becomes a link and we can then click on it to call up the code showing how this is defined. For instance, we can see from this that String implements two interfaces, Comparable and Char Sequence. We can also press control Q for documentation.
More information can be found on the Kotlin documentation website.
There is also a pdf with the Kotlin documentation which is quite handy and can be downloaded from here.
Test Your Knowledge with Kotlin Koans
The website, try.kotlinlang.org has a number of useful resources for learning Kotlin including an interactive interpreter and multiple examples including the examples from Kotlin in Action and a series of exercises called Kotlin Koans. These can be accessed via the webpage but it is also possible to introduce the examples from Kotlin in Action and Kotlin Koans in IntelliJ.
For reference, there is a free online version of Kotlin In Action.
To do this, go to File > Settings and select Plugins. Next, search for EduTools, select the version you want to install and click Install. When the Welcome appears, which should happen when IntelliJ starts or when a new project is created, you should see a screen asking whether you want to use the plugin as a learner or an educator. I didn’t see this so I have checked the plugins and I can see that EduTools has not been activated due to the fact that a required plugin, com.intellij.modules.androidstudio has not been enabled.
Searching plugins for Android Studio returns two, both of which are installed and enabled so I’m not sure what the problem is here. This would be a nice feature but is not critical so I will worry about it later!