Create a Library of Functions
It is important to remember that Kotlin is a fully functional language and allows a complex program to be broken into many different smaller and more manageable classes.
One of the simplest uses of a class in Kotlin is to manage collections of functions which would be static functions in Java since they are meant to be called from a class rather than an instance of a class. Since Kotlin does not have the concept of static class members, functions and variables which are meant to be called from a class become part of a companion object.
For this example, we are starting out with a Kotlin file containing two functions, the main() function and a function called addValues() that takes two numbers as arguments and returns the result of adding the two together. This is fine if we only want to use the addValues() function within this file but if we want it to be available anywhere, it is better to put it into a separate class.
			fun main(args: Array<String>) {
				try {
					print("Number 1: ")
					val string1: String? = readLine()
					val number1 = string1!!.toDouble()

					print("Number 2: ")
					val string2 = readLine()
					val number2 = string2!!.toDouble()

					val result: Double? = addValues(number1, number2)
					println("The answer is $result")
				} catch (e: NumberFormatException) {
					println("${e.message} is not a number")
				} catch (e: Exception) {
					println(e.message)
				}
			}

			fun addValues(number1: Double, number2: Double) = number1 + number2
We will create a new class by right-clicking the source folder and selecting new and then selecting New Kotlin File/Class. In this case, we will give it the name MathLib and select class rather than file from the drop down menu.
Now, if we take the code for addValues() and place it inside the companion object, the class this gives us is shown in figure 57.
			class MathLib {

				companion object {
					fun addValues(number1: Double, number2: Double) = number1 + number2
				}
			}
Originally, we had called the addValues() function simply with:
val result: Double? = addValues(number1, number2)
Now, to call it from the MathLib class, we simply change this to:
val result: Double? = MathLib.addValues(number1, number2)
Note that we are using a bit of code to allow the user to input the first number and then an almost identical bit of code for the second number. We might want to convert this to a function to avoid repetition and we can do this in IntelliJ by selecting the three lines of code used to get the first number, right-clicking and selecting Refactor followed by Extract and then finally function. We will call it getNumber and this converts the three lines to a single line calling the function:
val number1 = getInput()
It also generates the required function which can be seen in figure 58.
			private fun getInput(): Double {
				print("Number 1: ")
				val string1: String? = readLine()
				val number1 = string1!!.toDouble()
				return number1
			}
We want to use this function to input both numbers so the prompt will have to change. Since the prompt will not be the same each time the function is called, we will have the code that calls the function supply a prompt which getInput() will display. We will also generalise the variable names giving us the modified version of the function as shown in figure 59.
			private fun getInput(prompt: String): Double {
				print(prompt)
				val string: String? = readLine()
				val number = string!!.toDouble()
				return number
			}
This code can be copied into the MathLib class (removing the private keyword so that the functions scope becomes public) and we can now rewrite the main class as shown in figure 60.
			fun main(args: Array<String>) {
				try {
					val number1 = MathLib.getInput("Number 1")

					val number2 = MathLib.getInput("Number 2")

					val result: Double? = MathLib.addValues(number1, number2)
					println("The answer is $result")
				} catch (e: NumberFormatException) {
					println("${e.message} is not a number")
				} catch (e: Exception) {
					println(e.message)
				}
			}
So now we can see that the main() function is much smaller. The saving in terms of lines of code is not significant here because it is a small sample program but we can now use these functions as many times as we want with a simple function call. More significantly, the class can be added to any new project so we can use the functions again without re-writing them and this would be particularly useful if the function were larger and more complex.
Create a Class with Instance Members
We can create classes with methods and attributes just as we do in Java and these are public by default. It is not necessary to produce getters and setters but these can be added if needed and we can also restrict field visibility with modifier keywords.
For this example, we are using the MathLib class from the previous section. We will start by adding a variable to the MathLib class and this is outside of the companion object and is a Double value called runningTotal. Its value will change so it is declared as var and is initialised with 0.0.
Next, we will add a function called addValue() which will take one argument called value of type Double and it will add it to runningTotal. So now, if we create an instance of MathLib, it will have a variable called runningTotal which will persist for the lifetime of that instance.
Now, if we want to call methods belonging to the class, we will need an instance of the class and we can do that using the class constructor. Like Java, there is a Miranda constructor so we don’t need to create one.
In the main class, we are removing all the code we previously had in the try block and instead, creating our instance of MathLib which we will call mathLib. The syntax for this is:
val mathLib = MathLib()
Note that unlike Java, we don’t need the keyword new.
Next, we will create an infinite loop within our try block that asks the user for a number and adds it to the running total.
			while(true){
				val number: Double = MathLib.getInput("Enter a number: ")
				mathLib.addValue(number)
				println("Current total: ${mathLib.runningTotal}")
			}
This code is shown in figure 61. Now, as with Java, the JVM does not calculate floating point numbers precisely so at some point, you may see that the result is actually off by a thousandth or a millionth. In Kotlin, we can help to remove this problem by using a BigDecimal value. We do this by amending the code in our getInput() function inside the MathLib class. Specifically, we want to change these lines:
	val number = string!!.toDouble()
	return number
Here, we are taking a string and converting it to a Double value and then returning that same value. Instead, we want to change it to a BigDecimal value but we still want to return a Double so we will then convert the value we are returning to a Double so these lines become:
	val number = string!!.toBigDecimal()
	return number.toDouble()
This also neatly demonstrates the advantage of using a class like this to encapsulate functionality. We have encountered a problem with our code but since it is isolated in the class, we only have to fix it in one place. The external operation of the function has not changed so any other code that uses this function will be unaffected.
Manage Value Lists with Enums
Previously, we created constants as members of a companion object.
			class MathLib {
				companion object {

					const val ADD = "+"
					const val SUBTRACT = "-"
					const val MULTIPLY = "*"
					const val DIVIDE = "/"
					const val OPERATIONS = "+ - * /"

					fun addValues(number1: Double, number2: Double) = number1 + number2
					fun subtractValues(number1: Double, number2: Double) = number1 - number2
					fun multiplyValues(number1: Double, number2: Double) = number1 * number2
					fun divideValues(number1: Double, number2: Double) = number1 / number2

					fun getInput(prompt: String): Double {
						print(prompt)
						val string: String? = readLine()
						val number = string!!.toBigDecimal()
						return number.toDouble()
					}
				}
			}
Recall that in the calculator challenge, we used string literals for the operators. In figure 62, we have replaced these with constants declared in the MathLib class. Note that if we are using these constants in another class, we can hold down the control key and click on them and this will take us to the point in the MathLib class where they are declared.
In essence, we have a group of operators which are related but each have their distinct characteristics. Another way to deal with these would be to declare them in an Enum class or an enumeration. This can be nested class or it can be added to the same file as another class. Another option, which we will use here, is to declare it in its own separate class.
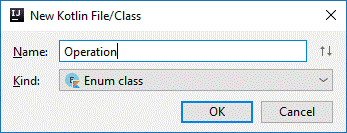
We will add the class in the same way as we added the MathLib class, but in the drop down menu we will select Enum Class as shown in figure 63.
In Java, an enum is created simply using the keyword enum but since it is a type of class in Kotlin, it is declared as an emum class as seen in figure 64.
			enum class Operation {
			}
Within the enum, we can now declare our four operators. Next, we want to add a pair of brackets after the class name and give it a String operator and after each of the values in our enumerator, we will define that string.
			enum class Operation(val operator: String){
				ADD("+"), SUBTRACT("-"), MULTIPLY("*"), DIVIDE("/")
			}
Figure 65 shows the code for the enum class and this allows to now tidy up our code somewhat. In the MathLib.class, we can take away the constants which we no longer need.
In main, where we had lines such as:
MathLib.ADD -> MathLib.addValues(number1, number2)
which made use of the constants, we can now modify this to:
Operation.ADD.operator -> MathLib.addValues(number1, number2)
Figure 66 shows the when block with these modifications completed.
			when (operation) {
				Operation.ADD.operator -> MathLib.addValues(number1, number2)
				Operation.SUBTRACT.operator -> MathLib.subtractValues(number1, number2)
				Operation.MULTIPLY.operator -> MathLib.multiplyValues(number1, number2)
				Operation.DIVIDE.operator -> MathLib.divideValues(number1, number2)
				else -> throw Exception("Unknown operation")
			}
We can further streamline this by adding an import statement to our main class:
import Operation.*
The completed classes are shown in figures 67 to 69.
			import Operation.*

			fun main(args: Array<String>) {
				try {
					val number1 = MathLib.getInput("Number 1: ")
					val number2 = MathLib.getInput("Number 2: ")

					print("Select an operation (${MathLib.OPERATIONS}): ")
					val operation = readLine()

					val result: Double? =
							when (operation) {
								ADD.operator -> MathLib.addValues(number1, number2)
								SUBTRACT.operator -> MathLib.subtractValues(number1, number2)
								MULTIPLY.operator -> MathLib.multiplyValues(number1, number2)
								DIVIDE.operator -> MathLib.divideValues(number1, number2)
								else -> throw Exception("Unknown operation")
							}
					println("The answer is $result")
				} catch (e: NumberFormatException) {
					println("${e.message} is not a number")
				} catch (e: Exception) {
					println(e.message)
				}
			}
			class MathLib {
				companion object {

					const val OPERATIONS = "+ - * /"

					fun addValues(number1: Double, number2: Double) = number1 + number2
					fun subtractValues(number1: Double, number2: Double) = number1 - number2
					fun multiplyValues(number1: Double, number2: Double) = number1 * number2
					fun divideValues(number1: Double, number2: Double) = number1 / number2

					fun getInput(prompt: String): Double {
						print(prompt)
						val string: String? = readLine()
						val number = string!!.toBigDecimal()
						return number.toDouble()
					}
				}
			}
			enum class Operation(val operator: String){
				ADD("+"), SUBTRACT("-"), MULTIPLY("*"), DIVIDE("/")
			}
So, enumerations and constants allow you to set values in a way the complier recognizes but can also help to reduce spellings like duplication of values, misspellings and other bugs.
Declare and Use a Data Class
In an object oriented language, classes are often used to manage data objects and such classes are sometimes called POJOs (Plain Old Java Objects) or sometimes Java Beans or Data Transfer Objects. Kotlin has a specific type of class for this type of functionality and it is called a data class.
To demonstrate this we are stating with an empty main function and we will add a class in the usual way, selecting class from the drop down menu. To change it to a data class we simply put the word data before class but notice that if this is done before anything else is added to the class, an error will appear.

The error is shown in figure 70 and the reason we are seeing this is because of a requirement of the data class – it must have at least one field. Typically, you declare a data class’ fields as part of the class declaration, in the primary constructor.
We do this by putting the data items in brackets after the class name and these are delimited, if necessary, with a comma.
			data class ClothingItem(val type: String,
									val size: String,
									val price: Double) {
			}
This is shown in figure 71. By calling this a data class, we are getting some free functionality such as a toString() method. In addition, if we don’t need explicit getters and setters, we don’t need to implement these.
Now, our class has a body with no code in it so we can also remove this.
To use the class, we can go back to main and create an instance of ClothingItem with its primary constructor.
			fun main(args: Array<String>) {

				val shirt = ClothingItem("Shirt", "Medium", 9.99)
				println(shirt)

				shirt.price=4.99

				print(shirt.toString())

			}
Looking at the code in figure 72, we can see that an object has been created and displayed, the price has then been updated and the item displayed again. However, this gives us an error when we try to amend the price because in the data class, price (as with the other items) has been declared immutable so we need to amend that to allow this code to work.
Note, in addition, that I have displayed the item using a simple print method and then using print in conjunction with the toString() method but in either case, the result is the same. In both cases, the toString() method is being called and we can see this quite clearly if we override the method as shown in figure 73.
		override fun toString(): String {
			return ("The item is a $type of size $size and costs £$price")
		}
Now, when we run the code, we see that the item is printed twice and in both cases, it uses the new method so from this we can see that a statement such as:
println(shirt)
although it doesn’t explicitly call the toString() function, does create an implicit call to the function.
Use Primary and Secondary Constructors
As with Java, we can create several constructors with different argument lists, but unlike in Java, not all constructors are created equal. Every Kotlin class has a primary constructor defined by the class declaration with the list of parameters defining this constructor. This can be made explicit by placing the keyword constructor before the parameter list but this does not affect how it executes.
The primary constructor does not have an implementation block. If you add a code block after the class definition, that block contains all the code for the class, not just code that is executed when the constructor is called. If you want a block of code that executes when the constructor is called, you would put the required code into an init block.
To demonstrate this, let’s say that we want our constructor to automatically convert the type to uppercase. To do this, we will add an init block to do the conversion and this gives us an amended ClothingItem class as shown in figure 74. Note that type had previously been immutable so the code has also been amended to allow us to update the value.
			data class ClothingItem(var type: String,
									 val size: String,
									 var price: Double) {
				init {
					type = type.toUpperCase()
				}
			}
To define a secondary constructor, we will add a constructor block to the ClothingItem class. Note that a secondary constructor must daisy-chain with the primary constructor.
constructor(size: String, price: Double) : this(type: null, size, price)
The secondary constructor is shown in figure 75 and there are a couple of important points to note here. Firstly, after the parameter list we have the special function called this which is calling the primary constructor.
Secondly, we are passing a null value for type to the primary constructor and this gives us a sequence of errors:
• The first error is that type is not nullable so we will simply fix this by changing it to nullable in the original constructor as follows o var type: String? • This in turn causes an error because we are converting type to uppercase in the init block but because of our modifications, type might now be null. To fix this, we must either use a safe call or assert that type is not null. To make our call a safe call, we will amend the code in init to o type = type?.toUpperCase() So now if type is null, the code will not be executed.
To create the constructor, we have not only added the code for it but also made an amendment to the primary constructor so to recap, the amended ClothingItem class is shown in figure 76.
			data class ClothingItem(var type: String?,
									 var size: String,
									 var price: Double) {
				init {
					type = type?.toUpperCase()
				}

				constructor(size: String, price: Double) : this(type: null, size, price)
			}
If we go back to the main function, we can now create a new object which we will call newItem with:
val newItem = ClothingItem(size="Large", price=14.99)
Aside, if we type in this line as far as ClothingItem() we can then press Control and P in order to see a list of the available signatures.
We can print this off as well and we will see the type shown as null.
There are a couple of points which must be made about the secondary constructor. Notice that the parameter list is just:
(null, size, price)
We don’t need to declare these as val or var since this declaration happens in the primary customer. Also, it may be tempting to type the name of the variable, type so you have:
(type: null, size, price)
but this will give us an error. We simply type null in place of the type variable and the IDE adds in the identifier.
Unlike a primary constructor, a secondary constructor can have an implementation block so we could use this to give the type a more descriptive value than simply showing it as null.
This gives us an amended secondary constructor as shown in figure 77.
			constructor(size: String, price: Double) : this (null, size, price) {
				type = "Unknown"
			}
Of course, this is not the only way to fix the description for type when it has a value of null. As an alternative, we might fix this in the init block using an Elvis operator. We already have a line of code to convert type to upper case but it does nothing if type is null so we can use the Elvis operator to provide the required alternative and this gives us an amended init block as shown in figure 78.
			init {
				type = type?.toUpperCase() ?: "Unknown"
			}
As with Java, you can have as many constructors as you like provided that each has a unique signature. However, unlike Java, where chaining constructors together is considered to be best practice, in Kotlin it is a requirement.
Use Explicit Getter and Setter Functions
You can create Kotlin getter and setter functions that work as class properties for any fields declared in the class body. You can’t create them for fields declared as part of the primary constructor.
To demonstrate this, we will use our ClothingItem class and start by renaming the variable we had called type which we will now call _type and declare it as private. We will also make changes to the variable in the init block and the code works just as it did previously.
Now, if we remove (or comment out) the init block and run the code again, we can see that the item created with the secondary constructor is again showing its type as null.
Still in the ClothingItem class, we will now add another data item called type and we will create a getter method that goes right after the variable declaration. If we only need a simple calculation, we can simply assign the value with an equals operator or we can put in a full code block. In this case, we want to return either the value of the type field or “unknown” so we just need to assign this with the Elvis operator.
To access the field, we use the keyword field so this gives us a setter method as shown in figure 79 (along with the variable declaration).
			var type: String? = _type
				get() = field ?: "Unknown"
If we run the code again, we can see that our item type still shows as null but the main point here is that we can access this via the getter method with something like:
println("Item type - ${newItem.type}")
Setter methods follow a similar pattern and we will demonstrate this with the price field. As before, we will change the name to _price and declare it as private. We will then declare a public variable called price and create a setter method right after it, using a code block this time.
			var price = _price
				set (value) {
					field = value * .9
				}
This is shown in figure 80 with value being the value sent to the setter method and again, the keyword field used to reference the field. Note that the value passed in is then multiplied by 0.9 rather than simply being assigned, effectively creating a 10% discount.
We can test this with a snippet of code as shown in figure 81.
			newItem.price = 10.00
			println("NewItem price = ${newItem.price}")
Notice, here, we have assigned the price for newItem as 10.00 and then printed it out and as expected, the price displayed is 9.00 – the 10% discount has been applied!
As was hinted previously, we can use a getter to deliver a calculated result and we will demonstrate this by adding a new data class to our application called Person. In the class, we will declare two private string variables in the primary constructor (firstName and lastName) and another public variable called fullName. Along with fullName, we will also have a getter method that returns, as you might expect, firstName followed by lastName. This class is show in figure 82.
			data class Person (private val firstName: String,
							   private val lastName: String) {

				var fullName: String =""
					get() = "$firstName $lastName"

			}
Side note – notice that the variable fullName has been initialised with an empty string. The code demonstrated on the video omitted this but I got an error when I copied that code stating that an initialisation was required and so this is why it appears here.
In figure 83, there is a snippet of code used to create a Person object with a firstName and a lastName followed by a line of code to print out the fullName.
			val p1 = Person("Philip", "Osztromok")
			println(p1.fullName)
In Kotlin, getters and setters allow us to encapsulate data management logic in our Kotlin classes, making for more readable, maintainable code.
Mix and Match Java Classes
When working in Kotlin, you might want to have access to some functionality which is available in Java but not in Kotlin. Fortunately, when you are working with Kotlin in a JVM environment (including when creating android apps)you have access to the entire Java core runtime.
To see how this works, let’s assume we want to display the price of a ClothingItem (using our previous example) as a neatly formatted currency amount.
First of all, let’s see how we would do this using Kotlin only. Kotlin does not have a native currency formatting function but we can come close with some simple string formatting.
We start by creating a variable which we will call f (for format) and we will initialise it as:
val f = "%.2f"
This means that there are two numbers after the decimal point.
The line we are currently using to display the price is:
println("NewItem price = ${newItem.price}")
and we will change this to:
println("Item price = ${f.format(newItem.price)}")
So in our string here, we are using the value f, sending it a format message with the price attribute of newItem as its parameter and this returns our neatly formatted currency value. If we also want a currency symbol we can put this in front of the $ we already have. This can be a second dollar sign if we want to show the value in dollars or it could be, for example, a £ sign.
The drawback here is that the currency formatting is hard-coded which would make it more difficult, for example, if we wanted to switch to a different currency.
As it happens, the Java localization libraries are really useful for this kind of coding so let’s look at how we would do this using the Java library.
We will, once again, starting by declaring a variable which we will call formatter and we will get its value with:
val formatter = NumberFormat.getCurrencyInstance()
Note that IntelliJ adds the line:
import java.text.NumberFormat
to the code to make this class accessible.
We can now print our currency value with the following:
println("Item price = ${formatter.format(newItem.price)}")
Note that the currency symbol has been omitted. In addition, because my system locale is the UK, the default value is a £ sign so this is automatically showing the code as UK currency.
If we want to use a different currency and currency format (for example, in France the currency is the Euro and a comma is used rather than a full stop) we can use the following line of code:
Locale.setDefault(Locale.FRANCE)
Obviously, we want to execute this code before we create the variable formatter and the result is that we will see our price displayed both in the currency used in France and in the format commonly used there as follows:
Item price = 9,00 €
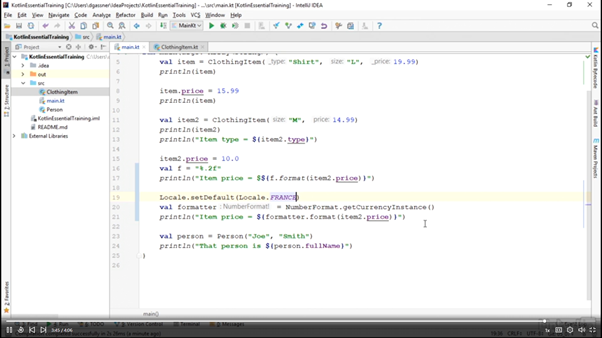
Figure 84 is a screenshot taken from the corresponding video in the LinkedIn Learning course. Note that the line creating the formatter variable also shows the data type inferred by the compiler which in this case is NumberFormat and is followed by an exclamation mark.
The exclamation mark denotes the fact that this class comes from the platform, in this case the JVM. Classes that do not have the exclamation mark come from the Kotlin standard library.
As it happens, I didn’t see this in my code which is why I have taken the screenshot but it is worth noting that the data type can be added to your own code simply by typing :NumberFormat after the variable name but you can’t add the exclamation mark, this is something the compiler does to show that it is an external class.
It is worth noting that this idea applies if you are working with Kotlin for Javascript or Kotlin native.
The main lesson to take from this is that although Kotlin is a great language, there will be times when there is a better solution to a particular problem available in, for example, the classes in the Java core runtime packages so you want to be sure you are selecting the best tools for a particular task.
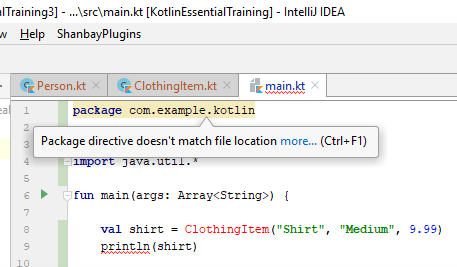
Organise Your Classes with Packages
As in Java, you can organise your Kotlin code in packages. But unlike Java, the package name does not have to match the directory in which the code is stored.
To show how this works, we will continue on with the ClothingItem example and we’ll start by declaring a package in the main class with the line:
package com.example.kotlin
This generates a warning because of the fact that our package name does not match the directory structure and this is shown in figure 85. But this is not a restriction.
Figure 85 also shows the name of our ClothingItem class in red and this applies also to the Person class which is not shown here. This indicates that these classes are no longer accessible since the main class is now in a different package (or rather, it is in a package that does not contain the other two classes).
We can easily fix this by adding the same package declaration to both the ClothingItem and the Person classes.
If we try to run the code now, we will see an error but this is not because of the code, it is actually because of the configuration of the IDE so we need to select the Run menu and then Edit Configurations.
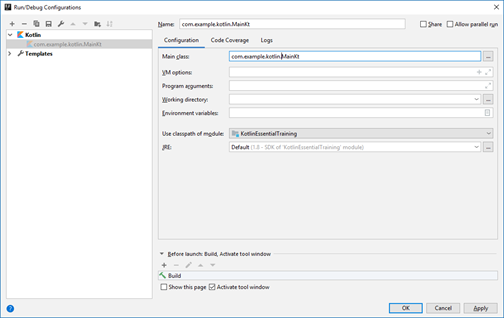
The panel shown in figure 86 then appears and this has been amended so that the name of the main class (MainKt) has been prepended with the package name, again using the reverse domain notation.
Note that at this point, the files themselves have not been moved, but in fact, IntelliJ makes it very easy to do this. We just need to move the cursor to the package name and use an intention action to ‘com/example/kotlin’ as shown in figure 87.

This automatically creates the appropriate folder with the source code folder as can be seen in figure 88.

We can do this for all of our classes and as shown in figure 88, this has already been done and all our files are in the kotlin folder.
If you are building an Android app with Kotlin, this is the way in which you will organise your files. The base class package in Android matches the universal unique application ID and so you will create your files in the directory that matches the base class package.
To demonstrate this, we will use version control to revert to a previous version of the code and then edit the configuration file to remove the package name from the main class and the application still runs.
So, you can use this type of package structure for a Kotlin program, but you can also use packages in a different way. For instance, in this application, the Person and ClothingItem classes are model classes. If we want, we can create a package called model for these classes.
We will right-click on the source folder and select New and then package and give it the name model. We can then select both ClothingItem and Person in the navigation pane and drag and drop them into the new package.
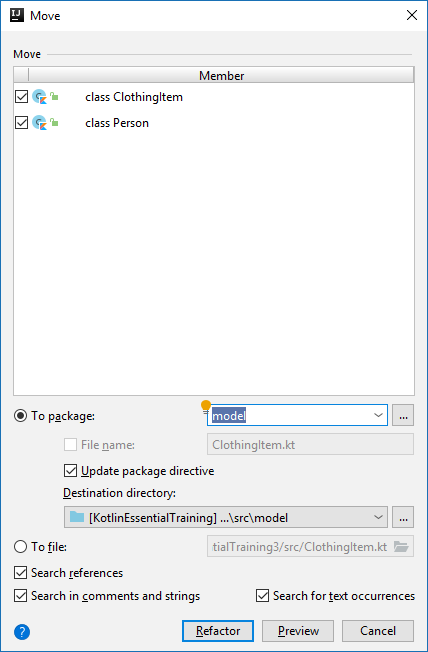
As we can see in figure 89, these are various options available when doing this but in order to complete the move we will click on refactor. This moves the files but also adds a package statement to each class and import statements to the main class so there are no manual changes required to ensure the application still runs.
It does!
Note that organising our files in this way means that we have a package declaration for each of the classes we have designated as model classes but not for the main class.
So this effectively gives us two ‘styles’ of file organisation. For a pure Kotlin application, the recommendation is that you should organise your files into packages that reflect their purpose, as we did with the model package.
For applications that mix Kotlin and Java, such as an Android app, you will use reverse domain notation for your base package and match the directory to the package.