Check Out the Exercise Files on GitHub
A GitHub account is not required to download the exercise files because the repository is set to public, but there are a lot of components and examples available there so it is a worthwhile thing to have.
The GitHub url for the exercise files is:
https://github.com/davidgassner/AndroidDev2019FirstApp
The procedure is to click on the Clone or Download button, click the clipboard icon to copy the url, go to Android Studio and select Check out project form version control on the welcome screen.
From here, select Git, paste in the url and click test to make sure the connection has been made successfully. Assuming it has, you then click Clone and then yes to confirm.
Side note, I had problems cloning the files via ssh but switched to downloading via https and this seems to have worked.
There are two ways to switch to a different branch. You can either select the VCS menu followed by Git and then branches to display a list of branches or select the Git Master in the bottom right and then show more branches and this does the same thing.
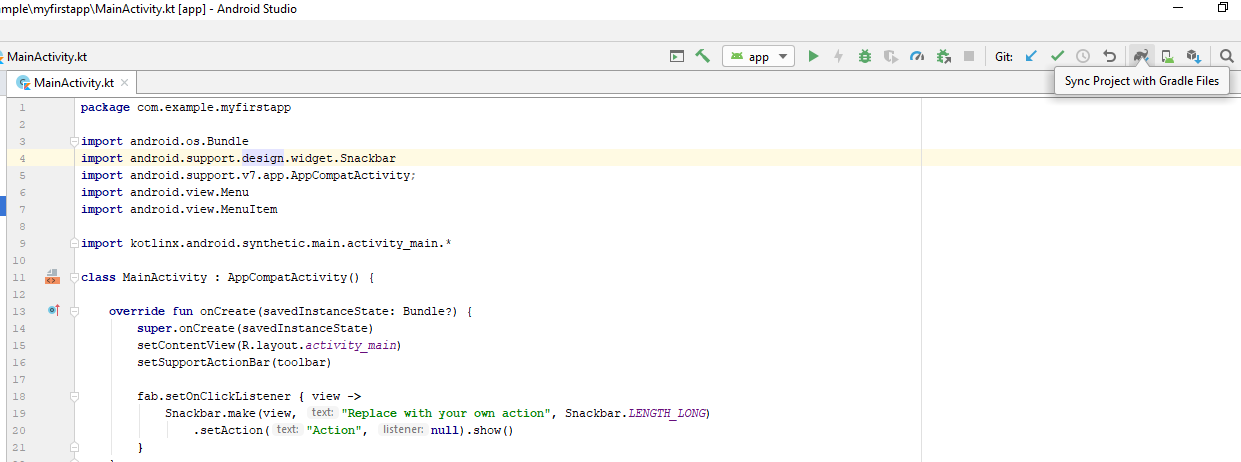
When you select a branch, you will see a new branch name suggested. Click OK and then, if asked, click Force Checkout. Sometimes, you may see problems such as unresolved references which can be fixed by refreshing the Gradle project. You do this by clicking on the Gradle tab on the right-hand side or the Gradle icon (which is a small elephant) on the toolbar (the tooltip is Sync Project with Gradle files (see figure 1) and this should resolve the problems.
For further information, the Gradle documentation can be found in the online Gradle Documentation.
At the end of each exercise, you should check your changes in to the local repository before checking out the next exercise file. To do this, click the Version Control tab in the bottom left (which was not visible on my system at the time of trying the exercise) or select Commit from the VCS menu.
One advantage of doing this via the VC tab is that you will see a list of changed files and you can click Control + D to being up a window showing the two versions of that file side by side and from here you can click on Commit. You may also see some errors here so you have the option of reviewing them before committing.
Note that in order to commit changes, you are required to provide some sort of commit messages to describe the version.
Explore the Project Structure
You will see, with Android Studio, that the structure of files and directory names for a project is relatively complex but standard. Files can be accessed via the project window to the left of the screen and this window can be opened and closed by pressing Control + 1 (although this doesn’t seem to work on my system).
Note that the project window includes multiple scopes. The project scope shows you all your applications files and folders as they appear on the disc and the other scopes files this data in different ways. The Android scope, for example, only shows you the files and folders you typically use the most while developing applications.
Note that the default option seems to be the Android scope and this is shown in a drop-down box at the top of the window. As you might expect, the drop-down box gives you access to the other scopes.
If we look at the project scope, one thing to note is that some directories are prefixed with a full stop and this indicates that the directories contain configuration files. These are .gradle for the Gradle plug in and .idea for the underlying IntelliJ Idea environment.
The source directory is under the app directory and this is where you put your code and resources for the application.
The app directory is a module and projects in Android Studio can contain multiple modules. Within the source directory is a directory called Main and within this, a directory called Java and this is where the code and resources for your application live. Note that this directory is also called Java even if you are coding in Kotlin.
Alongside the Java folder is the res folder and this contains resources for the application such as image or xml files. Within this folder, typically, image files will be inside the drawable folder and xml files inside the values folder. These xml files define various resources such as colours, dimensions, strings (such as the name of the app) and styles.
Other folders within the source folder are androidTest (within this folder is an ExampleInstrumetedTest) and Test (similarly, within this folder you will find an ExampleUnitTest) and these are used to test the interface rather than to test business (or application) logic.
Inside the main directory, in addition to the java and res folders, there is a file called AndroidManifest.xml and this file contains the declarations for the activities and services that are critical to the application.
Here is a sample of this type of file and this one, as it happens, is taken from the exercise file for this part of the course.
	<?xml version="1.0" encoding="utf-8"?>
	<manifest xmlns:android="http://schemas.android.com/apk/res/android"
			  package="com.example.myfirstapp">

		<application
				android:allowBackup="true"
				android:icon="@mipmap/ic_launcher"
				android:label="@string/app_name"
				android:roundIcon="@mipmap/ic_launcher_round"
				android:supportsRtl="true"
				android:theme="@style/AppTheme">
			<activity
					android:name=".MainActivity"
					android:label="@string/app_name"
					android:theme="@style/AppTheme.NoActionBar">
				<intent-filter>
					<action android:name="android.intent.action.MAIN"/>

					<category android:name="android.intent.category.LAUNCHER"/>
				</intent-filter>
			</activity>
		</application>

		</manifest>
Going back to Android Studio, we have been looking at files with the project scope, but it is recommended to use the Android scope in order to simplify the display. Everything you need should be shown there but it is also worth remembering that the option to switch back to the project scope is there if it is needed.
Manage Gradle Build Scripts
Gradle is a build system that manages the compilation and packaging of your code so that it can be deployed through an app store such as Google Play.
Gradle is configured via files called build.gradle and when you first create an application, there are two of these, one labelled as the project file and one labelled as the module file. However, there is a known bug in Android Studio which results in possibly only one of these being displayed in the Android scope so it may be necessary to switch back to the Project scope to see both.
From the project scope, you will see a top-level file called build.gradle but note that it is not labelled as either the project file or the module file. Recall that the app directory is a module and inside this directory is another file called build.gradle (also not labelled). As you might expect, the file inside the module directory is the same as the one labelled module file in the Project scope and the top-level file is the one labelled as the project file in the Project scope.
	// Top-level build file where you can add configuration options common to all sub-projects/modules.

	build script {
		ext.kotlin_version = '1.3.11'
		repositories {
			google()
			jcenter()

		}
		dependencies {
			classpath 'com.android.tools.build:gradle:3.4.0-alpha07'
			classpath "org.jetbrains.kotlin:kotlin-gradle-plugin:$kotlin_version"
			// NOTE: Do not place your application dependencies here; they belong
			// in the individual module build.gradle files
		}
	}

	allprojects {
		repositories {
			google()
			jcenter()

		}
	}

	task clean(type: Delete) {
		delete rootProject.buildDir
	}
A sample Gradle build configuration file (project file)
	apply plugin: 'com.android.application'

	apply plugin: 'kotlin-android'

	apply plugin: 'kotlin-android-extensions'

	android {
		compileSdkVersion 28
		defaultConfig {
			applicationId "com.example.myfirstapp"
			minSdkVersion 16
			targetSdkVersion 28
			versionCode 1
			versionName "1.0"
			testInstrumentationRunner "android.support.test.runner.AndroidJUnitRunner"
		}
		buildTypes {
			release {
				minifyEnabled false
				proguardFiles getDefaultProguardFile('proguard-android-optimize.txt'), 'proguard-rules.pro'
			}
		}
	}

	dependencies {
		implementation fileTree(dir: 'libs', include: ['*.jar'])
		implementation"org.jetbrains.kotlin:kotlin-stdlib-jdk7:$kotlin_version"
		implementation 'com.android.support:appcompat-v7:28.0.0'
		implementation 'com.android.support.constraint:constraint-layout:1.1.3'
		implementation 'com.android.support:design:28.0.0'
		testImplementation 'junit:junit:4.12'
		androidTestImplementation 'com.android.support.test:runner:1.0.2'
		androidTestImplementation 'com.android.support.test.espresso:espresso-core:3.0.2'
	}
A sample Gradle build configuration file (module file)
The files shown here are the Gradle build files and these are the project and module files respectively.
The project file defines the Gradle plugin version and also, if you are working in Kotlin, the Kotlin plugin version. Now, if you update either Android Studio or Kotlin after you have created a project, these numbers will no longer match and this will cause the build to fail.
To demonstrate this, I have closed the project and then from the welcome screen, selected check for updates (under the configure menu) and this has located an update to Android Studio which I have installed. When I restart Android Studio, there is now a discrepancy between the actual Gradle plugin version and the version number in the project file. This is reported in the dialog.
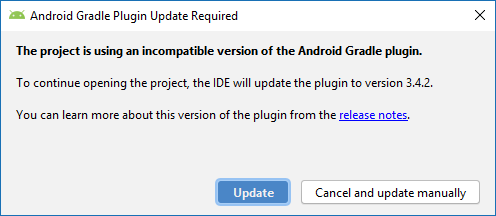
Note that I can choose to either update by clicking the Update button or do the update manually later. I’m not sure why I might want to update manually but for the time being, note (from figure 3) that the plugin version had been reported as:
classpath 'com.android.tools.build:gradle:3.4.0-alpha07'
and after the update, it is now reported as:
classpath 'com.android.tools.build:gradle:3.4.2'
Performing a manual update seems straightforward enough if you know the version of the plugin but I’m not sure how you find this other than in the dialog box so I would either take a note of it or close and reopen the project in order to make the dialog box reappear if I wanted to do a manual correction to the configuration.
The app level file includes things like the version code which is always numeric and the version name which can be any string. The version code is what you use internally to track the version and the version name is what the user sees on the app store.
The version code should be incremented every time you upgrade the application but the version name only needs to be updated if this makes sense for the users.
Other important entries in the module file include:
	•	The application id which matches the base package where your Java and Kotlin classes are stored.
	•	The target SDK version which points to an API level.
	•	The minimum SDK version which indicates the oldest version of Android the app is approved for (currently Google recommends a minimum SDK of 16 because older versions of Android are no longer supported by the Google Play support libraries).
	•	Under dependencies there are strings representing different libraries your application depends on.  These start with the word implementation which is followed by a string with the library name and version.  When the application is built, Gradle will use these dependencies to identify which components the app needs and will obtain some of these from a local Maven repository and some from online repositories.
The online Maven repositories are identified in the project in two places. The first is under repositories and the second is under allprojects > repositories. As you can see in figure 3, there are two such repositories listed.
	•	google() points to Google’s own Maven repository.
	•	jcenter() reports to another open-source Maven library that is also available online.
For more advanced Android apps, you will need to edit these. Most commonly you will edit the module level Gradle build file but occasionally you will also need to edit the project level file as well.
Manage the App Manifest File
Typically, a new app that you create will have a single module but in a complete production application, it is normal to have one module for the app and then other modules for various libraries that support the app.
Each module has a manifest file which is always called AndroidManifest.xml and these are stored in the manifests directory. Note on this point, the file appears to be inside a directory when you are viewing the project under the Android scope rather than the Project scope which suggests that this is a “directory” created for organisational purposes under Android scope rather than a physical directory. For instance, if I look at the manifest file shown in the examples above, its actual location is:
C:\Users\emuba\Documents\AndroidDev2019FirstApp\app\src\main
In other words, it is stored inside the main folder.
Recall that a sample AndroidManifest.xml file (which happens to be the same one referenced by the pathway shown above) is shown previously.
Some key points about this file are:
• It is an XML file. • Its root element is called manifest. • It declares at least one namespace used to identify various attributes in the rest of the file. • The package points to the base package for the application and this will match the package where you have stored your root classes such as MainActivity. • Within the manifest is an application element which has some useful attributes such as label, icon, allowBackup and so on. • There is also an activity element. In an Android app, each activity represents a different screen in the application and a typical app when created will have at least one activity. With the activity element: o Name refers to the class that controls the behaviour of the activity. If you hold down the control key and click on the class name, you can jump to the actual class definition. o The label can be displayed in a couple of places within the activity. Typically, it will appear at the top of the screen but if the activity is set to Main and the category to launcher, it will be displayed on the devices launcher screen associated with the launcher icon.
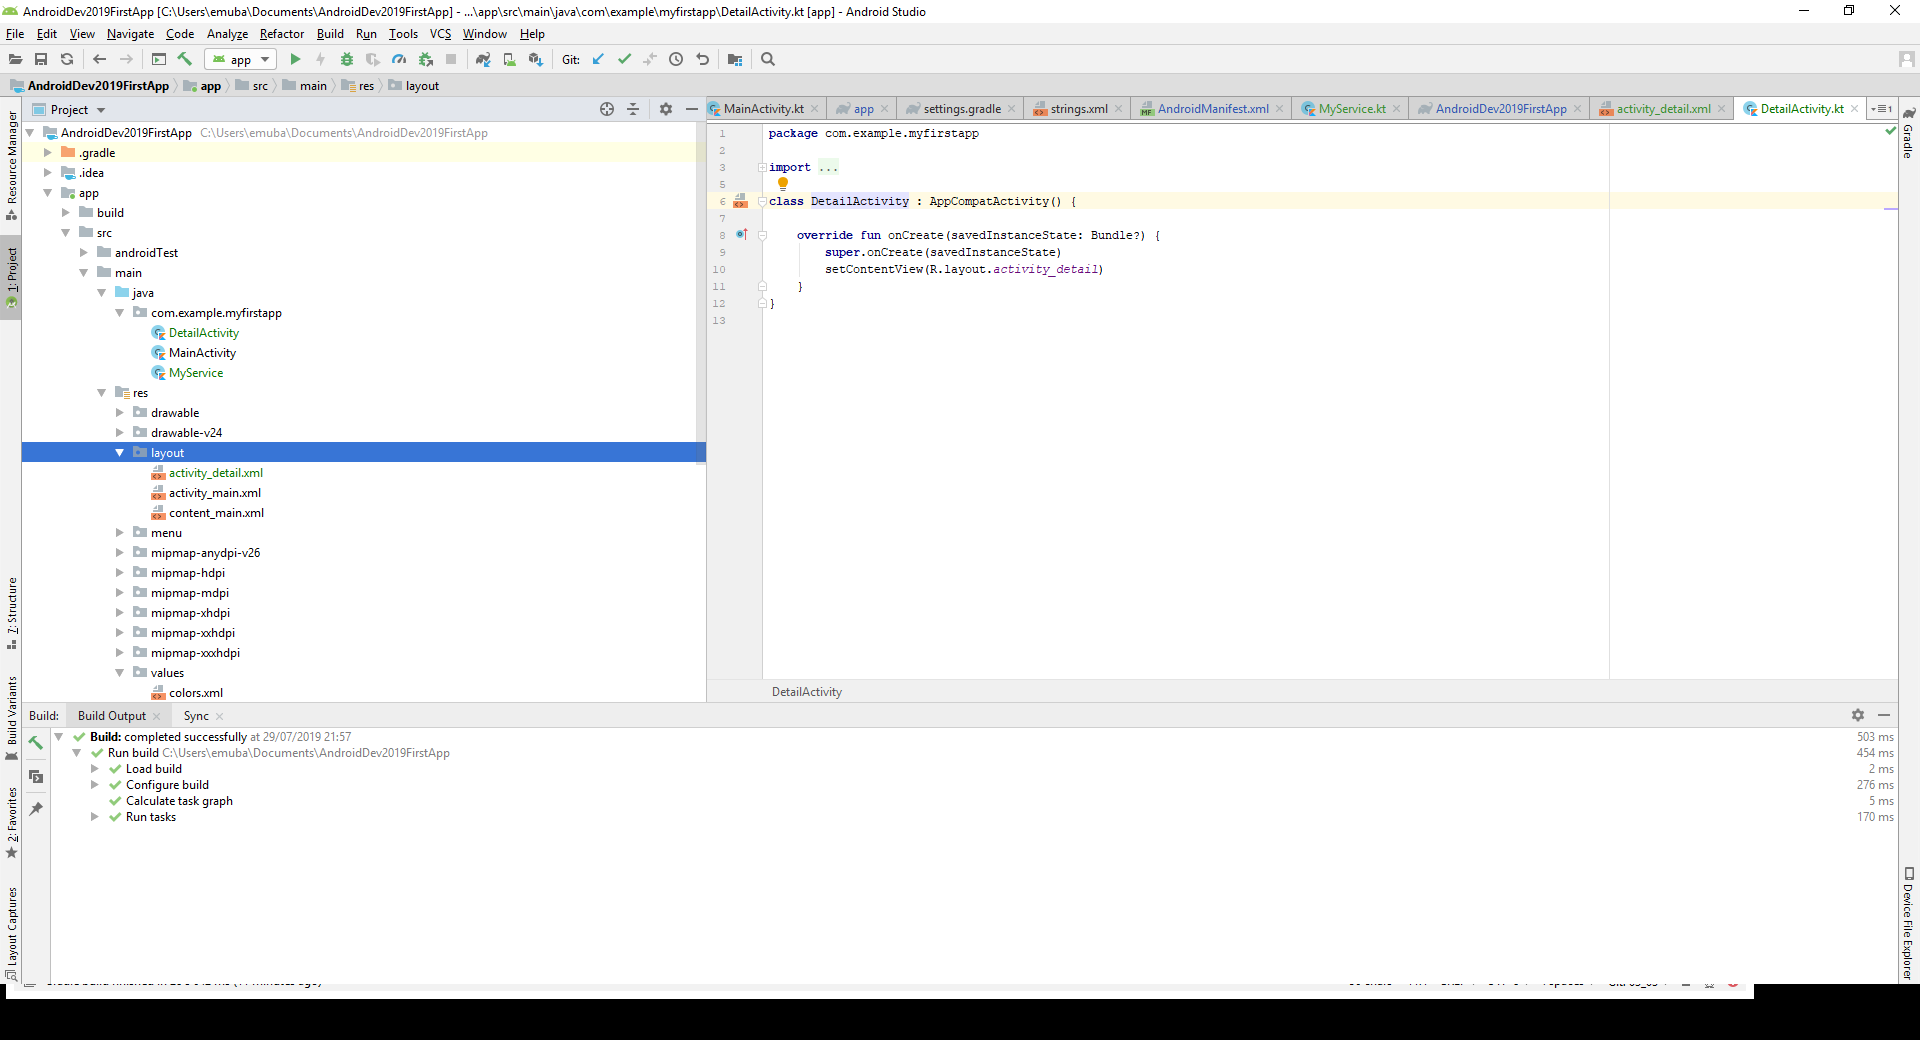
Each new activity or service in the application must be registered in the manifest. To see how this works, we will add a new activity to our application (the branch is now 03_04). This is done by right clicking on app, selecting new and then New and then Activity and in this case, I will select an Empty Activity.
I will then change the name to DetailActivity and accept all the other default settings and complete the process by clicking Finish and then clicking the button to add the file to Git.
Now, if I look at the manifest file again, I can see that it now has two elements, one of which is the newly added DetailActivity and this is empty.
If we do the same thing again but select Service rather than Activity, this time I will accept the default name of MyService and click Finish and add the file to Git, I can now go back to the manifest and see that this has also been registered. Figure 6 shows the manifest file again with these changes highlighted in yellow.
	<?xml version="1.0" encoding="utf-8"?>
	<manifest xmlns:android="http://schemas.android.com/apk/res/android"
			  package="com.example.myfirstapp">

		<application
				android:allowBackup="true"
				android:icon="@mipmap/ic_launcher"
				android:label="@string/app_name"
				android:roundIcon="@mipmap/ic_launcher_round"
				android:supportsRtl="true"
				android:theme="@style/AppTheme">
			<service
					android:name=".MyService"
					android:enabled="true"
					android:exported="true">
			</service>

			<activity android:name=".DetailActivity">
			</activity>
			<activity
					android:name=".MainActivity"
					android:label="@string/app_name"
					android:theme="@style/AppTheme.NoActionBar">
				<intent-filter>
					<action android:name="android.intent.action.MAIN"/>

					<category android:name="android.intent.category.LAUNCHER"/>
				</intent-filter>
			</activity>
		</application>

	</manifest>
The manifest file which is similar to the one shown in figure 2 but with the addition of the new activity (DetailActivity) and service (MyService).
Note that in addition to registering the activity and the service, classes are created for both of these and for the activity, and for the activity, an xml file has been created in the res folder under layout. Below, there is a snapshot of the project window displaying the location of these files and you will see that these are displayed under the Project scope.
When you deploy an Android app, the manifest is included and this allows the Android OS and application framework to examine the app to determine how to handle the app and its components. Understanding the manifest and how to maintain it is therefore a critical element of the process of creating apps for Android.
Use Dependencies and Support Libraries
The Gradle build system is integrated into Android Studio and it depends on a system known as Maven. A Maven repository is a library of libraries and allows developers to share these libraries with others.
The dependencies (mentioned previously) that you declare in the Gradle build file point to Maven libraries. The variables determining the versions of various libraries are stored in the Project build file but the actual dependencies should be declared in the Module build file.
	dependencies {
		implementation fileTree(dir: 'libs', include: ['*.jar'])
		implementation"org.jetbrains.kotlin:kotlin-stdlib-jdk7:$kotlin_version"
		implementation 'com.android.support:appcompat-v7:28.0.0'
		implementation 'com.android.support.constraint:constraint-layout:1.1.3'
		implementation 'com.android.support:design:28.0.0'
		testImplementation 'junit:junit:4.12'
		androidTestImplementation 'com.android.support.test:runner:1.0.2'
		androidTestImplementation 'com.android.support.test.espresso:espresso-core:3.0.2'
	}
To illustrate this, here is a copy of these dependencies taken from the Module build file we looked at earlier. Note that the strings defining these dependencies can be enclosed in single or double quotes where the dependency is a string literal but where the string includes a variable (which you can see, for instance, in the second dependency above which uses a variable to specify the Kotlin version), the string must be enclosed in double quotes.
Since these libraries are stored separately from the primary SDK, they may support older versions of Android. The third dependency in figure 8 shows a version number (v7) and this denotes the fact that this library is backward compatible as far as the level shown. In this example, the library is compatible with API level 7 and above.
There is a newer way to declare these dependencies and libraries using the newer style of declaration start with androidX rather than com.android.support. You can upgrade your app to the newer libraries by selecting the Refactor menu and then Migrate to AndroidX.
The changes that will be made are shown in a preview at the bottom of the screen and if you are happy to proceed, you can click on Do Refactor to complete the process.
These dependencies are the same as those shown above after the project has been migrated in this way.
	dependencies {
		implementation fileTree(dir: 'libs', include: ['*.jar'])
		implementation"org.jetbrains.kotlin:kotlin-stdlib-jdk7:$kotlin_version"
		implementation 'androidx.appcompat:appcompat:1.0.0'
		implementation 'androidx.constraintlayout:constraintlayout:1.1.3'
		implementation 'com.google.android.material:material:1.0.0'
		testImplementation 'junit:junit:4.12'
		androidTestImplementation 'androidx.test:runner:1.1.0'
		androidTestImplementation 'androidx.test.espresso:espresso-core:3.1.0'
	}
With this change, we are now seeing a warning in the build file that states that a newer version of the AndroidX libraries are available (in the video this applies to all 4 libraries prefixed with android but on my system, I already have a newer version of the constraint layout library and this one does not show the warning so I can only see this on 3 of the libraries).
Theoretically, you can use an intention action to change this to the latest library but this didn’t work on my install but there are two ways round this. It is possible to click on the drop-down box displaying the warning light bulb and select “Upgrade to….” followed by the correct version number. This number is also shown in the full warning message so a second option would be to manually change the version number.
However, the version numbers are updated, you will then need to re-sync the Grade files (this is confirmed by a message at the top of the screen) and you can do this by simply clicking Sync Now at the top-right of the screen.
So now, the application is set up to work with the latest version of the AndroidX libraries and I can run the application to confirm that everything is still working.
Explore Android Jetpack Components
The AndroidX libraries described previously are part of the Android Jetpack collection announced at the 2018 Google IO Conference. These are designed to speed up Android development.
Many of these libraries existed previously as part of the support libraries and we saw how to migrate over to AndroidX (and therefore to Jetpack). These are kept and maintained separately from the Android SDK in order to allow backward compatibility.
Some of these components are part of what are known as the Architecture components and these include the Lifecycles, Live Data, Navigation and Paging components and as well as speeding up development, these also help to ensure applications are easier to maintain.
If you put all of your functionality into a single activity, this is sometimes referred to as the ‘God Activity’ and this is not considered to be good practice. The architecture components encourage a development philosophy that supports a separation of concerns where each activity manages a distinct area of functionality such as dataset functionality, business logic, user interface management.
A more comprehensive description of these components is delivered in a course on Architecture Components.
In addition, there are some very specifically targeted components such as the Compatibility APIs for checking permissions, Notification APIs, APIs for Android Auto and so on. Becoming familiar with the Jetpack components is very important because Google are starting to focus on these as the preferred development methodology so that less code will be required to achieve the desired functionality.
The documentation along with a lot of additional supporting information can be found at https://developer.android.com/jetpack?hl=en.
Troubleshooting Android Studio Projects
Android Studio is updated quite frequently so it is fairly common to open a file built with an older version. To illustrate this, and also to demonstrate how to resolve the issues that arise from this, we will open an older project.
From the Android Studio welcome screen, select Import an Android code sample as shown.
In this case, we will filter for Kotlin and then scroll down to the Getting Started section and select
Basic sample (in Kotlin) for writing unit tests that mocks the framework
We will shorten this name to BasicSample and click Finish to download the sample.
Note that when the program loaded, I immediately saw an error not shown on the video which indicated that the Gradle daemon had stopped for some reason. This is easily resolved by attempting to build the project and this restarts the Gradle daemon. Also perform any other updates which might be recommended.
Next, I can see two error conditions in the bottom right pane and these
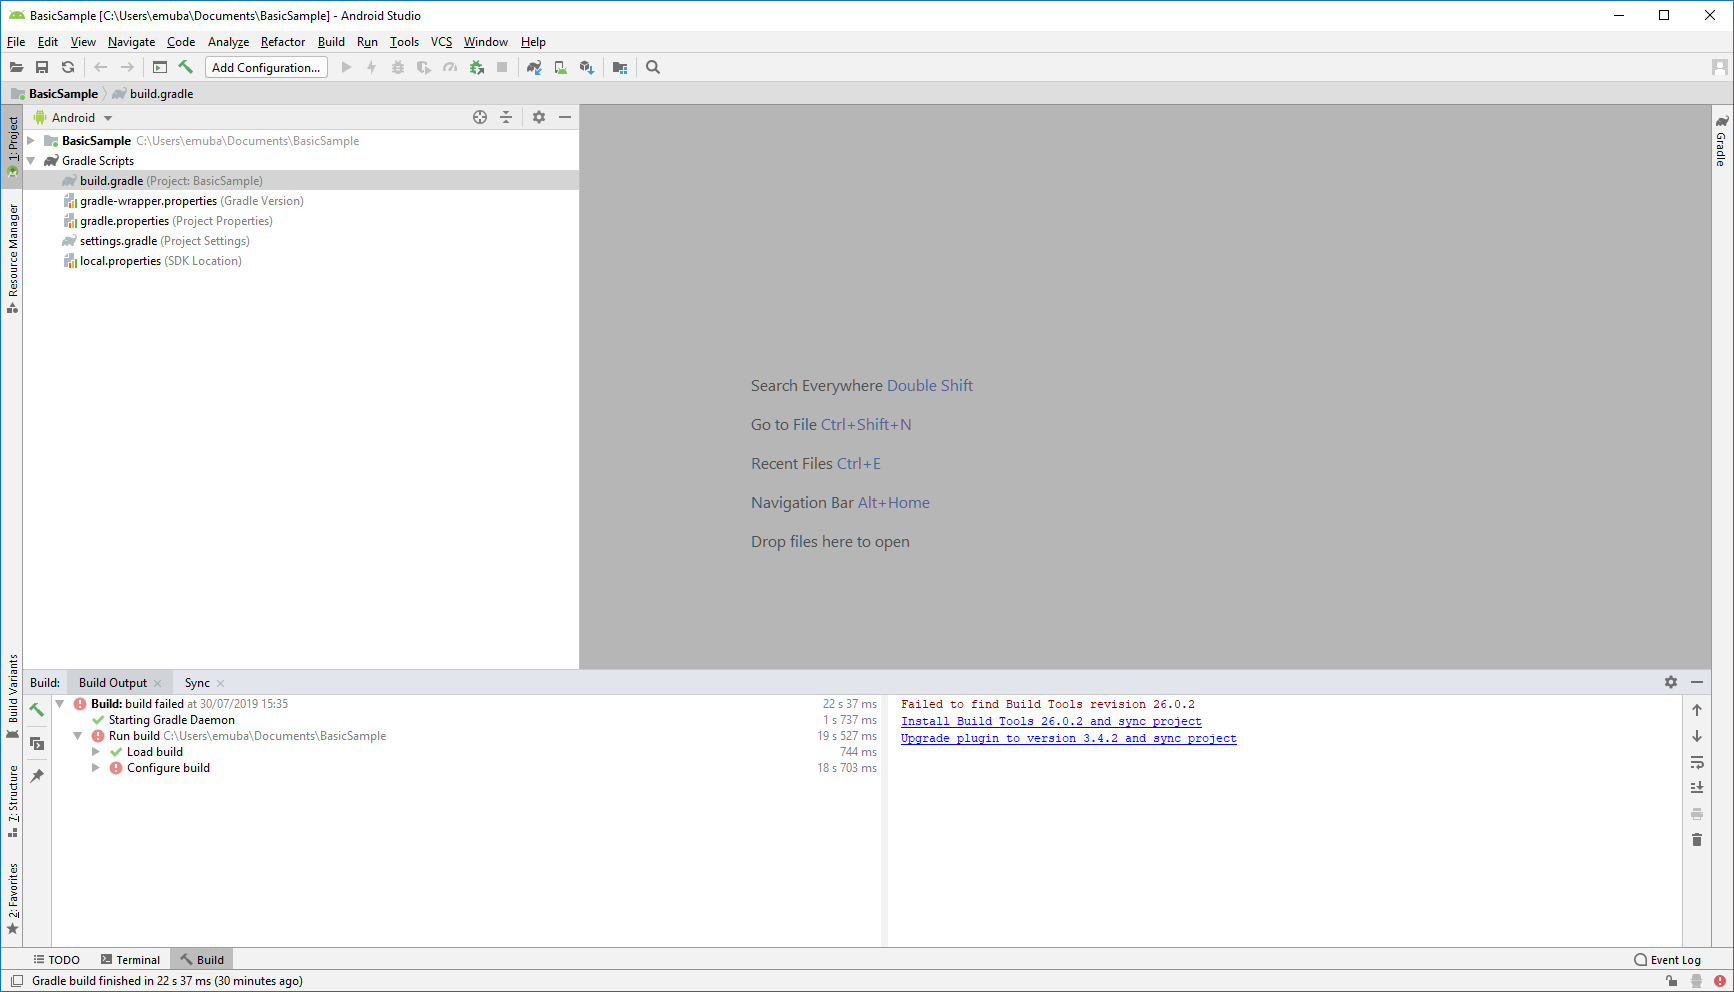
Clicking on the first link installs Build Tools 26.0.2 and I now get a new error message:
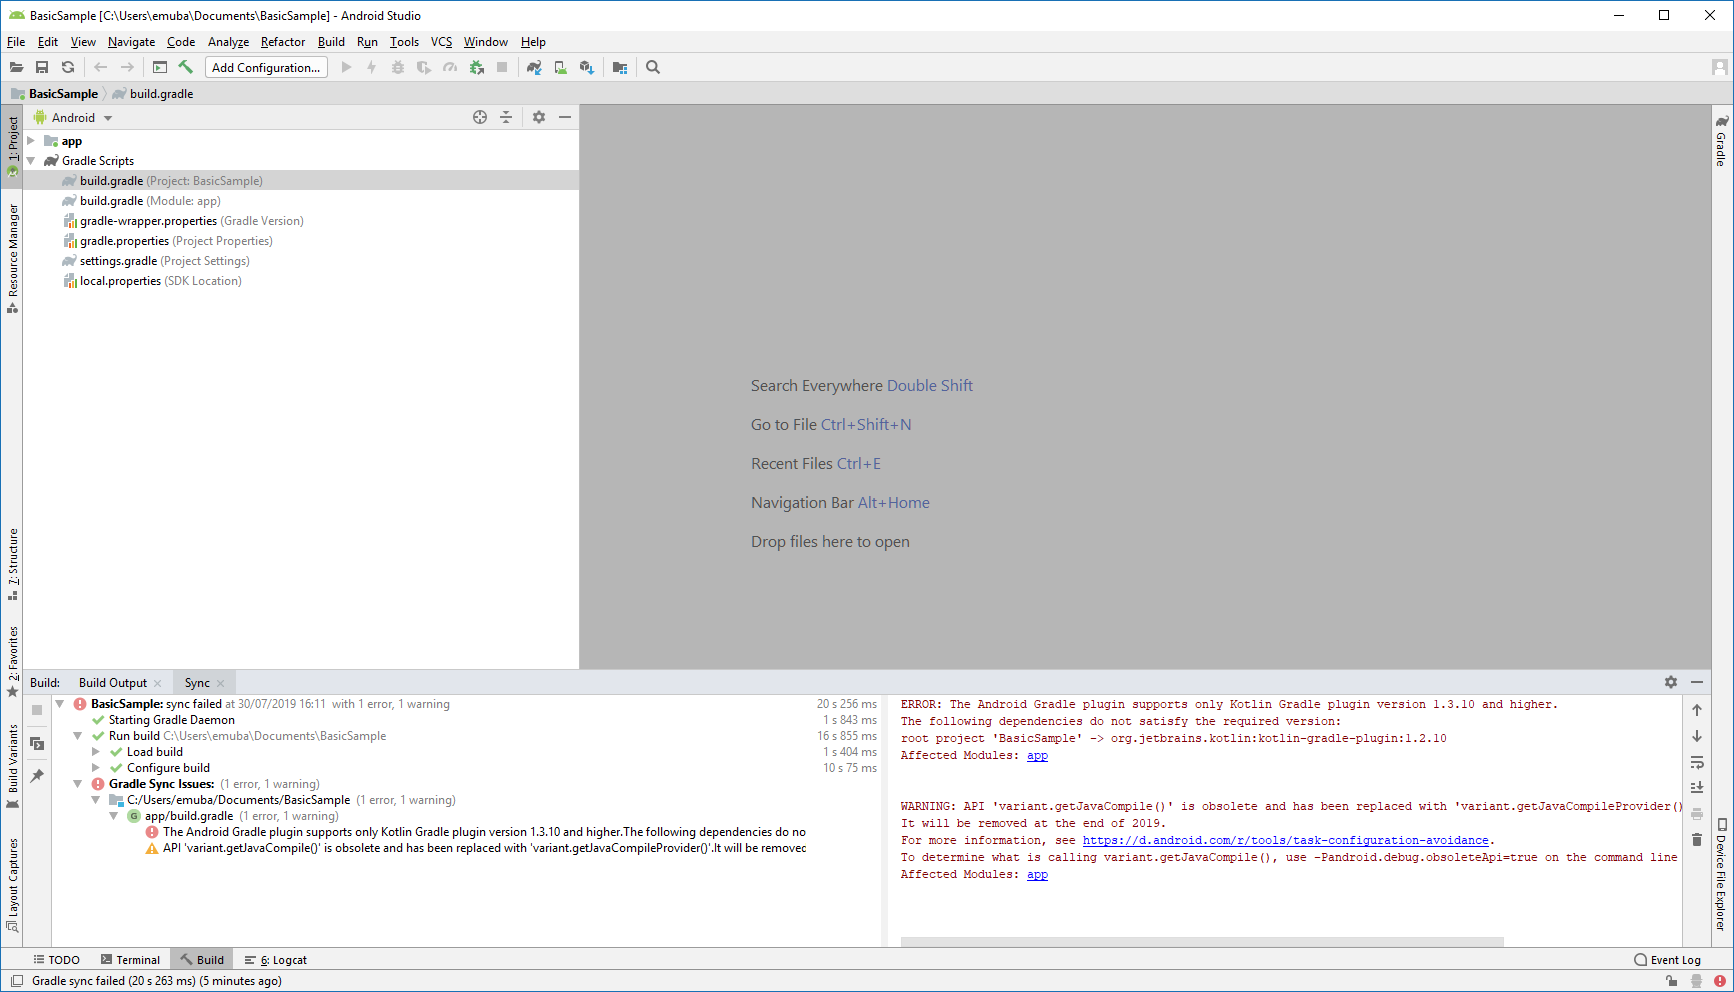
This error appears because this project’s Kotlin version does not match the version I currently have in Android Studio. To check the current version, from the File menu select Settings and then Plugins. Next, search for Kotlin and select the plugin (it may be necessary to ensure that the Installed tab is selected) and then click on the word Kotlin to obtain its installation details.
This shows that my Kotlin version number is 1.3.41 and when I call up the Gradle build file for the project, I can see that it has a Kotlin version number of 1.2.10 so I can manually change this to match the current version.

Now that the Kotlin versions match, we can see another error. This is actually caused by an inconsistency between how Kotlin is declared compared to how it was declared in the past. This is fixed by going to the Gradle build file for the module. In this file, we have the dependencies as shown here:
	dependencies {
		implementation "org.jetbrains.kotlin:kotlin-stdlib-jre7:$kotlinVersion"

		// Unit testing dependencies.
		testImplementation 'junit:junit:4.12'
		testImplementation 'org.mockito:mockito-core:2.8.9'
	}
The first line needs to be changed to:
implementation "org.jetbrains.kotlin:kotlin-stdlib-jdk7:$kotlinVersion"
Now, if we click Try Again at the top right, the project should build successfully and we can run it to confirm that this is the case.
At this point, if you still have some issues, there are a couple of other things you can try. Firstly, try rebuilding the project and this will delete any existing artefacts that have stale code in them and rebuilds the project from scratch. If this doesn’t solve the issue, click on the Gradle tab in the top right, right-click on the name of the project and select Refresh Gradle project.