Define Screens with Activities
An activity in Android equates roughly to something an app can do and if the app is designed for a phone or a tables, activities manage screens.
An activity screen can server as an interface for smaller user interface components called fragments so it may not always look the same, but it is always managed by an activity.
When an app is started via the launcher icon, the app framework looks for the apps launcher activity which is identified by the intent filter in the apps manifest. For exercise 04_02 the intent filter is shown below.
	<intent-filter>
		<action android:name="android.intent.action.MAIN"/>

		<category android:name="android.intent.category.LAUNCHER"/>
	</intent-filter>
Note that the intent filer has an action and a category. When the app starts, it will run the class defined by the action category and this class is of course, part of the class hierarchy.
For example, we can look at this class in our app and we will see that it extends a class called AppCompatActivity(). If we press control and click on this class name, we can see that it extends FragmentActivity and also implements three interfaces. We can continue in this way and see that FragmentActivity extends ComponentActivity which extends Activity and which extends ContextThemeWrapper and so on.
This highlights the fact that each activity is actually a type of context and the other type of context is the application context.
Now, returning to the Main class, when this executes, it calls a series of what are known as lifestyle functions which are callbacks made automatically by the app framework using interfaces that the activity implements and these are marked with the override keyword.
The most common of these is onCreate.
	override fun onCreate(savedInstanceState: Bundle?) {
		super.onCreate(savedInstanceState)
		setContentView(R.layout.activity_main)
		setSupportActionBar(toolbar)

		fab.setOnClickListener { view ->
			Snackbar.make(view, "Replace with your own action", Snackbar.LENGTH_LONG)
				.setAction("Action", null).show()
		}
	}
So, we are calling the super version of the same function first. Typically, you will then call setContentView and pass it a reference to a layout file, R.layout.activity_main. This file is stored in the resources folder and again, we can jump over to it by holding control and clicking the filename.
We can also jump to its location within the navigation panel by clicking on the Scroll from Source icon (which looks like a little wheel and is just next to the scope drop-down menu).
So now, we can summarise the startup process as:
	•	From MainActivity, the onCreate function is called.
	•	From onCreate, the setContentView function is called.
	•	The setContentView function loads the screen design which is defined in the XML layout file.
Implement Designs in XML Layouts
The setContentView takes an integer value as an argument and this is the resource ID of the XML layout file. Here is the onCreate function from where the call to setContentView is made.
	override fun onCreate(savedInstanceState: Bundle?) {
		super.onCreate(savedInstanceState)
		setContentView(R.layout.activity_main)
		setSupportActionBar(toolbar)

		fab.setOnClickListener { view ->
			Snackbar.make(view, "Replace with your own action", Snackbar.LENGTH_LONG)
				.setAction("Action", null).show()
		}
	}
This value is stored in a class called R which is auto-generated.
You will never make changes to the R class. If you do happen to make changes here, there is a background process which regenerates the class so any changes would be wiped out. Layout (R.layout.activity_main)references the layout directory in the resources directory and is followed by the name of the file without the extension.
We can jump to this file by pressing control and clicking on the filename. In the project window, you can go to the file’s location (as noted in the previous section) by clicking inside the code window and then clicking on the Scroll from Source icon.
This application has two layout files, one of which is activity_main.xml.
	<?xml version="1.0" encoding="utf-8"?>
	<androidx.coordinatorlayout.widget.CoordinatorLayout
			xmlns:android="http://schemas.android.com/apk/res/android"
			xmlns:app="http://schemas.android.com/apk/res-auto"
			xmlns:tools="http://schemas.android.com/tools"
			android:layout_width="match_parent"
			android:layout_height="match_parent"
			tools:context=".MainActivity">

		<com.google.android.material.appbar.AppBarLayout
				android:layout_height="wrap_content"
				android:layout_width="match_parent"
				android:theme="@style/AppTheme.AppBarOverlay">

			<androidx.appcompat.widget.Toolbar
					android:id="@+id/toolbar"
					android:layout_width="match_parent"
					android:layout_height="?attr/actionBarSize"
					android:background="?attr/colorPrimary"
					app:popupTheme="@style/AppTheme.PopupOverlay"/>

		</com.google.android.material.appbar.AppBarLayout>

		<include layout="@layout/content_main"/>

		<com.google.android.material.floatingactionbutton.FloatingActionButton
				android:id="@+id/fab"
				android:layout_width="wrap_content"
				android:layout_height="wrap_content"
				android:layout_gravity="bottom|end"
				android:layout_margin="@dimen/fab_margin"
				app:srcCompat="@android:drawable/ic_dialog_email"/>

	</androidx.coordinatorlayout.widget.CoordinatorLayout>
The other layout file is called contant_main.xml and this is nested or included within activity_main.xml layout file. So activity_main.xml is referred to as the outer file and content_main.xml is the inner layout file.
The floating action button (that’s the button displayed in the bottom right corner in the app and this is shown in this image) is defined in the outer layout.
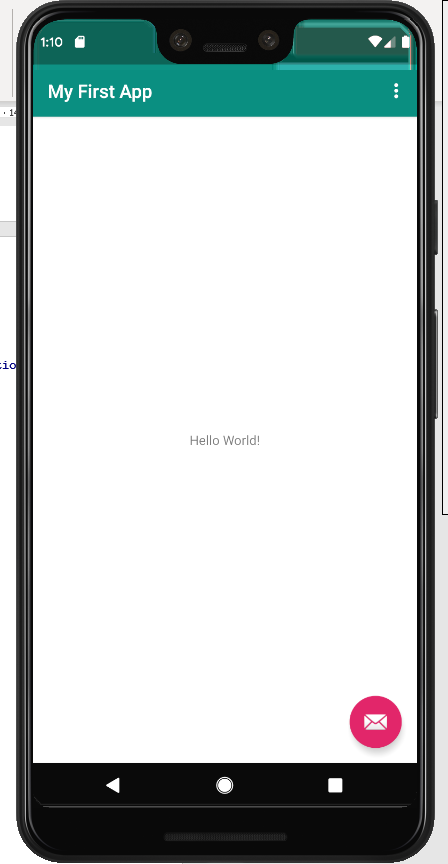
There are two implications here. The first is that if we make any changes to the layout in the inner file, this will not affect the floating action button. The second is that when the app is running, if we were to scroll in the inner layout, this again will have no effect on the floating action button (for instance, it won’t move around as the inner file scrolls up and down).
Typically, when you want to make any changes, you will do this within the nested file.
In this case, the nested file contains just one component and this is a text view component which is wrapped in a constraint layout container.
Constraint layout is one kind of view group and is designed to manage the layout of multiple views.
The text view is a child component, it is a child of the constraint layout. Its position is dictated by four attributes in the layout file and the TextView element, with these constraints, is
	<TextView
			android:layout_width="wrap_content"
			android:layout_height="wrap_content"
			android:text="Hello World!"
			app:layout_constraintBottom_toBottomOf="parent"
			app:layout_constraintLeft_toLeftOf="parent"
			app:layout_constraintRight_toRightOf="parent"
			app:layout_constraintTop_toTopOf="parent"/>
Note that these positional constraints all start with layout_constraint. Note that all four reference the edge of the screen (the top, the bottom, the left and the right) and all of them also reference parent with the result being that this component is position in the centre of the screen.
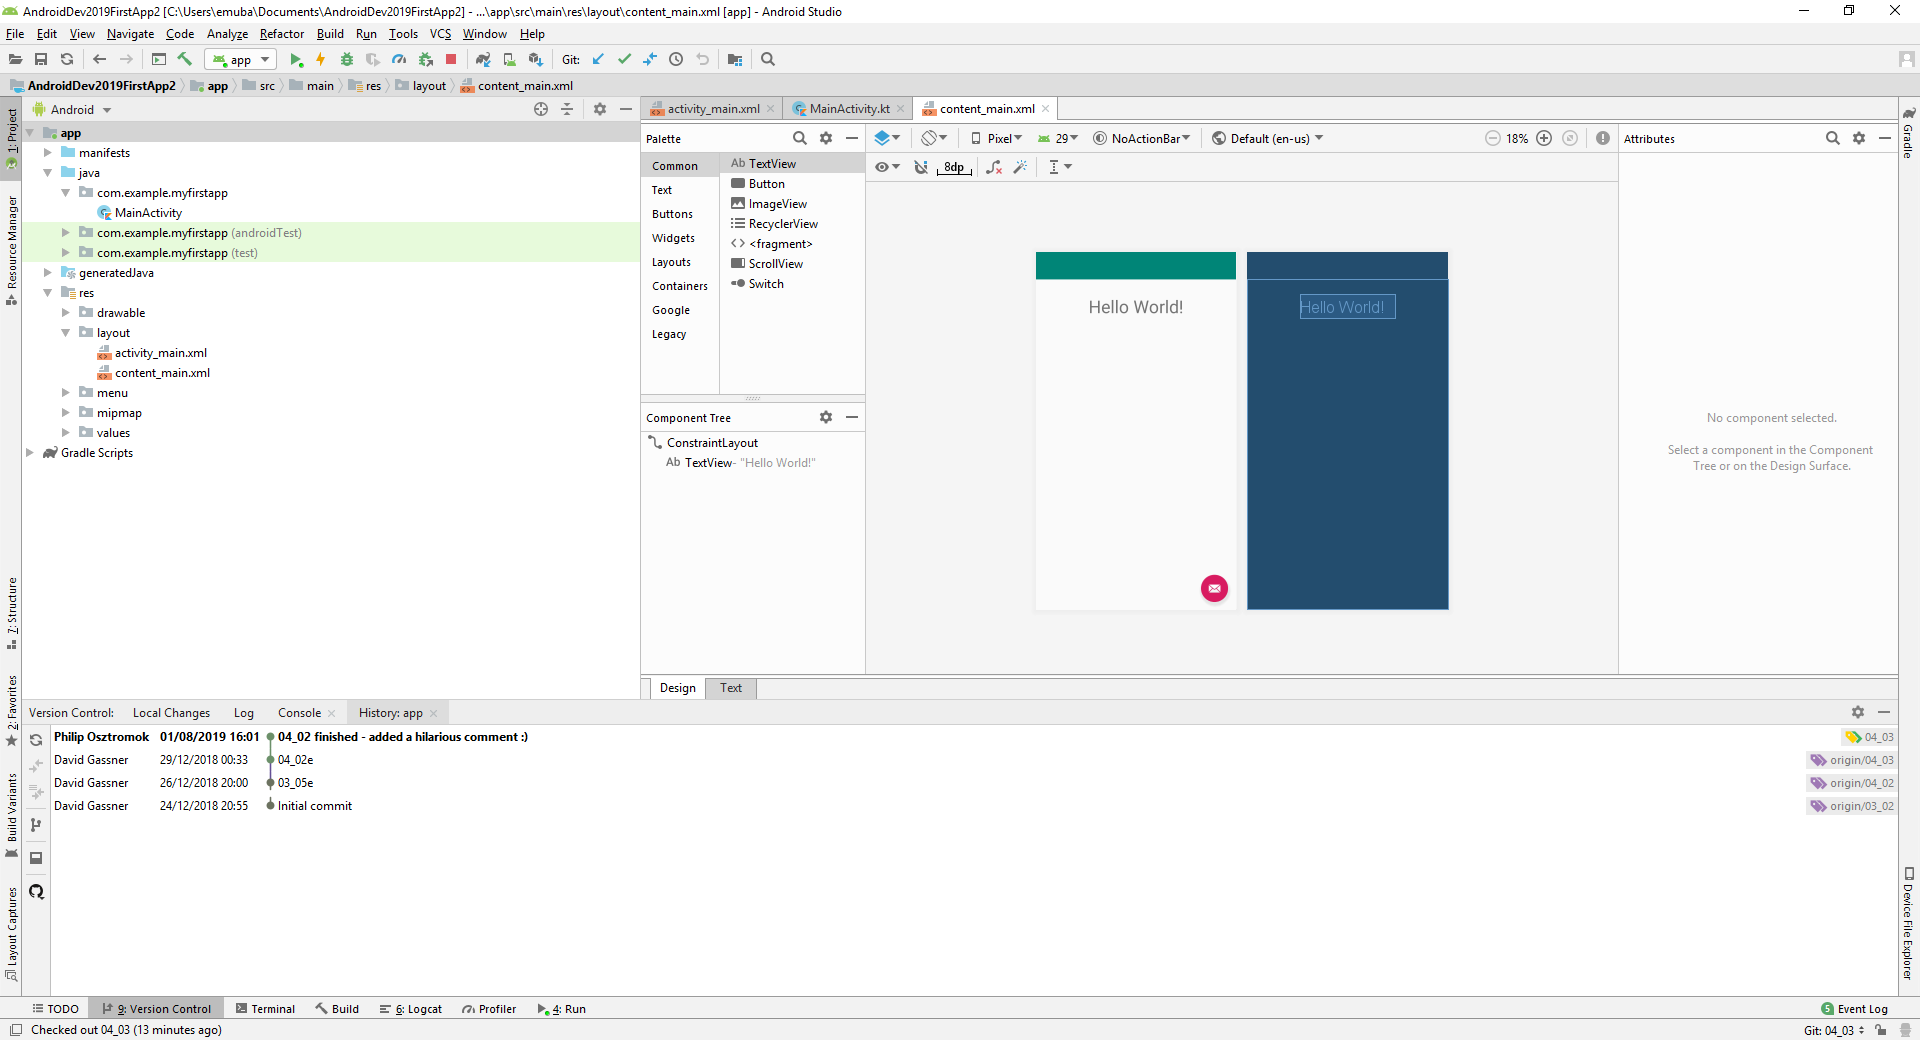
If we want to change this, we can go to the layout’s design view and select the TextView component and we should see something like the view shown.
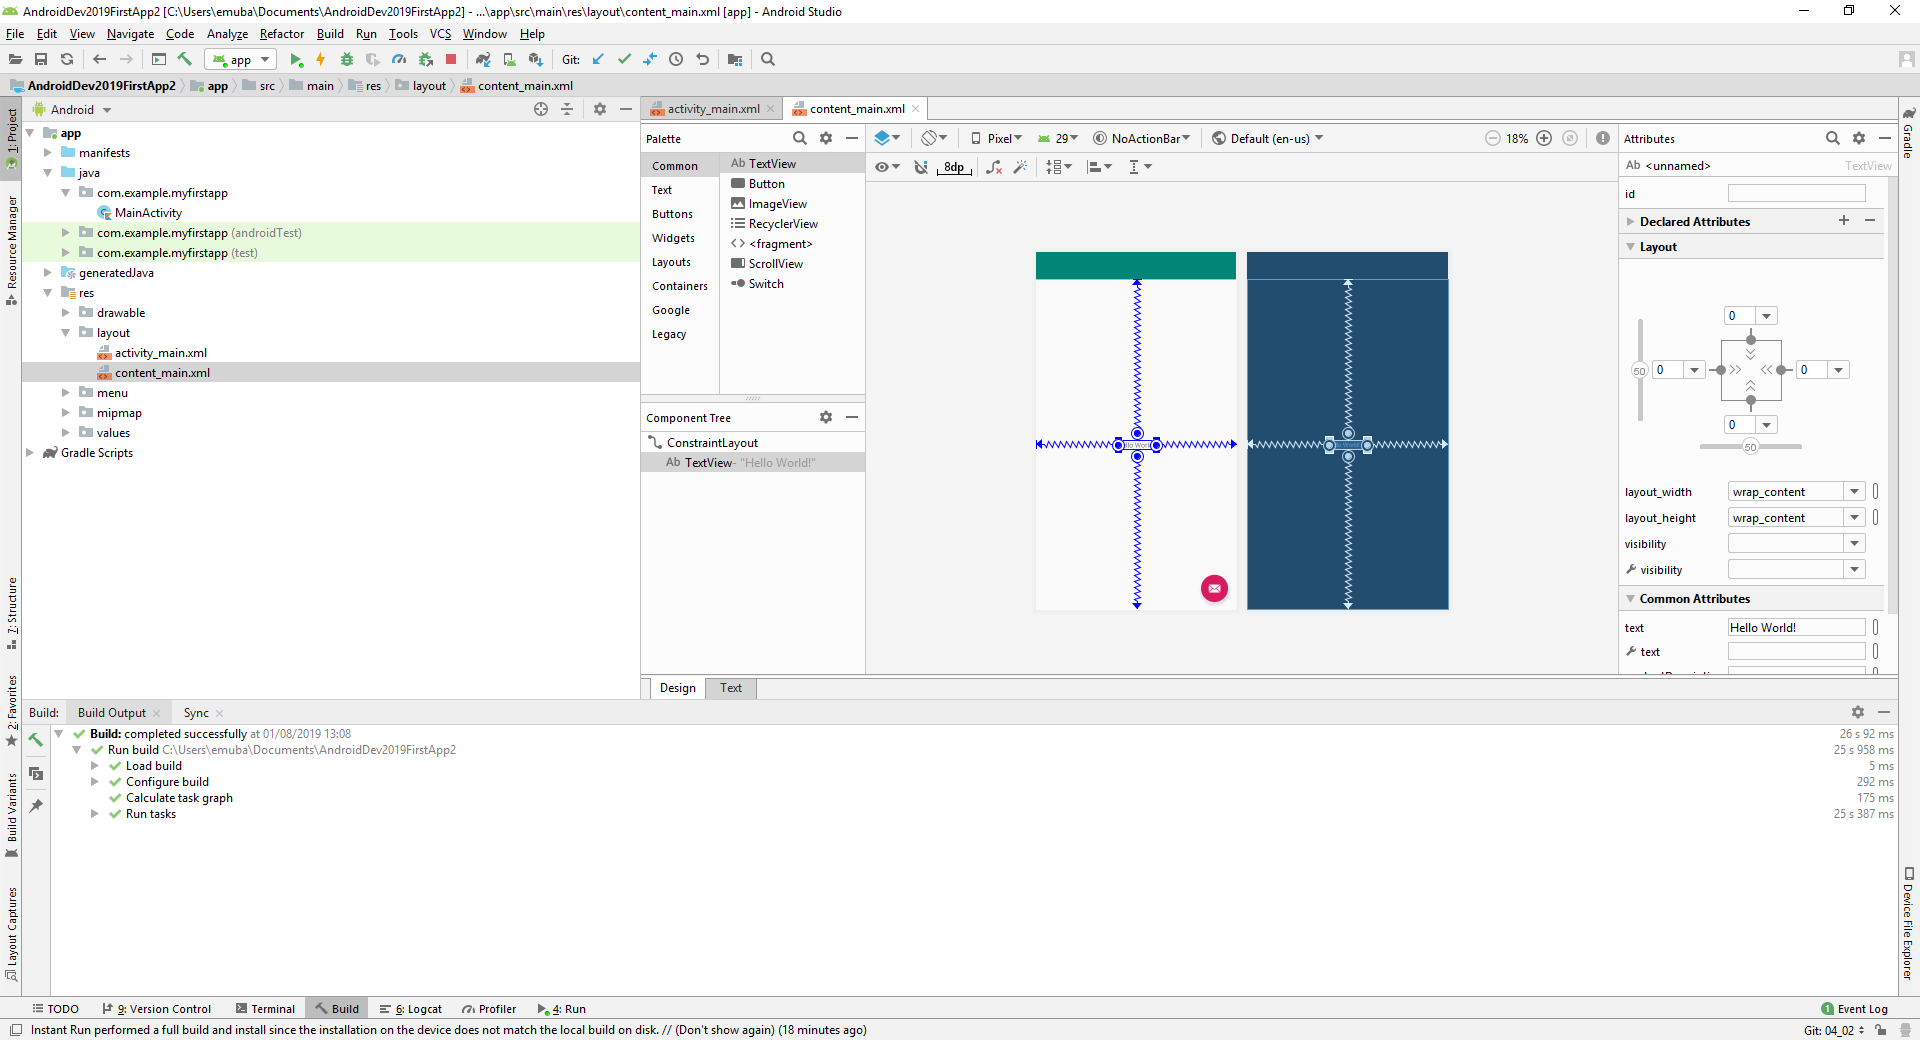
Now, in the right-hand pane we can see the layout. To make this a little clearer, here is an expanded view of this.
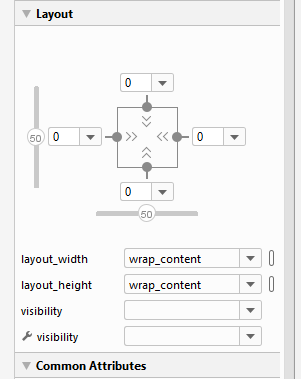
First of all, we will click on the grey circle at the bottom and this removes the bottom constraint with the result that the component floats all the way to the top.
If we want to position it a bit further down, there are two ways to do this (actually, three if you count direct manipulation of the code).
We can use the design view to drag and drop it to the desired location and this generates the code for the new position. Alternatively, we can go to the attributes section on the right-hand side and either search for the appropriate attribute manually or (more likely) type the attribute we want into the attributes search box.
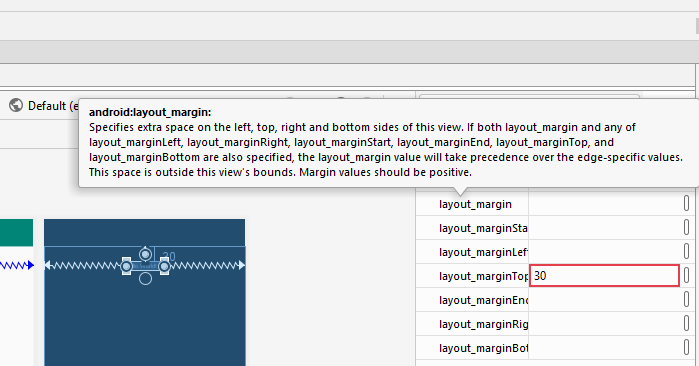
In this case, the attribute we want to search for is margin and this will show us the layout margins. If we expand these, we can see the margins for top, left and so on. We can enter a margin of, say, 30 for the top margin and we will then see that it is positioned slightly below the top margin.
Note that there is an option to specify a figure for the margin and this acts as the margin for left, right, top and bottom.
This means that it is possible to provide conflicting information. For instance, if we leave the top margin set to 30 and then insert a figure of 150 for margin, we can see that the TextView is now much further from the top. This is because the value we inserted for margin takes precedence over an edge-specific margin, in this case the top-edge margin.
This is noted in the hint that appears if you hover over margin and this is reproduced below.
Now, we can remove the figure of 150 from margin so that we have just the top margin set to 30 but we did not enter a unit. Actually, we can change the value and we will see this reflected in the changed positioning of the TextView but Android Studio shows an error condition of “unknown units” which you can see has resulted in the input box for the top margin displaying a red border.
To fix this, we can either add the units to the value in the input box or to the code in text view (that is, the text view for the layout file rather than the TextView component). We could use px (pixels) as a unit and this works but a warning is displayed that states we should prefer the use of dp which stands for device independent pixels.
Going back to the design view, we will search for size in the attribute search box and one of the attributes we find is textSize which we will change to 36 but notice here that the units are given as sp. In fact, we can specify this as dp, but just as we saw with dp being preferred over px for the margin, we will also see that Android Studio will warn us that sp is preferred over dp for textSize.
Note that sp stands for scale independent pixels and the difference is this. In settings, the user can choose to change the size of text displayed. For instance, there may be an option in Settings > Accessibility for the user to select large text. If the text size has been specified with sp, this will result in the user seeing larger text as expected, but if it has been specified with dp, the text size will not change when the user selects large text.
For more information on this and other measurement units, please see the YouTube video
Use the View and ViewGroup Components
Screens in Android are built using widgets known as Views. Here, we can see our app in Design View in Android Studio and on the left-hand side, there is palette showing these different widgets (or Views).
We can drag and drop these objects onto our screen and it does seem that it is now in a fixed position (I will add a button in this way), but if we run the app we will see that it has moved to the top of the screen. If you want it to stay in the position where it was dropped, it will have to be anchored.
When you create a new app in Android Studio, the root element (in the most recent versions of Android Studio) is a constraint layout. Actually, we can see ConstraintLayout in the palette by selecting Layouts and this is a[articular kind of view known as a ViewGroup. If we hold down control and click on ConstraintLayout to call up the class, we can see that it actually extends a class called ViewGroup.
A ViewGroup is designed to manage the position of its child views and at the moment, our constraint layout has two child views, a TextView and a Button, so we will look at the first way to anchor a component.
Before I do that, let’s take a brief look at the code in content_main.xml and we will see here that adding the button has generated some code here.
	<Button
			android:text="Button"
			android:layout_width="wrap_content"
			android:layout_height="wrap_content" tools:layout_editor_absoluteY="554dp"
			tools:layout_editor_absoluteX="108dp" android:id="@+id/button"/>
One thing to note which may not be clear from figure 25 is that the button element has been added as a nested element within constraintlayout in the XML code.
Now, I will go back to design view and note that the button is surrounded by constraints just as our TextView widget was when we clicked the bottom constraint to delete it, however, these are white to indicate that they are empty, there are currently no constraints.
I will click on the bottom circle to create a constraint and drag the button down to the bottom of the screen. Going back to text view, I can see that the following line has been added to the code:
app:layout_constraintBottom_toBottomOf="parent"/>
If I go back to design view and add similar constraints for left and right, the code for button is changed again and we end up with the button element shown below.
	<Button
			android:text="Button"
			android:layout_width="wrap_content"
			android:layout_height="wrap_content"
			android:id="@+id/button"
			android:layout_marginBottom="8dp"
			app:layout_constraintBottom_toBottomOf="parent"
			app:layout_constraintStart_toStartOf="parent"
			android:layout_marginStart="8dp"
			app:layout_constraintEnd_toEndOf="parent"
			android:layout_marginEnd="8dp"/>
Note that the code in figure 26 has been tidied up a little bit with respect to positioning without changing the actual code.
So, we have anchored the button to the bottom, left and right and these are all shown in the constraints in figure 26. Our first constraint was a bottom to bottom of constraint and we have also added start to start of and end to end of constraints. These latter two anchor the button to the left and right edges of the screen respectively. We could have used left to left of and right to right of constraints instead, but specifying start rather than left and end rather than right is actually preferred because it means that the app would react more elegantly if the app is run in a language that goes right to left. This doesn’t make a difference here since the button has been centred but let’s say we anchored it to the left only (with a left to left of constraint). The button would then appear on the left-hand side for any user.
In contrast, if we use a start to start of constraint without but not end to end of, this would anchor the button to the left hand side for most users, but it would be anchored to the right hand side if the users language went from right to left (since his or her text would start on the right hand side.
Now, let’s go back to the design view and add a top constrain, but we will anchor the button to the bottom of the text view. We can now see that the button is anchored halfway between the bottom of the text view (note that you will see the figure 8 at the bottom of the layout and this is the bottom margin).
There are other ViewGroups available for your layout and these include the LinearLayout (which allows you to layout objects from top to bottom or from left to right), the FrameLayout (designed to contain a single child view and one that you will not see in Android Studio unless you are looking at an old application, the RelativeLayout which is mostly deprecated and superseded by the ConstraintLayout.
There are also some views under the Widgets heading in the palette and these, in general, are fairly self-explanatory and include items such as the WebView, ImageView, VideoView and so on.
Display an Image in an Activity
Android supports a variety of image formats including web formats such as png or jpg files but there are formats that are better, either because they produce smaller file-sizes or they are vector-based and therefore adjust more elegantly to different screen sizes and pixel densities.
For the purpose of demonstrating the use of images, we will start with the app in the state that it was in when we finished the previous section. In the content_main.xml file, which you will recall is the inner file, we will make some changes to the text view object, primarily by giving it a unique id and by changing the text to “My favourite monster”.
With regard to the unique id, it is worth noting that anything you want to refer to programmatically must have a unique id and in Android Studio, a unique id always begins with “@+id/” and is followed by the unique identifier which should be lower vase with underscores if you need to separate words. In this case, we will give the TextView object a unique id of “@+id/headline” and also change the top margin so that the TextView object now looks like this.
	<TextView
			android:id="@+id/headline"
			android:layout_width="wrap_content"
			android:layout_height="wrap_content"
			android:text="My favourite monster"
			app:layout_constraintLeft_toLeftOf="parent"
			app:layout_constraintRight_toRightOf="parent"
			app:layout_constraintTop_toTopOf="parent"
			android:layout_marginTop="30dp"
			android:textSize="36sp"/>
Images are displayed using a component called ImageView and we can drag this onto the layout. When it is first added, you also have the option of selecting an avatar which just helps to see what your image might look like when it has been added.
We can add some constraints to anchor our image to the bottom of the TextView object, the left and right edges of the screen and the bottom edge. You will see that the image is displayed as a small square in the centre of the screen, almost like an icon. It did not, as you may have expected, stretch to fill the available area and, in fact, we need to change some settings before it will do that.
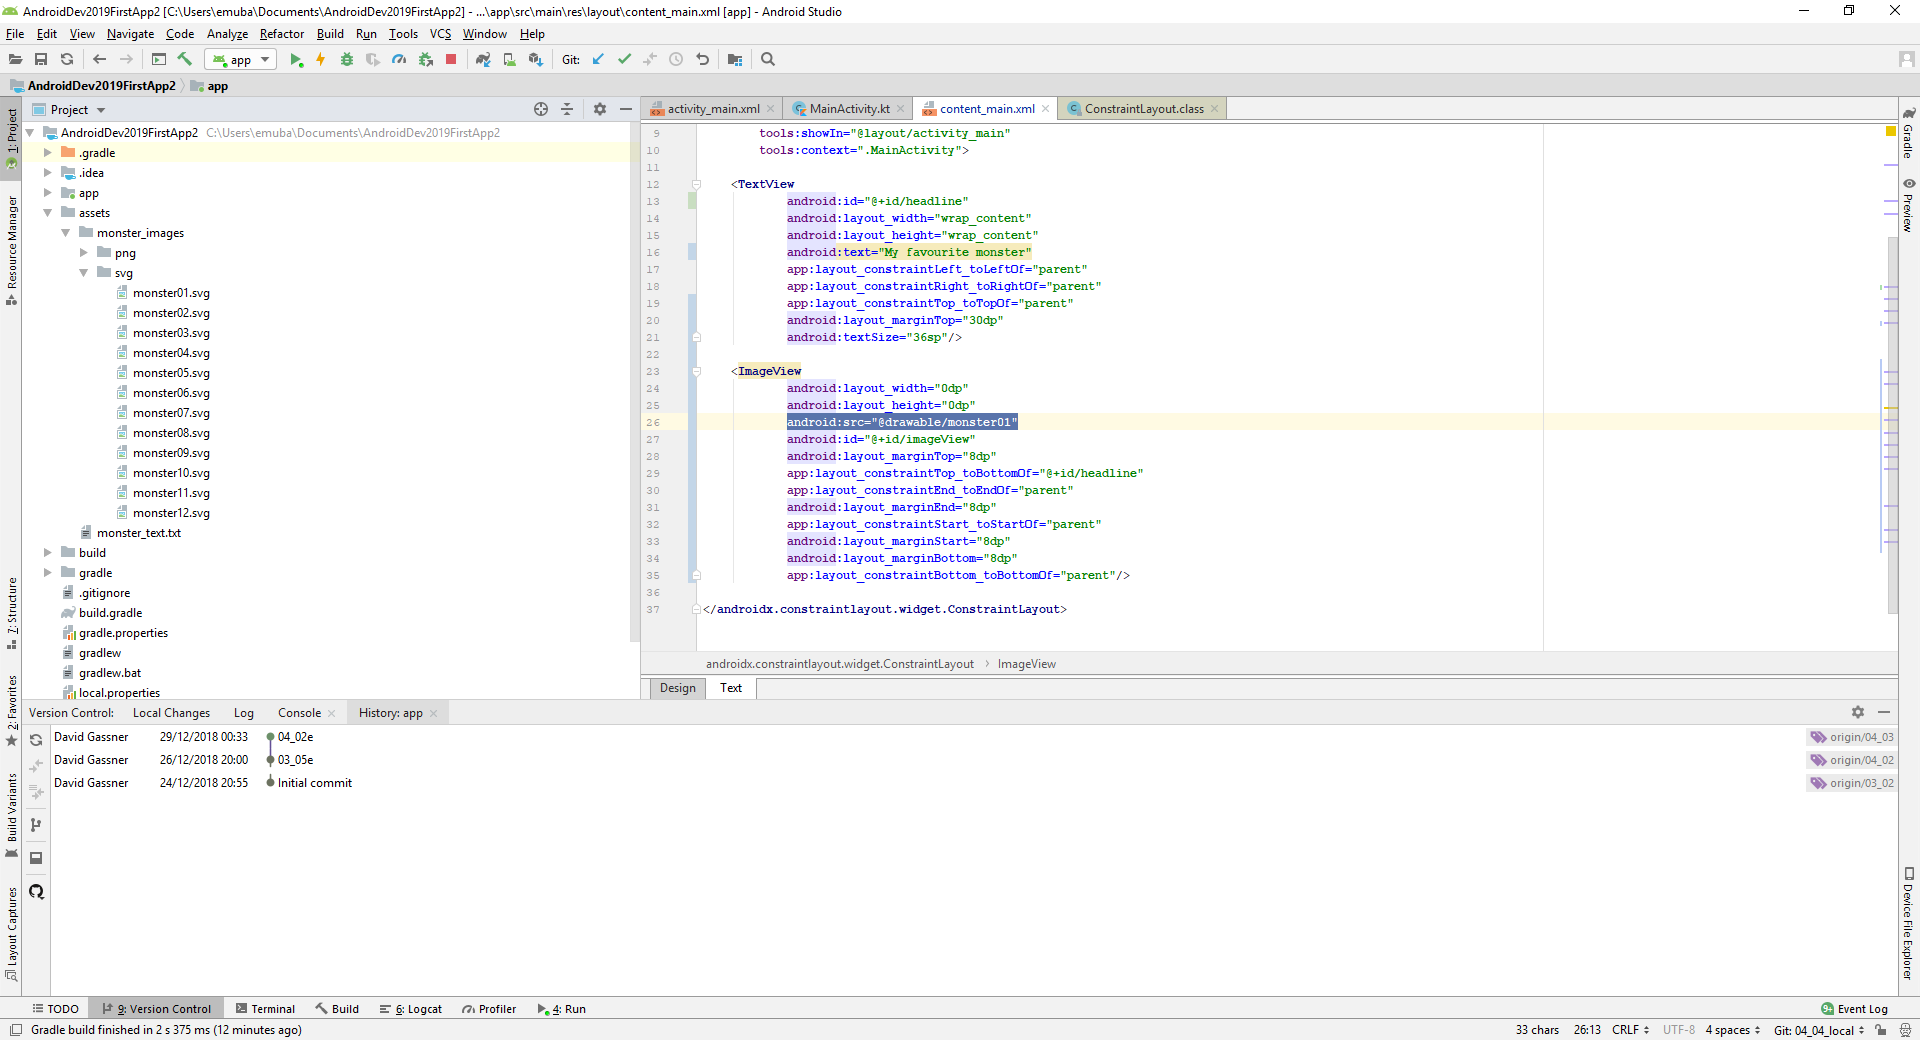
	<ImageView
			android:layout_width="0dp"
			android:layout_height="0dp"
			tools:srcCompat="@tools:sample/avatars"
			android:id="@+id/imageView"
			android:layout_marginTop="8dp"
			app:layout_constraintTop_toBottomOf="@+id/headline"
			app:layout_constraintEnd_toEndOf="parent"
			android:layout_marginEnd="8dp"
			app:layout_constraintStart_toStartOf="parent"
			android:layout_marginStart="8dp"
			android:layout_marginBottom="8dp"
			app:layout_constraintBottom_toBottomOf="parent"/>
The changes we need to make are in the ImageView element in the XML file and this element, before the changes are made, is shown in figure 28. Note that both the layout width and layout height are set to “wrap content” and in both cases, we will set this to 0dp. Back in design view, we can now see that the image has indeed been stretched to fit the area.
However, if we now run the application, we will see the text, but not the image and this is because the image we have used is temporary and is not included with the built app. The image used in the video comes from the assets folder in the git repository which can be found on David's GitHub page. I have copied this file into the images folder for this report and I will copy it from there into the app.
The process for copying the file is quite straightforward, I have right-clicked the file in Windows Explorer and selected Copy. Back in Android Studio, I have checked to make sure that I am in Android scope rather than Project scope and then right clicked on the Drawable folder and selected paste and I can see that it is now showing in the folder.
To use this image in my app, it needs to have a resource ID which is the name of the file without the extension. However, since I copied the file directly into the apps folder structure, it is possible that it has not been noticed, so before I do anything with it, I will rebuild the app.
Back in the content_main.xml file, I have removed the line:
tools:srcCompat="@tools:sample/avatars"
which is the reference to the temporary file. I will replace this line of code with:
android:src="@drawable/monster01"
Note that when you type src, you can then select from the variable resources and monster1.png is listed there so I don’t need to type out the resource name. Apart from the fact that this involves a bit less typing, this has the added advantage that because I can see the image listed here, I know that it has been recognised as a resource by Android Studio.
Now, if I run the application, I can see the image being displayed. This is how we work with simple image formats such as PNG and JPG but if we want to use more advanced formats, some conversion may be required.
Convert PNG and SVG Image Files
WebP is a more contemporary format (it is also a bitmap format but it is compressed smaller than PNG files) and Android versions from 4.3 onwards (that is, API level 18 and above) support transparency. To convert our PNG file to WebP, we just need to right-click on the image in Android Studio (in the resources folder) and select Convert to WebP. As it happens, this image has transparency so we want to ensure that the option to Skip images with transparency is not selected.
Clicking OK shows a preview of what the changed file would look like and it is much smaller than the original. The quality can be adjusted as required and it also shows you how big the WebP file is compared to the original (at a quality level of 100% it is 52% of the size of the original).
Note that when the conversion is complete, we only have one image file (monster01.webp) in our resources folder, monster01.png is no longer there so there is no need to change our code. Recall that the resource name of the image is the filename without the extension.
Another format you can use is an XML format known as VectorDrawable. This is similar to the SVG files you may see on a webpage but SVG is not supported by Android Studio.
Now, to convert an SVG file to the VectorDrawable format, we need to use a tool in Android Studio called the Android Asset Studio.
Going back to the Project scope, we can see that we have an assets folder with a subfolder called monster_images and this contains folders called png and svg which themselves contain the images in png and svg format respectively. This is also shown below.
We can double click on one of these images and Android Studio will open a preview of it, but we cannot use this image directly in the app.
In Android Studio, we will go back to Android Studio, right-click on app and select New and then Vector Asset. This brings up the dialog box:
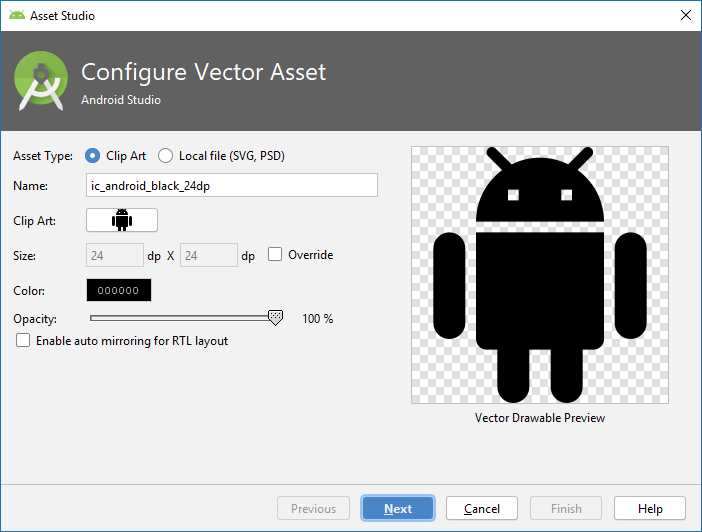
From here, we will select Local file and then navigate to the assets folder within our project and select monster01.svg. There are a couple of other options. The size seems to have defaulted to a square format (24dp x 24dp) and this would distort the image so we want to select Override and then next and finish.
We now have an additional file in the drawable folder and the new file is prefixed with ic_ so it has the filename ic_monster01.xml. Again, we will select the Build menu and Make Project to make sure the asset is recognised in Android Studio.
To modify our app so that it displays the VectorDrawable image, we need to edit the content_main.xml file again and as before, we can see that the file is recognised as an asset by Android Studio so we can select it from the list of suggestions.
We can then run the app again and it looks exactly the same as it did before.
VectorDrawable files are not smaller than WebP files and are actually larger in many cases. However, they are more flexible in that they automatically adjust to the size and density of your screen without distorting the images as a bitmap format might.
To sum up, the two formats, WebP and VectorDrawable give you a lot of flexibility with your images and allow you to select between the smallest possible file or the one that resizes most elegantly.
Start New Activities with Intents
In an Android app, you navigate from one screen to another by creating something called an Intent. An intent can include an action which is typically expressed as a constant, but it can also include arbitrary data values known as extras.
In order to navigate, you create an intent that references the current activity as a context and the desired target activity’s class. This creates an instance of the target activity’s class and then loads it. It is the responsibility of the application framework to interpret the Intent.
We will create a new activity in our app to demonstrate this and we do that from the Android scope by right-clicking on app and selecting New and then Activity and Basic Activity.
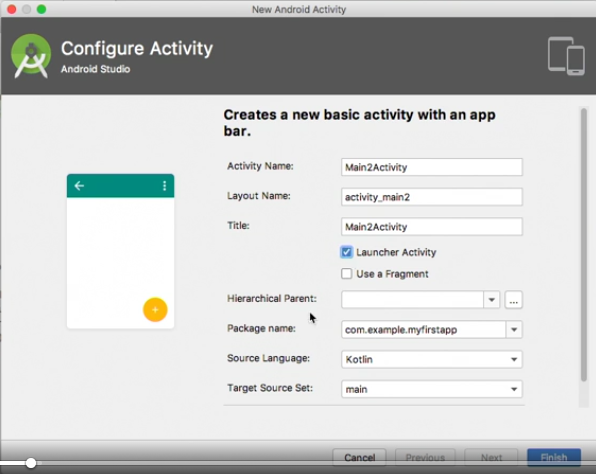
This brings up the new activity wizard (above). In this case, we have accepted the default activity name and ensured that the Launcher Activity box is checked.
Because the Launcher Activity button is checked, this will activity will represent the first screen that the user will see when the app is launched and so this is the primary activity. We can now click Finish.
This new activity is automatically registered in the manifest, but if view the manifest, we see a warning to the effect that the app is not indexable by Google search but we will select an Intent action and choose to ignore this warning.
In addition, both the original activity (MainActivity) and the new activity (Main2Activity) are marked as Launcher Activities. To resolve this, we will delete the Intent filter from the original activity and add a new attribute called parentActivityName and set it to Main2Activity with:
android:parentActivityName=".Main2Activity">
So now we have identified Main2Activity as the primary activity and MainActivity as the secondary activity. We can now add some action to this by setting the app up so that when the user clicks on the floating action button, he (or she) will be taken to the secondary activity screen.
If we look at the code for Main2Activity (that is, the file Maun2Activity.kt) we can see that there is a setOnClickListener function that currently holds some default code which we will delete and in its place, we will insert an Intent object. We will pass two values to the constructor and these are a package context (represented by this) and a the class of the activity we want to navigate to and that is given as MainActivity::class.java.
Just a reminder that we are using Kotlin syntax for this so this would look a little different if we were coding in Java.
The next thing we want to do is to call a function called StartActivity which takes one argument, and that argument will be the Intent object we created and once the code has been added, the code for setOnClickListener will look like this.
	fab.setOnClickListener { view ->
		val intent = Intent(this, MainActivity::class.java)
		startActivity(intent)
	}
Now we can run the application and when it starts, we can see the screen for Main2Activity and clicking the floating action button calls up the screen for MainActivity which displays a monster image! We can also press the phone’s back button to go back to the main activity and press it again, to go back to the Launcher screen.
There are newer approaches to managing navigation between screen including the Navigation Architecture component which is described more fully in the course, Android Development: The Navigation Architecture Component. This is a worthwhile course for new Android developers, but it is also useful to be able to understand the lower level approach shown here.
There will be times when you want manage navigation yourself using your own intents.
Send an Action to a New Activity
When an activity is loaded with an intent as we saw previously, there are a number of ways of sharing data with the new activity.
We are starting with an app that has a simpler (in terms of code) main activity but four buttons have been added to the layout file (which is shown below) four buttons have been added.
	<?xml version="1.0" encoding="utf-8"?>
	<androidx.constraintlayout.widget.ConstraintLayout
			xmlns:android="http://schemas.android.com/apk/res/android"
			xmlns:tools="http://schemas.android.com/tools"
			xmlns:app="http://schemas.android.com/apk/res-auto"
			android:layout_width="match_parent"
			android:layout_height="match_parent"
			app:layout_behavior="@string/appbar_scrolling_view_behavior"
			tools:showIn="@layout/activity_main"
			tools:context=".MainActivity">

		<TextView
				android:id="@+id/instruction"
				android:layout_width="wrap_content"
				android:layout_height="wrap_content"
				android:text="@string/choose"
				app:layout_constraintTop_toTopOf="parent"
				app:layout_constraintLeft_toLeftOf="parent"
				app:layout_constraintRight_toRightOf="parent"
				android:textStyle="bold"
				android:textSize="24sp"
				android:layout_marginBottom="16dp"/>

		<LinearLayout
				android:id="@+id/layout1"
				android:layout_width="match_parent"
				android:layout_height="0dp"
				app:layout_constraintTop_toBottomOf="@+id/instruction"
				app:layout_constraintLeft_toLeftOf="parent"
				app:layout_constraintRight_toRightOf="parent"
				android:orientation="horizontal"
				android:layout_marginBottom="16dp">

			<ImageButton
					android:id="@+id/monster01"
					android:contentDescription="@string/choose"
					android:src="@drawable/monster01"
					android:layout_width="0dp"
					android:layout_height="150dp"
					android:layout_weight="1"
					android:scaleType="fitXY"/>

			<ImageButton
					android:id="@+id/monster02"
					android:contentDescription="@string/choose"
					android:src="@drawable/monster02"
					android:layout_width="0dp"
					android:layout_height="150dp"
					android:layout_weight="1"
					android:scaleType="fitXY"/>

		</LinearLayout>

		<LinearLayout
				android:id="@+id/layout2"
				android:layout_width="match_parent"
				android:layout_height="0dp"
				app:layout_constraintTop_toBottomOf="@+id/layout1"
				app:layout_constraintLeft_toLeftOf="parent"
				app:layout_constraintRight_toRightOf="parent"
				android:orientation="horizontal">

			<ImageButton
					android:id="@+id/monster03"
					android:contentDescription="@string/choose"
					android:src="@drawable/monster03"
					android:layout_width="0dp"
					android:layout_height="150dp"
					android:layout_weight="1"
					android:scaleType="fitXY"/>

			<ImageButton
					android:id="@+id/monster04"
					android:contentDescription="@string/choose"
					android:src="@drawable/monster04"
					android:layout_width="0dp"
					android:layout_height="150dp"
					android:layout_weight="1"
					android:scaleType="fitXY"/>

		</LinearLayout>

	</androidx.constraintlayout.widget.ConstraintLayout>
As the content_main.xml file shows, the four buttons have been added to a LinearLayout and they are a particular kind of component called an image button. Each has an id of monter_01, monster_02 and so on and this is also the filename as seen in the source (src) attribute.
The intention here is that when the user clicks on one of the buttons, the app will jump to the detail screen which will display the image for the selected monster full-screen.
To implement this, we will refer to the id of each button in the main function (that is, in MainActivity.kt) and we will do this in the onCreate function. This is the state of the onCreate function before these changes are made.
	override fun onCreate(savedInstanceState: Bundle?) {
		super.onCreate(savedInstanceState)
		setContentView(R.layout.activity_main)
		setSupportActionBar(toolbar)
	}
Starting with monster01, we will add the following line of code:
monster01.setOnClickListener {viewMonsterImage(R.drawable.monster01)}
Note that the resource id has been generated automatically and we are calling onClickListener on this and passing our method name to it. In this case, the function we are using, viewMonsterImage(), to which we are passing the id of the monster image, is a custom function that has not been written yet. So we can use an intent action to generate this function.
We will start by creating an instance of Intent. We will pass in this as the context and the class of the activity we want to load:
val intent = Intent(this, DetailActivity::class.java)
Since the viewMonsterImage function has been created for us, it has taken monster01 as an argument and we want to generalise the function so we will change this to monsterID. Note that we had been using monsterID in the auto-generated function hence monster01 was being passed as an int value since it was the id rather than the image we were passing in.
Now, we want to add an action to intent with:
intent.setAction(Intent.ACTION_VIEW)
Note that an action is a string and typically you use a constant value that’s defined in the Intent clas. Then we call startActivity and pass it our intent object with:
startActivity(intent)
The completed viewMonsterImage is shown here.
Just an interesting aside here, when we were typing ACTION_VIEW, as usual, a list of suggestions appears but this is a very long list and ACTION_VIEW, as you might expect, is near the bottom. However, if you type A followed by V or VI, IntelliJ seems to recognise that you want ACTION followed by a word starting V or VI so it jumps to that part of the list. So this is a handy way of accessing a suggestion without having to scroll down to the bottom of a very long list!
Next, we will call up the DetailActivity.kt file. We can access this through the navigation panel or use another handy IntelliJ shortcut which is Shift Shift and this opens up the search anywhere panel. We can type Detail in the Search box and then select the file we want from the search results.
In the onCreate function (of DetailActivity.kt) we will log the received action using the Log class, and a function of that class called i for information. This takes two parameters, a tag and a message. The tag is “Intents” and this is used to filter the Logcat messages in Android Studio. For the message, we “Action = “ a dollar sign followed by a pair of curly braces. Inside the curly braces we have intent.action. So this line of code is:
Log.i("Intents", "Action= ${intent.action}")
This syntax would be more verbose in Java where you would use get intent and get action as method calls, but Kotlin allows you to use this more compact simple property syntax.
We can now run the app and see that it works pretty much as expected although I notice that whichever button I click, the image shown full screen is always monster01 and in the video, when the app is running, only the button for monster01 is clicked.
When I switch to the branch for 04_07e, I note that clicking on the button for monster01 works as expected, but in the course, no event listeners were added for the other buttons so clicking on them doesn’t do anything!
Going back to Android Studio, we can click on the Logcat tab in the bottom left to see what is happening when the app is executed. Note that there is what looks like a search box here, but it would be more accurate to consider it to be a filter. If we type in intents here, we will only see logged messages which include this term and we can see that the action has been passed over to DetailActivity.
Send Data with URIs and Extras with Intents
Previously we say how it is possible to pass an action over when starting a new activity with an intent but here, we will look at how it is possible to pass over much more detailed data. We can do this by using either the data object of the Intent or by passing data extras.
The URI (Uniform Resource Identifier) is a single property and it is strongly typed. In the main activity class, just before startActivity, we will create a URI object which we call uri – note that this is being created from a Java class (from Android.net). We then call the parse function and pass it a uriString which looks like a URL. It starts with “http://” and is followed by the base package. You can then add one or more virtual directory names and these constitute the action you want to pass and you can add a query string. Taking these in turn, the string is built up like this:
	•	http:// - this is our starting point
	•	http://com.example.myfirstapp – the package name has been added
	•	http://com.example.myfirstapp/view - this is the action we want to pass over
	•	http://com.example.myfirstapp/view?id=monsterid – and this is our query string
So the uri is created with the line of code:
val uri = Uri.parse("http://com.example.myfirstapp/view?id=monsterid")
Note that we are passing a uriString object to parse so it is wrapped in double quotes.
Next, we want to add the uri we created as the data property of the Intent object which we do with:
intent.data = uri
In DetailView.kt, we will receive the uri from MainActivity.kt. We will then find out what the action is by using something known as the lastPathSegment of the data object.
We will create a variable called lastPart and assign it the value of lastPathSegment which is a property of data which is, in turn, a property of Intent, or at least this is how it looks based on the syntax so let’s check that.
	public class Intent implements Parcelable, Cloneable {
		private static final String ATTR_ACTION = "action";
		private static final String TAG_CATEGORIES = "categories";
		private static final String ATTR_CATEGORY = "category";
		private static final String TAG_EXTRA = "extra";
		private static final String ATTR_TYPE = "type";
		private static final String ATTR_COMPONENT = "component";
		private static final String ATTR_DATA = "data";
		private static final String ATTR_FLAGS = "flags";
In any case, the assignment of the value to lastPart looks like this:
val lastPart = intent.data?.lastPathSegment
Note that data is defined as nullable. Next, we want to check if our action is view and if it is, execute the appropriate code so we will use a conditional statement.
	if (lastPart!!.equals("view")) {
		val monsterId = intent.data?.getQueryParameter("id")
		Log.i("Intents", "Query parameter = $monsterId")
	}
Note that in the condition, we have !! after lastPart. This is an assertion that the value of lastPart is not null.
If the condition evaluates to true, we are creating a new variable called monsterId and to determine its value, we will extract the monsterId from data using a getQueryParameter function to which we will pass the string, id. Note that we are doing this with a safe call so this code will not execute if intent.data returns a null value.
Again, we will log some information to the Logcat window.
	package com.example.myfirstapp

	import android.content.Intent
	import android.net.Uri
	import android.os.Bundle
	import androidx.appcompat.app.AppCompatActivity
	import kotlinx.android.synthetic.main.activity_main.*
	import kotlinx.android.synthetic.main.content_main.*

	class MainActivity : AppCompatActivity() {

		override fun onCreate(savedInstanceState: Bundle?) {
			super.onCreate(savedInstanceState)
			setContentView(R.layout.activity_main)
			setSupportActionBar(toolbar)

			monster01.setOnClickListener{viewMonsterImage(R.drawable.monster01)}
		}

		private fun viewMonsterImage(monsterId: Int) {
			val intent = Intent(this, DetailActivity::class.java)
			intent.setAction(Intent.ACTION_VIEW)

			val uri=Uri.parse("http://com.example.myfirstapp/view?id= $monsterId")
			intent.data = uri
			startActivity(intent)
		}

	}
The MainActivity.kt file
	package com.example.myfirstapp

	import android.os.Bundle
	import android.util.Log
	import androidx.appcompat.app.AppCompatActivity

	import kotlinx.android.synthetic.main.activity_detail.*
	import kotlinx.android.synthetic.main.content_detail.*

	class DetailActivity : AppCompatActivity() {

		override fun onCreate(savedInstanceState: Bundle?) {
			super.onCreate(savedInstanceState)
			setContentView(R.layout.activity_detail)
			setSupportActionBar(toolbar)

			Log.i("Intents", "Action = ${intent.action}")

			val lastPart = intent.data?.lastPathSegment
			if (lastPart!!.equals("view")) {
				val monsterId = intent.data?.getQueryParameter("id")
				Log.i("Intents", "Query parameter = $monsterId")
			}
		}

	}
The DetailActivity.kt file
For reference, the current state of the MainActivity.kt and DetailActivity.kt files are shown in above.
So, here we have used a query parameter to pass data between activities and we can add as many of these as are needed to pass all the data required.
Another way to pass information between activities is by using Intent extras. These are kry value pairs where the key is a string and the associated value is strongly typed. It can be a string, a number or any primitive type supported by Java and Kotlin.
Passing the data is very simple. In MainActivity.kt, we just need to call putExtra on the Intent we had created and we do this with:
intent.putExtra("monsterId", monsterId
In this case, the mosterId we are passing as a value is the same monsterId that was passed as an argument to the viewMonsterImage function. You may also notice that there are a large number of versions of the putExtra function, one for each of the supported data types but in this case, the type is inferred from the value we are passing in.
To receive the data in DetailActivity.kt, we will create a variable called extraId and use the getInt function, using the same key of “monsterId” that we added to the Intent in MainActivity.kt and the syntax for this is:
val extraId = intent.extras!!.getInt("monsterId")
Again, we are asserting that intent.extras does not return a null value because we cannot retrieve any data if this is the case (this would mean that there are no extras for us to query).
We will also log this on the Logcat window with:
Log.i("Intents", "Extra value = $extraId")
So we have managed to pass the monsterId over to the ActivityDetail activity but as yet, we are not doing anything with it. What we want to do is to use this value to dynamically load the selected image.
Let’s take a look at the activity layout which we can access by following these steps:
	•	In the DetailActivity.kt file, hold control and click on the layout in the line
	o	setContentView(R.layout.activity_detail)
	•	This calls up the file activity_detail.xml and from here, we want to control click on the included layout in
	o	<include layout="@layout/content_detail"/>
	•	And this calls up the file, content_detail.xml.
	<ImageView
			android:layout_width="0dp"
			android:layout_height="0dp"
			android:src="@drawable/monster01"
			android:id="@+id/monsterImage"
			android:contentDescription="@string/my_favorite_monster"
			app:layout_constraintTop_toBottomOf="@+id/headline"
			app:layout_constraintEnd_toEndOf="parent"
			app:layout_constraintStart_toStartOf="parent"
			app:layout_constraintBottom_toBottomOf="parent"
			android:layout_margin="8dp"/>
The fragment of code from the content_detail.xml above shows the ImageView element found in this file. Note that this ImageView element has an id of monsterImage.
Back in DetailActivity.kt, note that we have an import statement for the layout file so we can directly reference the monsterImage object. We will call a function from monsterImage called setImageResource and we will pass this the value extraId:
monsterImage.setImageResource(extraId)
You may have noticed that in MainActivity.kt, we set an onClickListener for the monster01 image, but not for the others and so our app, so far, only had the ability to display this image full screen. Now that we are using a simple method to pass our monsterId over to DetailActivity.kt and used it to set the full screen image to any of the selected images, this will work for any of the images provided that they have the same onClickListener set so we will now add these.
And if we run the application again, we can now select any of the images and they will be displayed full screen. So now we are allowing the user to interactively select an image they want to see in full screen.
We can pass any sort of data between activities and as we have seen, we can do this in three different ways:
	•	Using actions
	•	Using URIs as data
	•	Using Intent extras
As a final reference for this section, figures 40 and 41 show the final versions of the MainActivity.kt and DetailActivity.kt files.
	package com.example.myfirstapp

	import android.content.Intent
	import android.net.Uri
	import android.os.Bundle
	import androidx.appcompat.app.AppCompatActivity
	import kotlinx.android.synthetic.main.activity_main.*
	import kotlinx.android.synthetic.main.content_main.*

	class MainActivity : AppCompatActivity() {

		override fun onCreate(savedInstanceState: Bundle?) {
			super.onCreate(savedInstanceState)
			setContentView(R.layout.activity_main)
			setSupportActionBar(toolbar)

			monster01.setOnClickListener {viewMonsterImage(R.drawable.monster01)}
			monster02.setOnClickListener {viewMonsterImage(R.drawable.monster02)}
			monster03.setOnClickListener {viewMonsterImage(R.drawable.monster03)}
			monster04.setOnClickListener {viewMonsterImage(R.drawable.monster04)}
		}

		private fun viewMonsterImage(monsterId: Int) {
			val intent = Intent(this, DetailActivity::class.java)
			intent.setAction(Intent.ACTION_VIEW)

			val uri = Uri.parse("http://com.example.myfirstapp/view?id=$monsterId")
			intent.data = uri

			intent.putExtra("monsterId", monsterId)
			startActivity(intent)
		}

	}
The final version of MainActivity.kt for this section
	package com.example.myfirstapp

	import android.os.Bundle
	import android.util.Log
	import androidx.appcompat.app.AppCompatActivity

	import kotlinx.android.synthetic.main.activity_detail.*
	import kotlinx.android.synthetic.main.content_detail.*

	class DetailActivity : AppCompatActivity() {

		override fun onCreate(savedInstanceState: Bundle?) {
			super.onCreate(savedInstanceState)
			setContentView(R.layout.activity_detail)
			setSupportActionBar(toolbar)

			Log.i("Intents", "Action = ${intent.action}")

			val lastPart = intent.data?.lastPathSegment
			if (lastPart!!.equals("view")) {
				val monsterId = intent.data?.getQueryParameter("id")
				Log.i("Intents", "Query parameter = $monsterId")
			}

			val extraId = intent.extras!!.getInt("monsterId")
			Log.i("Intents", "Extra value = $extraId")

			monsterImage.setImageResource(extraId)

		}

	}
The final version of DetailActivity.kt for this section
Handle Shared Data with an Intent Filter
Passing data between activities in the same application is relatively straightforward because we know the names of the activities and classes within the app and so these can be specified explicitly and for this reason, we refer to these as explicit intents.
When data is passed between applications, it does not know which activity or application is going to handle it. An example of this would be, for instance, where you click on a link to a webpage from inside an app that does not handle web pages, for instance a link embedded within a Word document, this intent would be handled by an app that has registered an ability to handle this type of data – in other words, a web browser.
Your own application can register to handle these kinds of intents and this is done in the application manifest. To demonstrate this, we will register the app from the previous section to handle simple text data from other applications which we will translate into a request to display a particular image.
In the manifest file, we have already registered the activity we called DetailActivity and as a reminder, this declaration is
	<activity
			android:name=".DetailActivity"
			android:label="@string/my_favorite_monster"
			android:theme="@style/AppTheme.NoActionBar"
			android:parentActivityName=".MainActivity"/>
The DetailActivity as registered in our manifest (AndroidManidest.xml)
We will start here by turning the DetailActivity declaration into an opening and closing tag and then copying the intent filter from MainActivity so that we now have the modified DetailActivity.
	<activity
			android:name=".DetailActivity"
			android:label="@string/my_favorite_monster"
			android:theme="@style/AppTheme.NoActionBar"
			android:parentActivityName=".MainActivity">
	<intent-filter>
		<action android:name="android.intent.action.MAIN"/>

		<category android:name="android.intent.category.LAUNCHER"/>
	</intent-filter>
	</activity>
The modified DetailActivity.
As before, of course, we can’t have two LAUNCHER activities but we will amend these as follows:
<action android:name="android.intent.action.MAIN"/>
Becomes
<action android:name="android.intent.action.SEND"/>
SEND equates to a constant in the intent class of action_set and when any application sends simple text for handling by another application, the action is always SEND.
And
<category android:name="android.intent.category.LAUNCHER"/>
becomes
<category android:name="android.intent.category.DEFAULT"/>
Next, I need to indicate what type of data I want to receive. We will create a data element and set it’s mimeType attribute to “text/plain” and this is effectively a declaration that if an app on the device sends simple text, my app is able to handle it.
Now, we want to go to the DetailActivity.kt file and just before our first line of code that logs an intent, we will add some code to examine the intent action to see if it matches ACTION_SEND. We will put this in an if statement but we aren’t doing anything else with the text at the moment so if there is a match, we will execute a simple return and this gives us the code shown below.
if(intent.action == Intent.ACTION_SEND) {
val monster = intent?.getStringExtra(Intent.EXTRA_TEXT)
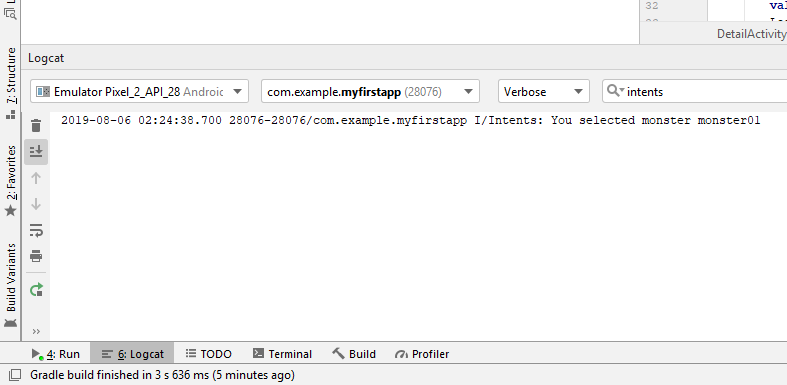
Log.i("Intents", "You selected monster $monster")
return
}
Now, if we run the application on our virtual device (I an running it on a Pixel 2 device) we should be able to send text to our app. I have installed keep (a simple note-taking app) on the device and if I select Send and then Send via other apps, I can see that our app is displayed as one of the apps that we are able to send this data to.
If we select our app, we will jump to the Detail Activity because we have not provided any code yet to handle this text.
We will go back to DetailActivity.kt and add some code before our return statement. When our app receives the text (for example, from Keep) it arrruves as a StringExtra with a key of extra_text and that is a constant of the Intent class. So we will create a variable called monster and we will use the intent’s getStringExtra function to return the StringExtra with:
val monster = intent?.getStringExtra(Intent.EXTRA_TEXT)
We will also log this and the message will be “You selected monster…” followed by the text passed to our app and the code for this is:
Log.i("Intents", "You selected monster $monster")
We will run the application again, and once again send our text (note that the text we are sending is monster01) and again, we will see that our app is not really doing anything with the text it has received. However, we can see in Logcat the text that we received and it is what we were expecting. The output in the Logcat window below.
Now, we want to use the text we receive to retrieve the corresponding resource ID so we will create a new variable called monsterId. To obtain a value for monsterId, we will use an expression which starts with resources and then calls a function called getIdentifier. The getIdentifier takes three functions and these are:
	•	The variable which is monster in this case, and we will call the function trim on this because it may have a trailing hard return or extra space
	•	Next is the type of resource which is drawable.
	•	The final argument is the package name which is the location in he resources class where the resource is stored.
The resulting line of code is:
val monsterId = resources.getIdentifier(monster?.trim(), "drawable", packageName)
Since we now have the resource ID, we can call setImageResource just as we did in a previous exercise and pass it that ID. And the line of code to do that is:
monsterImage.setImageResource(monsterId)
We will retain the return statement because this passes control back after the code has been executed and note that this code only executes when the app is sent some simple text by an external app.
Now, we can run the app again and pass text over to our app and if it corresponds to one of our four resource IDs, the appropriate monster image is displayed full screen. Note that we had indicated that this data is nullable so if we send in some text that does not correspond to one of the resource ID, we simply see a white screen.
So now we can see that the app will receive and handle plain text sent from any other app, but what it does with the text is determined solely by the code in our app.
To finish off, I will reproduce the important files from this app.
	package com.example.myfirstapp

	import android.content.Intent
	import android.net.Uri
	import android.os.Bundle
	import androidx.appcompat.app.AppCompatActivity
	import kotlinx.android.synthetic.main.activity_main.*
	import kotlinx.android.synthetic.main.content_main.*

	class MainActivity : AppCompatActivity() {

		override fun onCreate(savedInstanceState: Bundle?) {
			super.onCreate(savedInstanceState)
			setContentView(R.layout.activity_main)
			setSupportActionBar(toolbar)

			monster01.setOnClickListener {viewMonsterImage(R.drawable.monster01)}
			monster02.setOnClickListener {viewMonsterImage(R.drawable.monster02)}
			monster03.setOnClickListener {viewMonsterImage(R.drawable.monster03)}
			monster04.setOnClickListener {viewMonsterImage(R.drawable.monster04)}
		}

		private fun viewMonsterImage(monsterId: Int) {
			val intent = Intent(this, DetailActivity::class.java)
			intent.setAction(Intent.ACTION_VIEW)

			val uri = Uri.parse("http://com.example.myfirstapp/view?id=$monsterId")
			intent.data = uri

			intent.putExtra("monsterId", monsterId)

			startActivity(intent)
		}

	}
MainActivirt.kt
	package com.example.myfirstapp

	import android.os.Bundle
	import android.util.Log
	import androidx.appcompat.app.AppCompatActivity
	import android.content.Intent

	import kotlinx.android.synthetic.main.activity_detail.*
	import kotlinx.android.synthetic.main.content_detail.*

	class DetailActivity : AppCompatActivity() {

		override fun onCreate(savedInstanceState: Bundle?) {
			super.onCreate(savedInstanceState)
			setContentView(R.layout.activity_detail)
			setSupportActionBar(toolbar)

			if(intent.action == Intent.ACTION_SEND) {
				val monster = intent?.getStringExtra(Intent.EXTRA_TEXT)
				Log.i("Intents", "You selected monster $monster")
				val monsterId = resources.getIdentifier(monster?.trim(), "drawable", packageName)
				monsterImage.setImageResource(monsterId)
				return
			}

			Log.i("Intents", "Action = ${intent.action}")

			val lastPart = intent.data?.lastPathSegment
			if (lastPart!!.equals("view")) {
				val monsterId = intent.data?.getQueryParameter("id")
				Log.i("Intents", "Query parameter = $monsterId")
			}

			val extraId = intent.extras!!.getInt("monsterId")
			Log.i("Intents", "Extra value = $extraId")

			monsterImage.setImageResource(extraId)

		}

	}
DetailActivity.kt
	<?xml version="1.0" encoding="utf-8"?>
	<manifest xmlns:android="http://schemas.android.com/apk/res/android"
			  xmlns:tools="http://schemas.android.com/tools" package="com.example.myfirstapp">

		<application
				android:allowBackup="false"
				android:icon="@mipmap/ic_launcher"
				android:label="@string/app_name"
				android:roundIcon="@mipmap/ic_launcher_round"
				android:supportsRtl="true"
				android:theme="@style/AppTheme" tools:ignore="GoogleAppIndexingWarning">
			<activity
					android:name=".MainActivity"
					android:label="@string/app_name"
					android:theme="@style/AppTheme.NoActionBar">
				<intent-filter>
					<action android:name="android.intent.action.MAIN"/>

					<category android:name="android.intent.category.LAUNCHER"/>
				</intent-filter>
			</activity>
			<activity
					android:name=".DetailActivity"
					android:label="@string/my_favorite_monster"
					android:theme="@style/AppTheme.NoActionBar"
					android:parentActivityName=".MainActivity">
			<intent-filter>
				<action android:name="android.intent.action.SEND"/>

				<category android:name="android.intent.category.DEFAULT"/>
				<data android:mimeType="text/plain"/>
			</intent-filter>
			</activity>

		</application>

	</manifest>
AndroidManifest.xml
	<?xml version="1.0" encoding="utf-8"?>
	<androidx.coordinatorlayout.widget.CoordinatorLayout
			xmlns:android="http://schemas.android.com/apk/res/android"
			xmlns:app="http://schemas.android.com/apk/res-auto"
			xmlns:tools="http://schemas.android.com/tools"
			android:layout_width="match_parent"
			android:layout_height="match_parent"
			tools:context=".DetailActivity">

		<com.google.android.material.appbar.AppBarLayout
				android:layout_height="wrap_content"
				android:layout_width="match_parent"
				android:theme="@style/AppTheme.AppBarOverlay">

			<androidx.appcompat.widget.Toolbar
					android:id="@+id/toolbar"
					android:layout_width="match_parent"
					android:layout_height="?attr/actionBarSize"
					android:background="?attr/colorPrimary"
					app:popupTheme="@style/AppTheme.PopupOverlay"/>

		</com.google.android.material.appbar.AppBarLayout>

		<include layout="@layout/content_detail"/>

	</androidx.coordinatorlayout.widget.CoordinatorLayout>
ActivityDetail.xml
	<?xml version="1.0" encoding="utf-8"?>
	<androidx.constraintlayout.widget.ConstraintLayout
			xmlns:android="http://schemas.android.com/apk/res/android"
			xmlns:tools="http://schemas.android.com/tools"
			xmlns:app="http://schemas.android.com/apk/res-auto"
			android:layout_width="match_parent"
			android:layout_height="match_parent"
			app:layout_behavior="@string/appbar_scrolling_view_behavior"
			tools:showIn="@layout/activity_detail"
			tools:context=".DetailActivity">

		<TextView
				android:id="@+id/headline"
				android:layout_width="wrap_content"
				android:layout_height="wrap_content"
				android:text="@string/my_favorite_monster"
				app:layout_constraintLeft_toLeftOf="parent"
				app:layout_constraintRight_toRightOf="parent"
				app:layout_constraintTop_toTopOf="parent"
				android:layout_marginTop="30dp"
				android:textSize="36sp"/>

		<ImageView
				android:layout_width="0dp"
				android:layout_height="0dp"
				android:src="@drawable/monster01"
				android:id="@+id/monsterImage"
				android:contentDescription="@string/my_favorite_monster"
				app:layout_constraintTop_toBottomOf="@+id/headline"
				app:layout_constraintEnd_toEndOf="parent"
				app:layout_constraintStart_toStartOf="parent"
				app:layout_constraintBottom_toBottomOf="parent"
				android:layout_margin="8dp"/>

	</androidx.constraintlayout.widget.ConstraintLayout>
ContentDetail.xml